Release Notes > Older Releases > 5.34.0
Page Builder - Page Rendering Engine Migration
See what's new in Webiny version 5.34.0.
Before starting with the migration, make sure you’re using Webiny version 5.34.0 or greater. For more information on how to upgrade, please check the Upgrade From 5.33.5 to 5.34.0 article. Additionally, we also recommend you update your Webiny project to the latest 5.34.x version, which, at the time of writing this article, is 5.34.3.
Introduction
 Page Elements: A Brand New Page Rendering Engine
With the 5.34.0 release, we’ve introduced a brand-new page rendering engine called Page Elements. Essentially, for pages created with Webiny’s Page Builder app , the rendering engine provides faster page loads, better SEO score, better DX, and also the ability to render pages in external projects, like a standalone Next.js application.
For new Webiny projects, the new rendering engine is enabled by default. No extra steps needed.
For existing projects, users have the option to migrate to the new rendering engine over time, once it’s convenient for them. This article provides a step-by-step instructions on how to do that.
Until users perform the migration, their existing projects will still use the now legacy rendering engine, which we plan to support until the end of June 2023. After that, the legacy rendering engine will be considered deprecated and will receive no further support from the Webiny team.
Setting the Expectations
Before we dive into the migration steps, let’s set some expectations.
The most important fact to be aware of is that there is no automatic migration that “just works”.
Sure, there are simpler steps to take, for example enabling the new rendering engine via a simple feature flag adjustment. There’s also no database migration involved.
On the other hand, all custom page elements that you previously had will need to be manually migrated (rewritten). This is because a couple changes that the new rendering engine introduced, mainly the way custom page elements work and are created, but also how the new theme works.
Furthermore, note that we’ll also need to update our theme and website code. Although, in theory, you could adapt the code you already have in your project, ultimately, we believe it’s more efficient to just start with the latest code for these two apps, and start adapting them. To make this step a bit easier, we provide a migration script that will generate the initial files quickly (but any customizations will still need to be handled manually).
Finally, note that incremental migration is not possible. In other words, you cannot migrate page by page. This is because you cannot have both rendering engines working at the same time. It’s either the old or the new one. That’s why we recommend to perform the migration first on a non-production system, where you can try different things and break stuff. Once the existing page elements have been migrated, and the website overall looks good, then it’s time to think about doing the actual migration, on a production system.
Now that we’re aware of these initial expectations, let’s see how to actually perform the migration.
Migration Steps
In the following text, we show all the steps needed to perform the migration from the old page rendering engine to the new one. To do this, we are using a brand new Webiny project, which was created with the 5.33.4 version (last 5.33.x version) and then migrated to the latest 5.34.3 (the latest version at the time of writing this guide).
This means the project has two default pages: Welcome to Webiny (home page) and Not Found. In this guide, we’ll use the former to demonstrate how the steps we’re making are affecting the actual page.
The project also doesn’t have any customizations, like custom typography, colors, or custom page elements. Depending on the level of customizations present in your project, additional work might be needed. But still, the steps shown in the following section will give a clue on what needs to be done.
Enabling the New Page Rendering Engine
There’s no need to run the webiny watch command
immediately. We’ll highlight when that’s needed in one of the following sections.
To begin with the migration process, we first need to remove the pbLegacyRenderingEngine feature flag, located in project root’s webiny.project.ts configuration file:
By removing this flag, we’re instructing the Page Builder app to stop relying on the legacy rendering engine and use the new one.
Running the Upgrade Script
The next step is to run the following webiny upgrade command:
Once run, the upgrade script performs the following changes:
- backups your theme (
apps/theme) and Website app (apps/website) folders, by renaming them to_backup_themeand_backup_website, respectively - generates the latest theme and Website app code
- runs
yarnto ensure all needed dependencies are installed
Note that the upgrade script recreates the apps/theme and apps/website from scratch, using the latest
code.
Apart from the React code, we also suggest double-checking the following.
apps/website/webiny.application.ts - if you had any cloud infrastructure changes here, make sure to restore them. Also, if your project is not relying on the pulumiResourceNamePrefixparameter,
make sure to remove it.apps/website/webiny.config.ts - if you had any application customizations here, for example Webpack or Babel customizations, also make sure to restore them.apps/website/package.json - if you had custom NPM dependencies installed, make sure to restore them.apps/theme/package.json - if you had custom NPM dependencies installed, make sure to restore them.If you had custom layouts for some of your pages, you also need to restore them and also register them via the
apps/theme/index.ts file.
To be sure that you don’t miss any of these, we also suggest double-checking the changes upon committing the changes to your code repository.
Importing the Newglobal.scssFile
Before we try to start our Admin app locally, there’s one final step we need to perform and that is updating the import path located in the apps/admin/src/App.scss file:
The global.scss is a new file located in the theme folder and it is also the only SCSS file you’ll find in your project. It has three purposes:
- applies base reset.css styles
- imports fonts
- imports styles needed for the
@webiny/react-rich-text-rendererpackage to work correctly
Any other styling is completely handled via the mentioned Emotion CSS-in-JS library.
First Look - Not Exactly What We Expected
At this point, we should be able to start up our Admin app locally, via the webiny watch command:
From Webiny version 5.34.0, upon running various Webiny CLI commands, users no longer need to type the full path of
the project application. That’s why the above command passes admin as the application name, and not apps/admin.
For more information, check out the changelog.
And although the Admin app should be up and running, if we were to take a look at an existing page, we’d probably be surprised with the result, and not in a good way.
The result might be something like the following:
 Welcome To Webiny Page - After the Performed Migration Steps
Which is definitely different from what had before we performed the above migration steps:
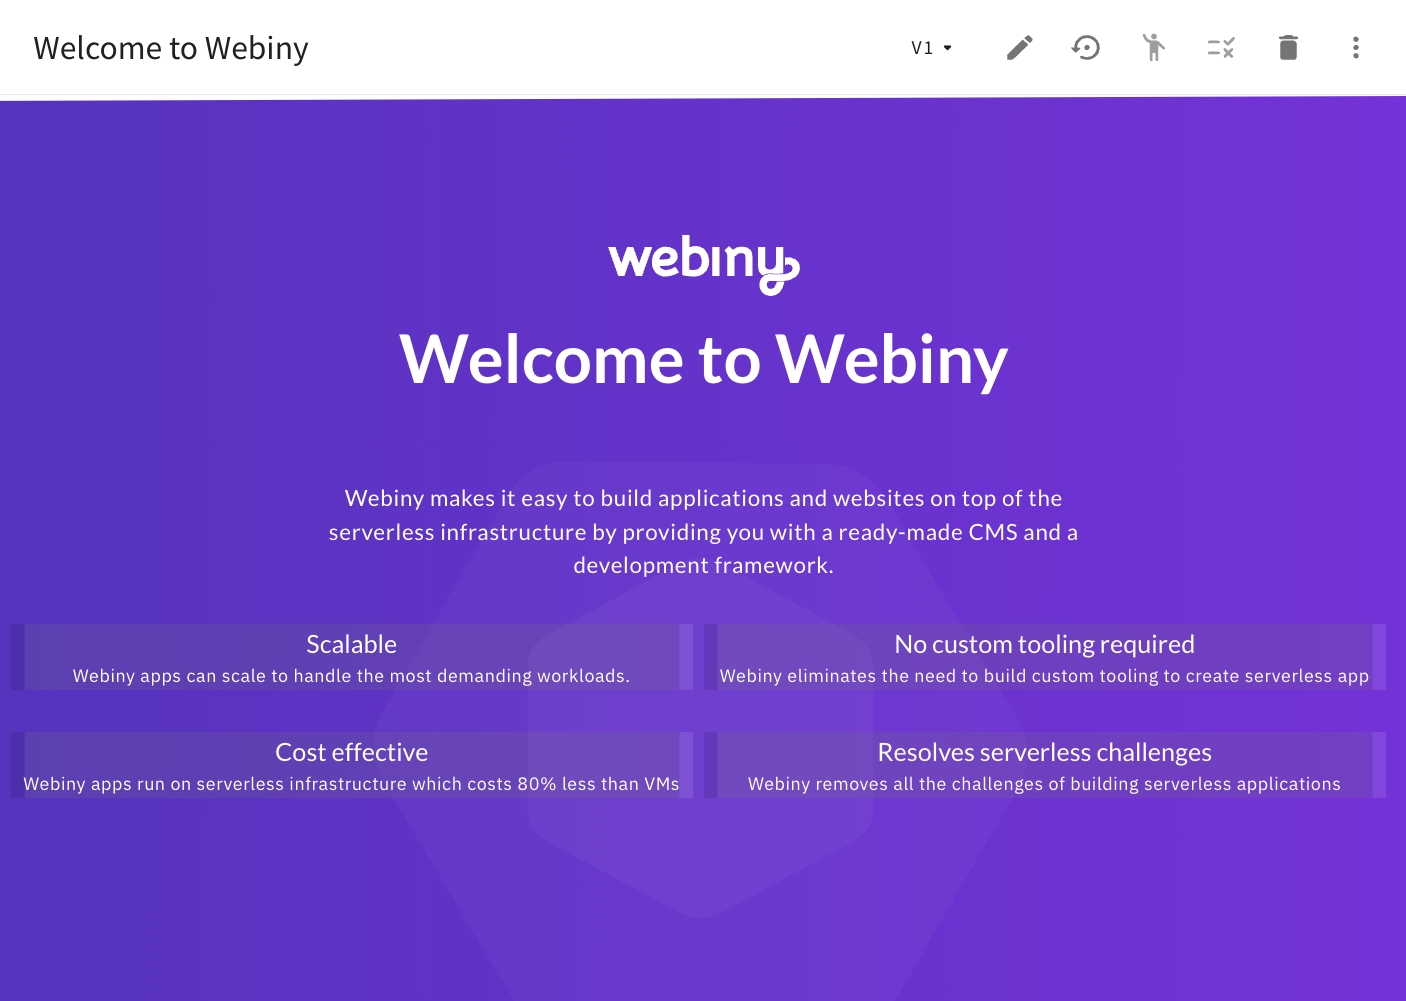 Welcome To Webiny Page - Before the Performed Migration Steps
As we can see in the first screenshot, the page is rendered and still looks somewhat like the page we expected to see. But, we can also see that typography and colors are incorrect.
In order to tackle this, we’ll need to perform a couple of theme-related adjustments, which is done via the new theme object.
Another issue you might also encounter is your custom page elements not being rendered. This is something we’ll cover in the Custom Page Elements section of this guide.
Adjusting the Theme
The visual differences we’ve seen above exist because of the theme-related changes that were introduced with the new rendering engine. Essentially, the existing pages still reference theme-related values (like colors and typography) from the old theme files, but those files are no longer in use. With the new rendering engine, there’s only one single theme file that exist, and that’s apps/theme/theme.ts.
To demonstrate the problem a bit further, as an example, if we were take a closer look at the actual data of an arbitrary page (more specifically, page’s content property), with the old rendering engine, we might encounter the var(--webiny-theme-color-primary) value being set as the font color of a paragraph.
The value is not an actual color, but a CSS variable, which, in an old project, is defined in the apps/theme/pageBuilder/styles/variables.scss file.
But, as mentioned, since the old theme object is no longer being used, the value doesn’t have any affect on the actual color of the font. All the theme-related values like colors, typography, and more, are defined within the new apps/theme/theme.ts file, which is structured and used differently. In it, we’d see that the colors are now listed via the styles.colors property, where each color is an actual color, and not a CSS variable.
Ultimately, without performing any database migrations, the easiest way to fix this is to simply insert the theme-related values that were used with the old rendering engine, into the new theme object. In this case, there are two insertions we need to make: one is for colors, the other one is for typography.
1. Colors
We first need to insert five color values that are being used in pages created with the old rendering engine.
With these insertions in place, if a paragraph had its text color set to var(--webiny-theme-color-primary), the new rendering engine is able to find the actual color within the colors section of the new theme object, thus the final rendering should be looking good.
2. Typography
As the second step, first, we insert all the typography values that are being used in pages created with the old rendering engine.
As we can see, we’ve added three typography entries: webiny-pb-typography-body, webiny-pb-typography-description, and webiny-pb-typography-heading (which contains style definitions for all six levels of headings).
Like with the colors, if your project doesn’t rely on the default typography, make sure to adapt the above styles defined in the above code example.
One final change we need to make here is commenting out the following line from the headings object (otherwise the heading colors would not get applied correctly):
Ultimately, with these changes in place, we should be able to see the typography and colors rendered correctly on an existing page.
Welcome To Webiny Page - After the Performed Theme AdjustmentsNote that, so far, we did not cover the migration of custom page elements. But, if your project doesn’t contain any, then this migration guide is actually concluded, and you’re ready to start doing additional testing, and, hopefully, start planning the migration for your project’s production environment.
On the other hand, if your project does contain custom page elements, then please continue reading the following section.
Custom Page Elements
As mentioned in the Setting the Expectations section of this guide, unfortunately, there is no automatic migration when it comes to custom page elements. All custom page elements that you previously had will need to be manually migrated (rewritten). This is because a couple changes that the new rendering engine introduced, mainly the way custom page elements work and are created, but also how the new theme works.
The good news is it’s not a complete rewrite. Existing plugins have actually stayed the same. We still:
- register plugins within both Admin and Website apps
- introduce custom page elements into the page editor with the same plugin
- define custom page element settings via the same plugin
The main difference is in the React component that actually render the page element. For example, with the new rendering engine, we create all the components via the new createRenderer factory function. This provides several utilities that makes the whole custom page element creation process simpler and more seamless.
To learn more about how custom page elements are created with the new rendering engine, please take a look at the updated Create a Custom Page Element article. With the information outlined in it, you should be able to start migrating one custom page element at a time, until all have been taken care of.
Cleanup
Once the migration has been concluded and proper testing has been done, apps/_backup_theme and apps/_backup_website folders can be removed.
Conclusion
With all the steps correctly performed and proper testing, the migration can be considered as concluded.
All the existing pages are now using the new page rendering engine, which means faster page load and better SEO. When it comes to further development, developers benefit because of the better overall DX the new rendering engine provides.
Of course, for any additional questions or any kind of feedback, feel free to get in touch with us via our Community Slack. We’re always glad to assist.