Release Notes > Older Releases > 5.29.0
New Project Setup Migration
See what's new in Webiny version 5.29.0.
Before starting with the migration, make sure you’re using Webiny version 5.29.0. For more information on how to upgrade, please check the Upgrade From 5.28.0 to 5.29.0 article.
Introduction
With the 5.29.0 release, we’ve introduced a brand-new project setup. Essentially, the new project setup abstracts a solid amount of files and folders from a Webiny project, making it easier for users to grasp Webiny and develop on top of it.
Overview
In order to migrate from the old project structure (projects created before the 5.29 Webiny version) to the new one, we will use the following approach.
Instead of updating the old project and transform it into the new project structure, it has been shown that it’s easier to simply create a new 5.29.0 Webiny project, and make the necessary adjustments there.
With the new project created, we can start moving different pieces of our old project, into the new one. Some of these pieces will be:
- custom frontend/backend (Page Builder, GraphQL API) plugins
- different configurations (
yarn,.env,package.json, …) - cloud infrastructure (Pulumi) state files
Out of the mentioned pieces, we can immediately highlight cloud infrastructure (Pulumi) state files as the piece that will be the most crucial part of the whole migration.
With that being said, here are some additional migration-related notes to take into consideration.
Performing the Migration
Note that the document and the steps outline below assume the migration is done from a local machine / from a locally set up project, which has the ability to deploy into the target environment. These can be your regular development environments, but also long-lived ones.
This is because, at Webiny, we aren’t familiar with internal protocols and CI/CD workflows that you might have in place. It will be up to you to analyse the steps that are presented in this document, and then try to accommodate them to your internal protocols / CI/CD workflows.
Different Environments
The steps outlined in this document only cover the migration of a single environment, be it your ordinary development environment, or a long-lived one. If you have five environments to migrate, you will need to follow these steps five times, once for each environment.
Deletion of Old Resources
Note that the migration will re-use some of the previously deployed cloud infrastructure resources, it will create new ones, but it will also leave some resources hanging. For example, when migrating the API project application, all of the AWS Lambda functions will be created from scratch, and the existing ones will not be deleted by Webiny (by Pulumi).
If possible, after the migration, you should perform an analysis and try to determine which resources are no longer in use, and delete them. Doing this straight from the AWS Management Console will do.
We will try to mention some of these resources in the section which cover cloud infrastructure (Pulumi) state files and deployments.
Steps
1. Create a New Webiny Project
On your local machine, create a new Webiny project via the following command:
Note that the wizard that follows will ask you to choose an AWS region and a database setup. Please select the same AWS region and the database setup you were already using.
This new project will be our new base from now on. Once the migration has been completed, the old project won’t be needed anymore (but you can keep it around for some time, just in case).
Once we’ve created the project, we continue by doing the following initial steps in it.
1. Custom Plugins
For starters, we copy all the custom plugins we have in the old project. This includes the plugins folder, as well making sure all the plugins inside of it are properly imported in relevant project applications (API, Admin, Website).
2..envFiles
If you’re migrating a local / development-related project, then you’re most probably relying on the .env file. If so, make sure to copy the file into the new project. On the other hand, if you’re migrating a long-lived environment, environment variables should already be present in CI/CD provider’s secrets vault. In that case, this step can be ignored.
Then again, if you’re migrating a long-lived environment from a local machine, ensure all of the environment variables, that are usually assigned in a CI/CD workflow, are assigned locally.
From all the environment variables, we should highlight the Pulumi (PULUMI_SECRETS_PROVIDER, PULUMI_CONFIG_PASSPHRASE) and AWS environment variables.
Failing to have these values the same will prevent us from performing the actual migration. For example, when it comes to Pulumi-related environment variables, Pulumi usually will throw an error.
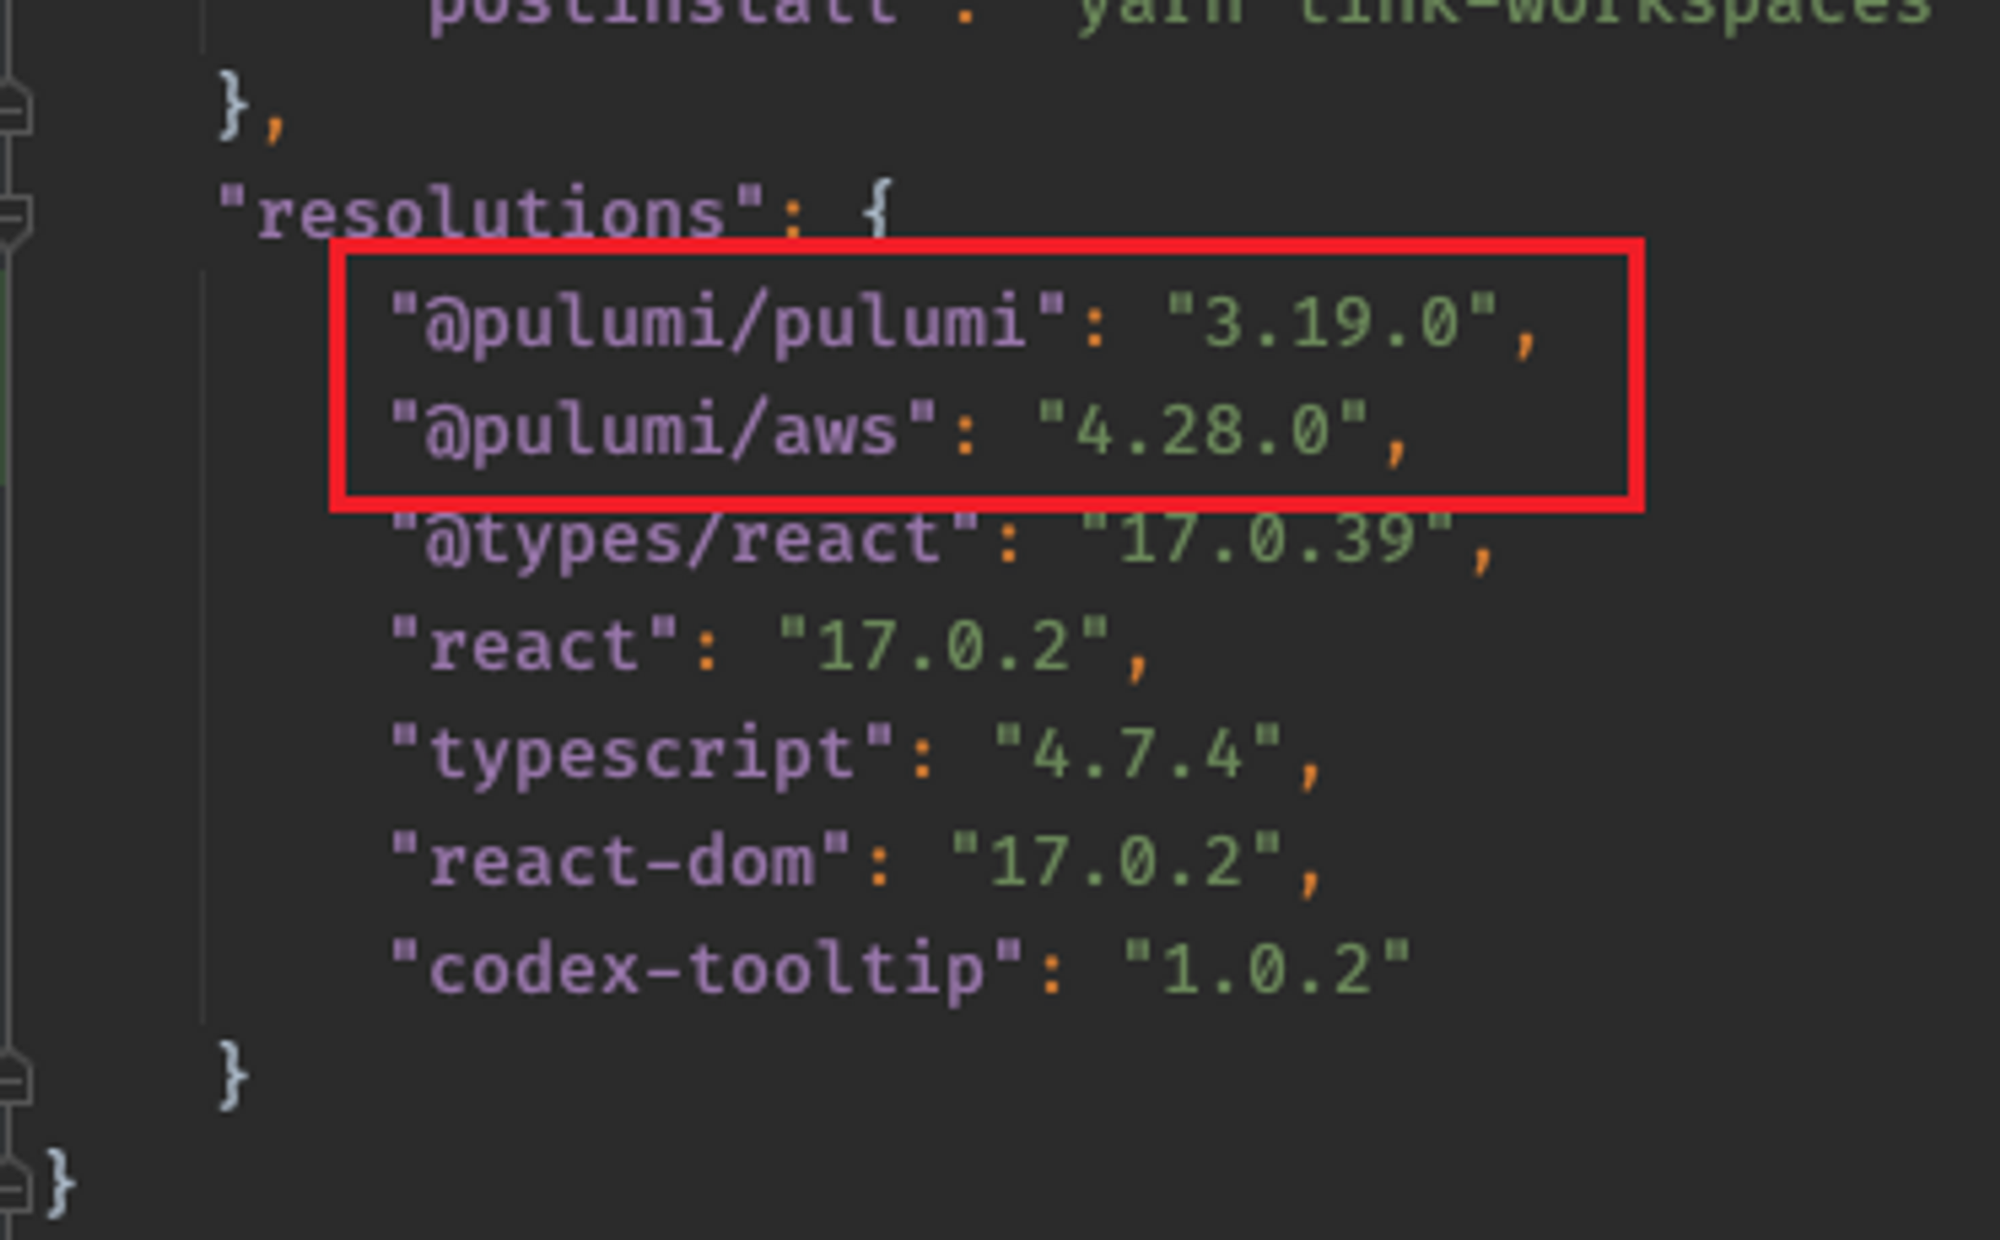
3. Package Resolutions
In the new project, we want to keep the same versions of Pulumi-related NPM packages. That’s why, we need to copy the related resolutions entries, located in root package.json file of our old project:
After the change, in the new project, updated resolutions block should look like the following:
4. Runyarn
In order for the yarn and resolutions-related changes to take affect, let’s run yarn from the new project’s root.
If the command execution has completed successfully, then we’re ready to start applying cloud infrastructure (Pulumi) code adjustments.
2. Apply Cloud Infrastructure (Pulumi) Code Adjustments
Your old project might contain changes in the cloud infrastructure, applied via the code located within the pulumi folders. If so, we want to have these as well in the new project.
With the new project structure, all of the project applications are located within the apps folder. In it, there are four applications, where each one has its own webiny.application.ts file:
- Core (
apps/core/webiny.application.ts) - API (
apps/api/webiny.application.ts) - Admin (
apps/admin/webiny.application.ts) - Website (
apps/website/webiny.application.ts)
These are the files via which the cloud infrastructure adjustments can be applied. To learn more, we suggest you take a look at the Modify Cloud Infrastructure
3. Pulumi State Files Migration
In this step, we’ll perform the Pulumi state files migration. In other words, we’ll adjust the existing state files that exist in the old project, to the new structure that should exist in the new one.
The main difference is that, in the old project, we had three project applications, thus three sets of state files:
- API (
api) - Admin (
apps/admin) - Website (
apps/website)
In the new project, we now have four project apps, thus four sets of state files:
- Core (
apps/core) - API (
apps/api) - Admin (
apps/admin) - Website (
apps/website)
More info on the new cloud architecture can be found here.
At the end of this migration, running the deploy command should result in some changes when it comes to the deployed cloud infrastructure, but the most important part is that all of the stateful services should not be deleted.
1. Exporting Old Project’s State Files
In order to start with the Pulumi state files migration, we need to retrieve the old project’s state files. If you’re migrating a local / dev-purposed project, these should be located in your project root’s .pulumi folder. If you’re migrating a long-lived environment, you should retrieve them from the relevant Amazon S3 bucket.
2. Copy Retrieved Pulumi State Files Into the New Project
Once retrieved, we will copy them into the new project. Let’s copy the retrieved Pulumi state files into the .pulumi-old folder.
3. Run the State Files Migration Script
For this migration, we provided a migration scrip which can be downloaded here.
Unzip the provided migration script into your scripts/migration folder, and, from your new project root, run the following:
The command uses the xyz deployment environment name, so please update this with an actual environment name.
Once the script has completed the state files migration, we’re ready to start deploying our new Webiny project, application by application.
4. Redeploying the Project Apps
We’ll be doing deployments in an application by application manner. We definitely do not want to just run yarn webiny deploy, as for each application, we want to preview the deployment, analyse the changes Pulumi will perform, and make sure all is in order.
More on this in the following section.
Core Application (apps/core)
Let’s preview the deployment by running the following command from our new project’s root:
The result should be as similar as possible the following:
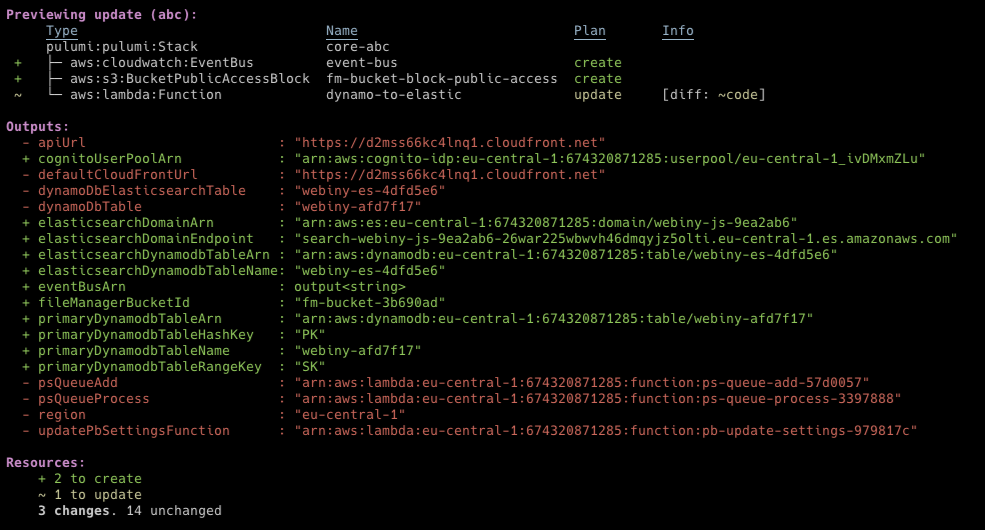
As we can see, two create operations and one update operation will be performed.
The create operations are related to new Amazon EventBridge that is now deployed with the new Webiny setup, and also the “block-public-access” policy for File Manager’s Amazon S3 bucket (ensures bucket objects are not public).
Note that the above preview doesn’t show us the changes that were potentially applied via the apps/core/webiny.application.ts file on your behalf. If any, you should additionally inspect the preview output and ensure changes you had in place are also intact.
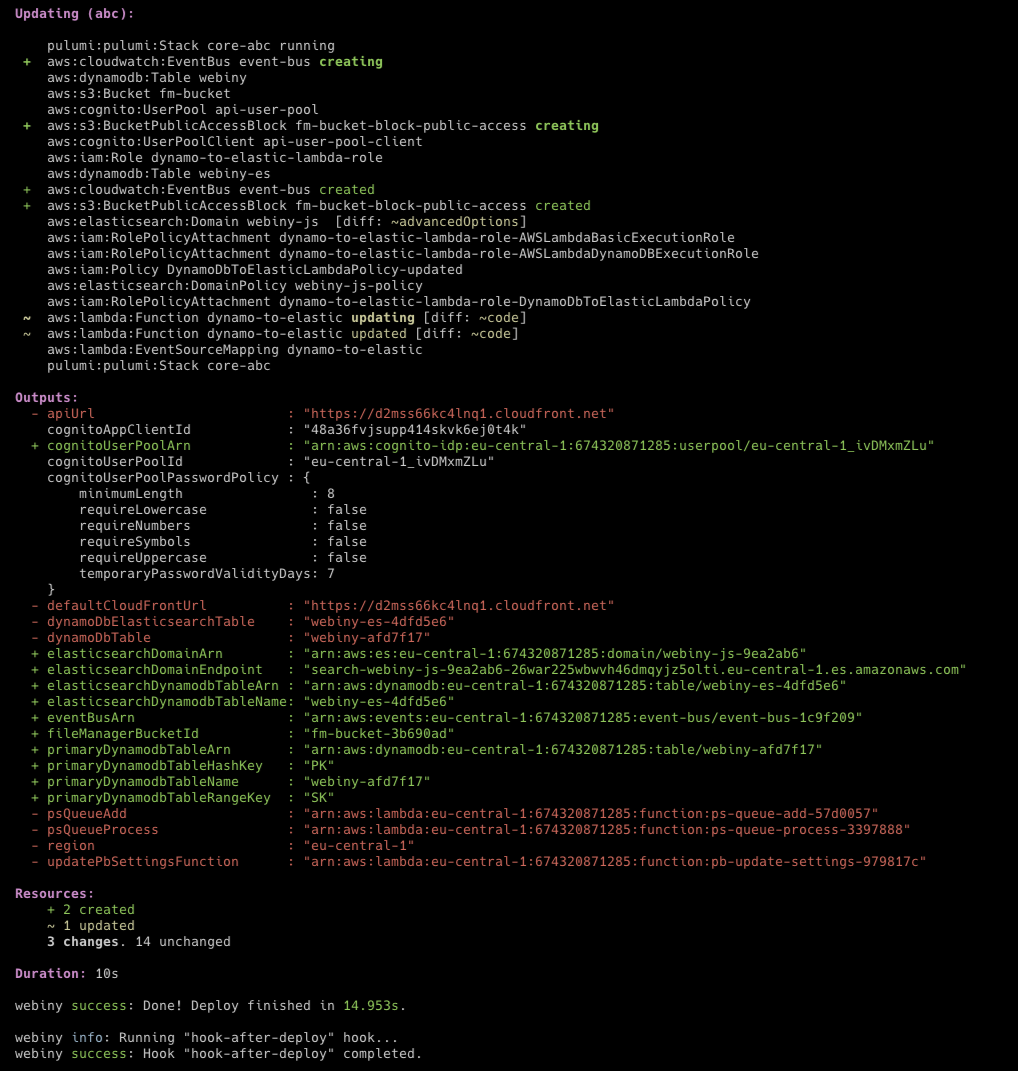
If the preview looks correct, then we can proceed with the actual deployment:
The result should be the following:
API Application (apps/api)
When it comes to the API application, we’ve decided to go with the following approach.
Since the application is stateless (unlike with the Core application, which is stateful), to minimise the possibility of an error in Pulumi state files, we’ll completely redeploy this application.
Except for the Amazon Cloudfront. This is because, in your long-lived environments, most probably there are real domains linked with already deployed Amazon Cloudfront distributions. By not redeploying distributions, we’re making the migration easier.
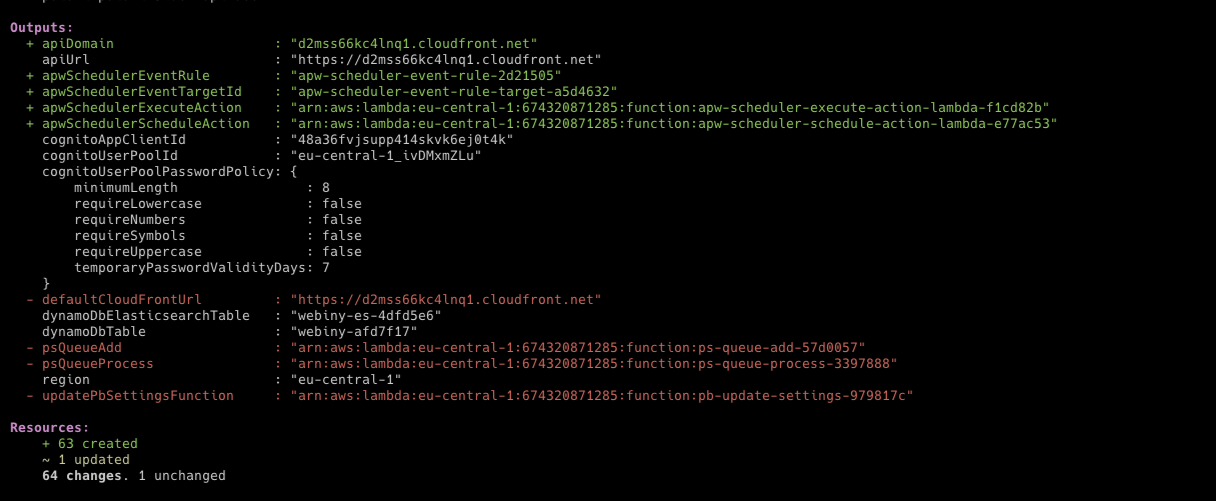
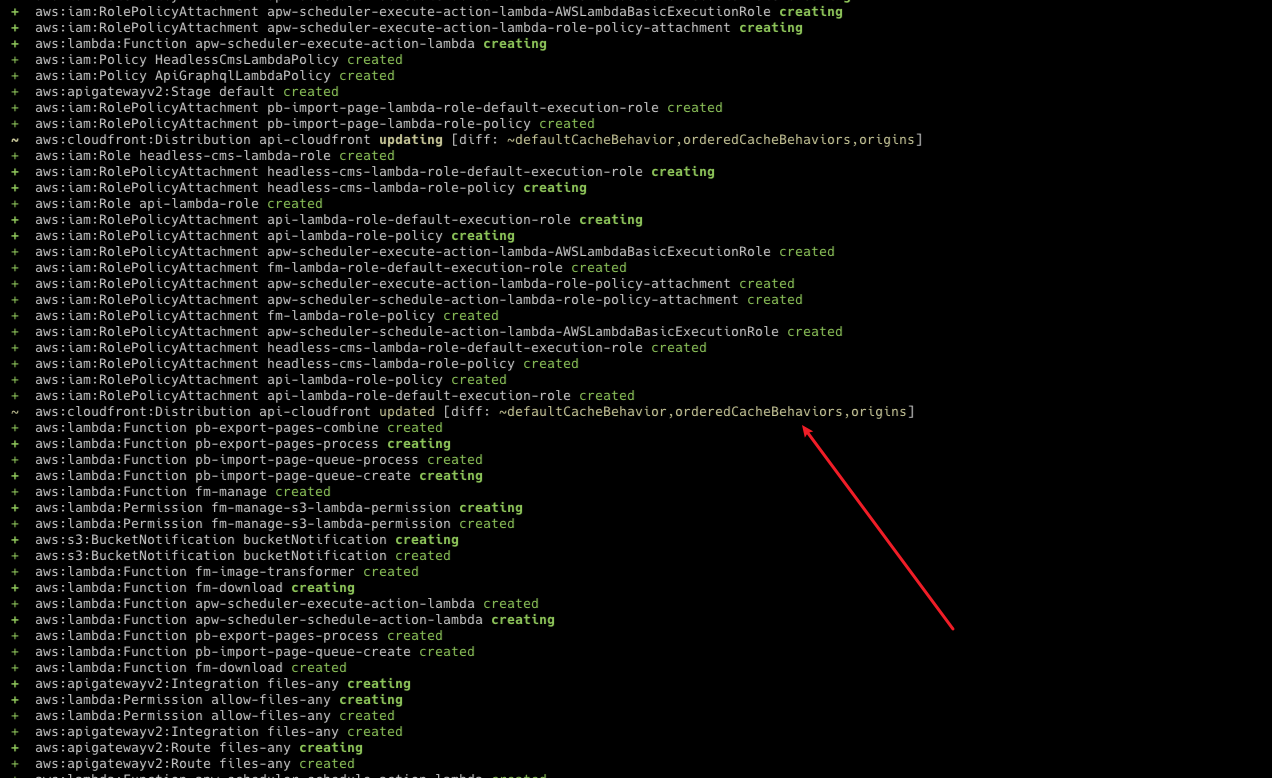
Once we run the following preview command:
The result should be the following:
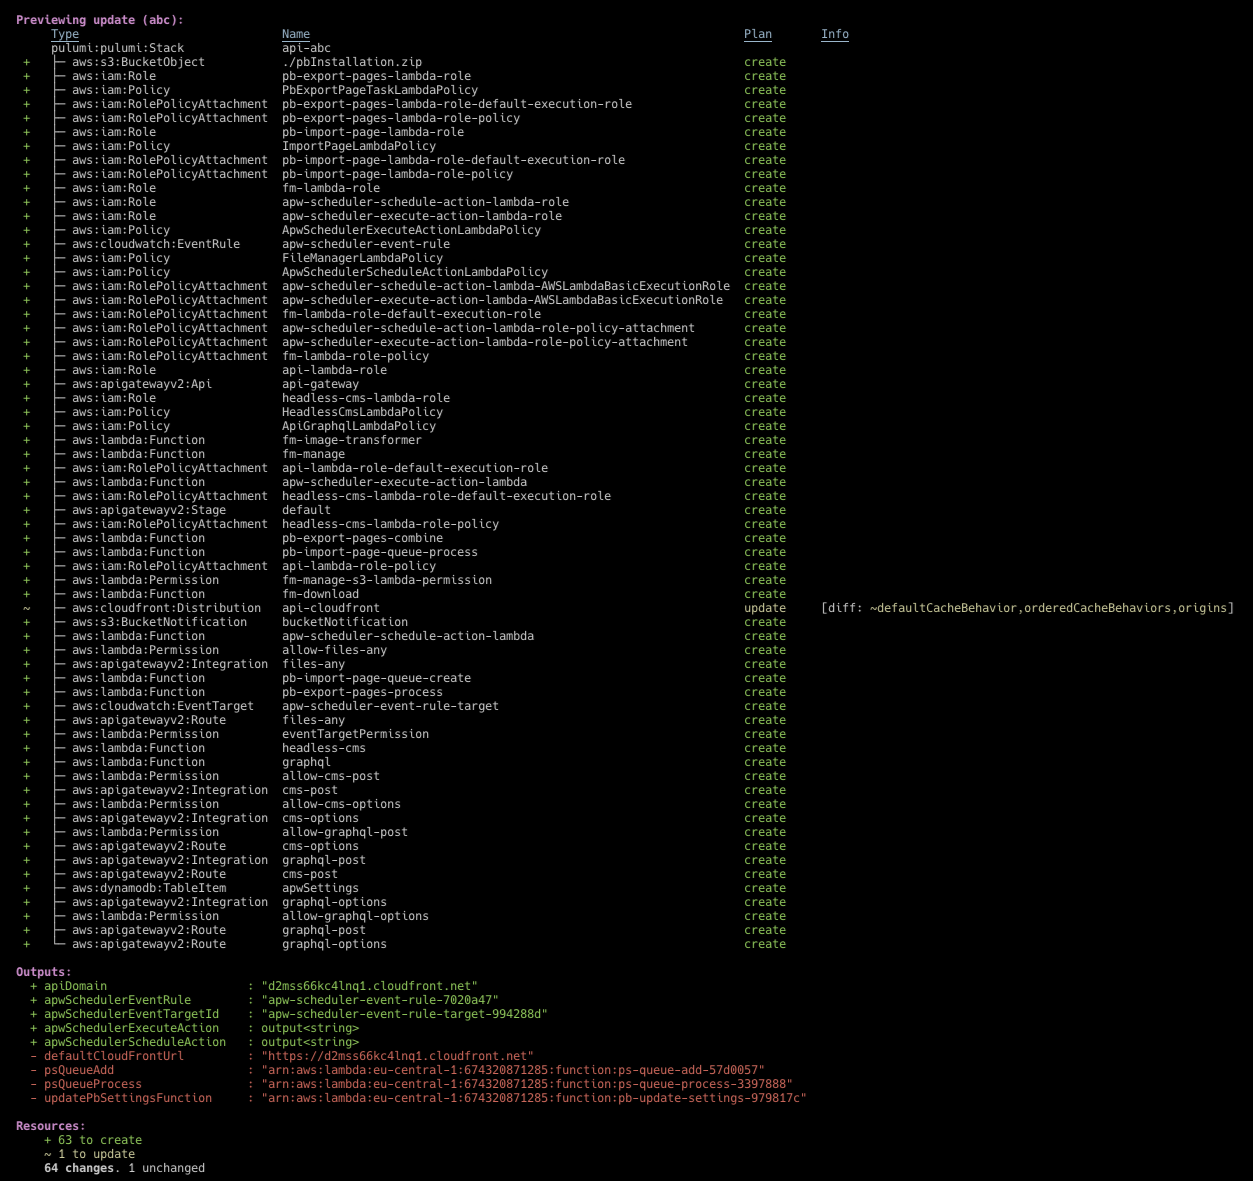
As we can see, all of the resources will be recreated, except for the api-cloudfront one, which shows changes in the defaultCacheBehavior,orderedCacheBehaviors,origins.
If we were to further inspect those with the second preview command we mentioned above:
…we’d see the following changes:
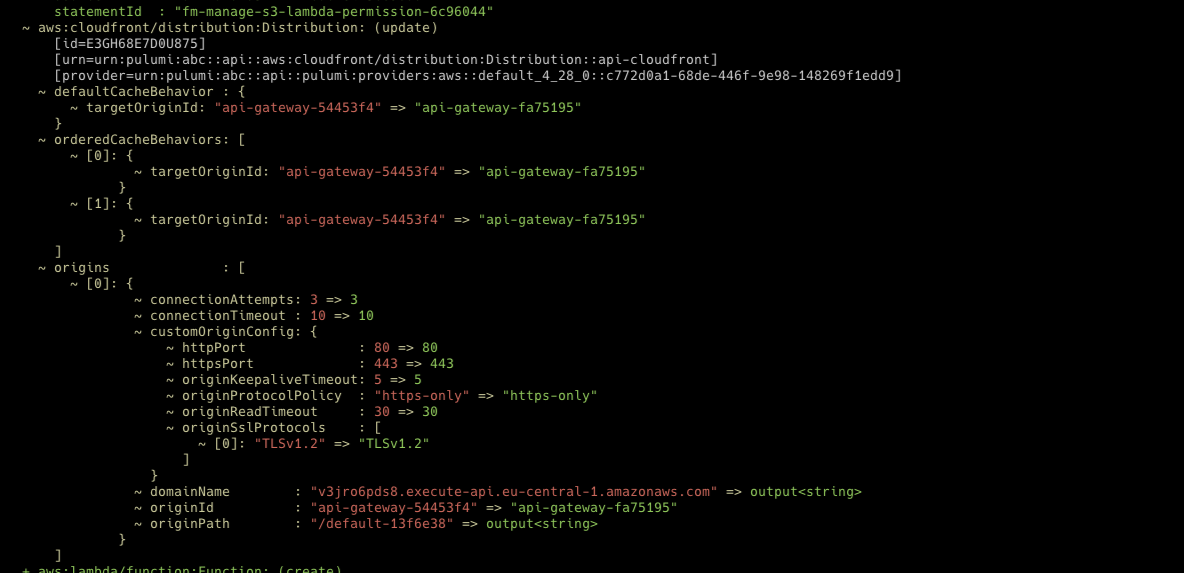
As we can see, we have changes in targetOriginId properties and within the origins property. Essentially, the existing Amazon Cloudfront distribution is just linked with the newly deployed API Gateway. If those are the only differences that the preview command showed, then we’re almost ready to deploy.
Note that the above preview doesn’t show us the changes that were potentially applied via the apps/api/webiny.application.ts file on your behalf. If any, you should additionally inspect the preview output and ensure changes you had in place are also intact.
We say “almost”, because we have to perform one additional step before doing it. If we were to deploy immediately, there’s a chance an error would be thrown, saying a APW#SETTINGS DynamoDB record cannot be created:
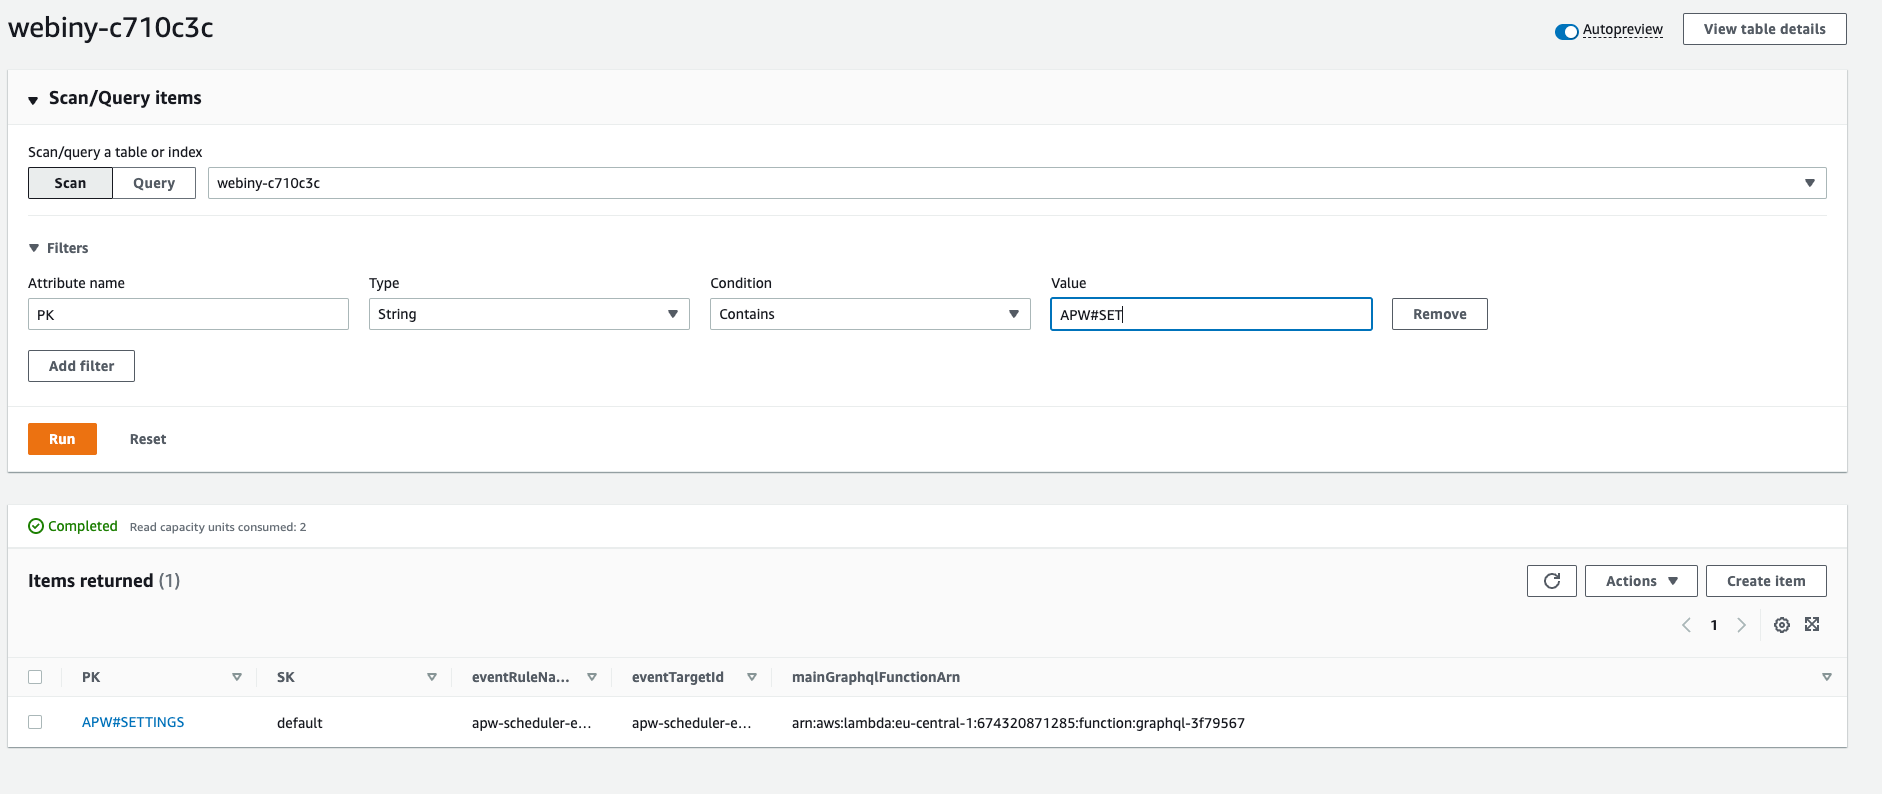
It’s a record that gets created during the deployment (also defined within internal Pulumi infrastructure code). Unfortunately, at this time, Pulumi doesn’t allow us to ignore or overwrite existing DynamoDB records. If the same record already exists, an error will be thrown.
So, in order to fix the issue, we’ll have to go into our AWS console, find the relevant DynamoDB table, and manually delete the record shown in the above screenshot (APW#SETTINGS). Note that if you don’t have the record in the table, there’s nothing to do then.
Once deleted, we’ve completed all the necessary pre-deployment steps, so we can start the deployment.
We can start the deployment via the following command:
The result should be something like the following:
From the logs above, we can see it’s Amazon Cloudfront distribution that received changes seen in the previous preview command:
If that is the case, then we’re ready for the next step, which is redeploying the Admin app.
Admin Application (apps/admin)
As before, the first step we want to take before deploying the Admin application is performing the deployment preview:
The result should be the following:
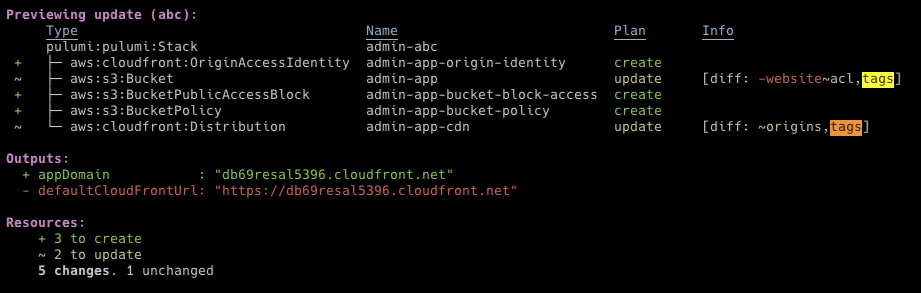
As we can see, we can see three create and two update operations.
All operations are related to making the Amazon S3 bucket (that hosts the Admin app) private. In a nutshell, we disable the website hosting feature form the Amazon S3 bucket, block all public access to it, and introduce Amazon Cloudfront Origin Access Identity, which enables us to ensure only HTTP requests that are coming from the deployed Amazon Cloudfront distribution can be actually served.
If these are the changes that the preview command reported, then we’re ready to deploy.
Note that the above preview doesn’t show us the changes that were potentially applied via the apps/admin/webiny.application.ts file on your behalf. If any, you should additionally inspect the preview output and ensure changes you had in place are also intact.
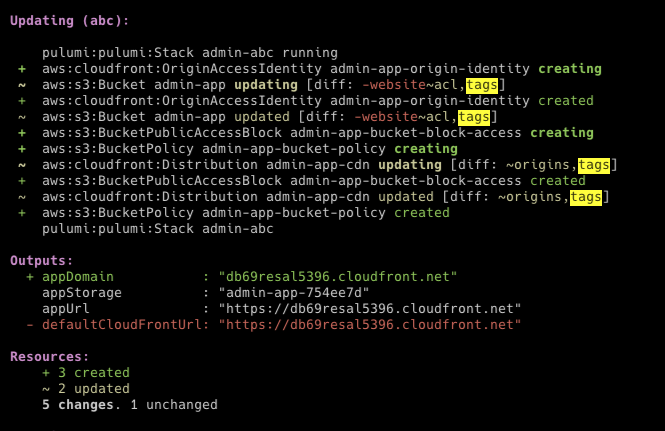
Before running the deploy, just in case, it’s not a bad idea to do a refresh:
This will ensure current state files are synced with what is already deployed with the old project.
The result should be the following:
Website Application (apps/website)
Finally, the Website application. To perform the deployment preview, we can run the following commands:
The result should be the following:
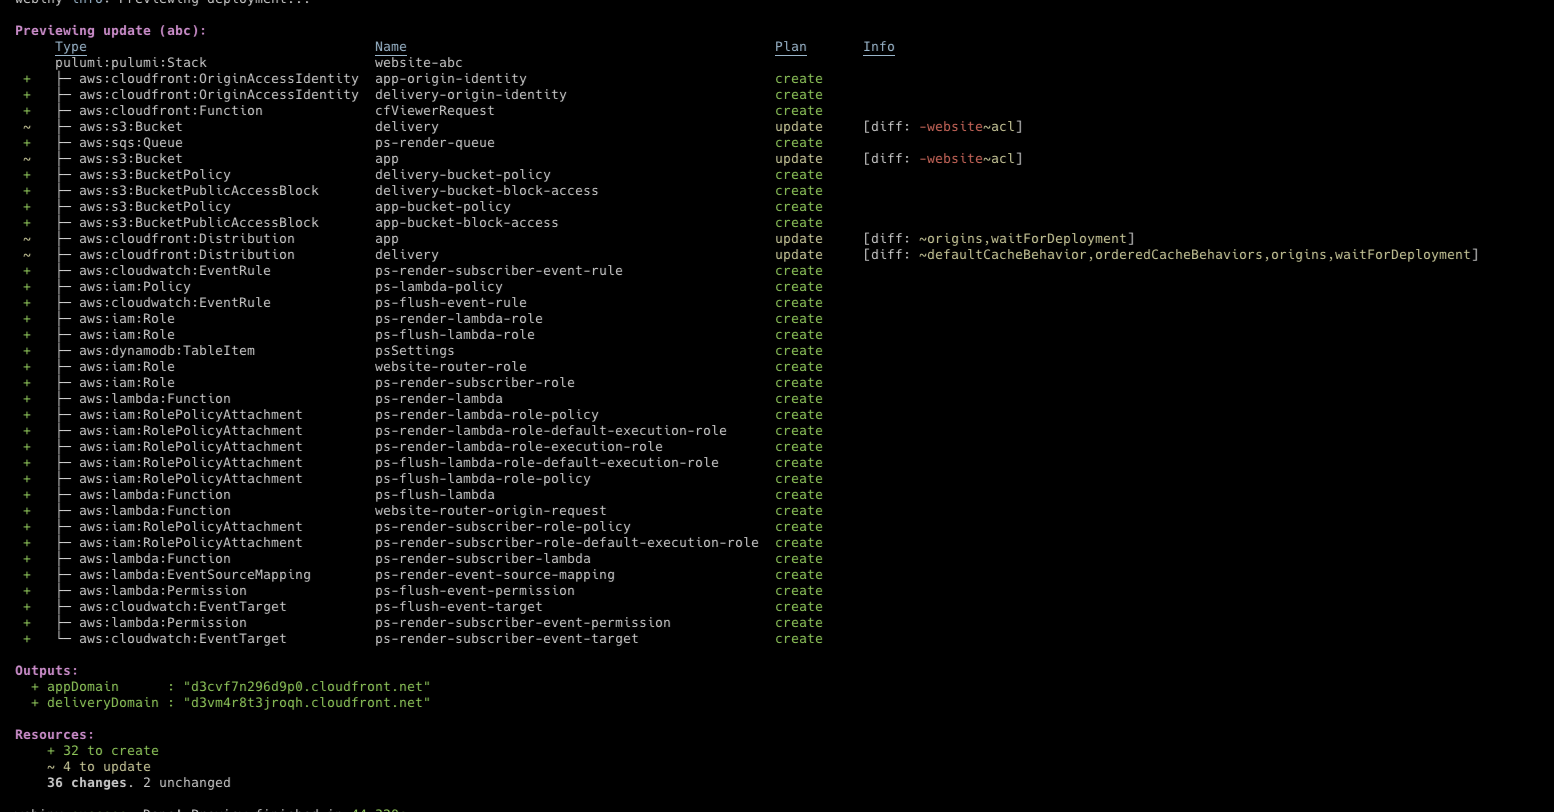
Note that the above preview doesn’t show us the changes that were potentially applied via the apps/website/webiny.application.ts file on your behalf. If any, you should additionally inspect the preview output and ensure changes you had in place are also intact.
As we can see, a lot of create operations. But this is mainly because of the fact that the Page Builder’s Prerendering Service is no longer deployed as part of the API application, but as part of the Website application. All of these are related to the Prerendering Service:
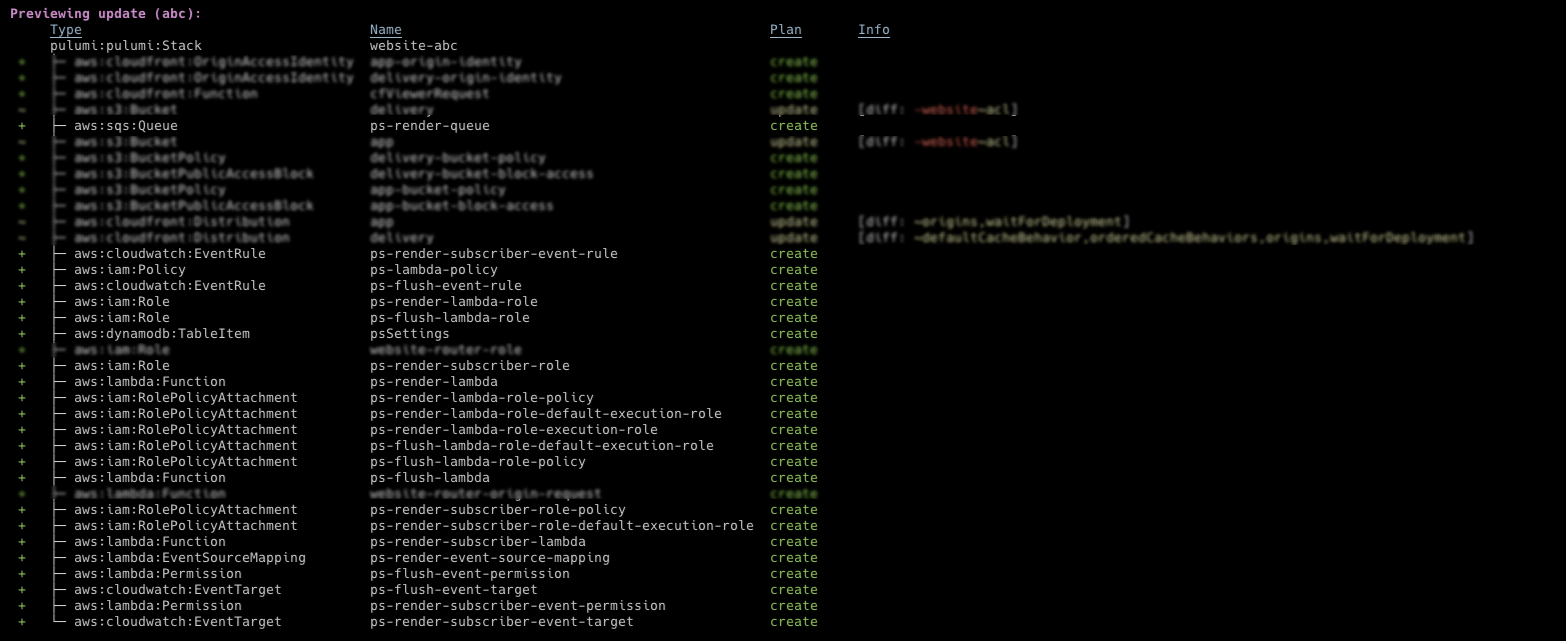
What about the rest?
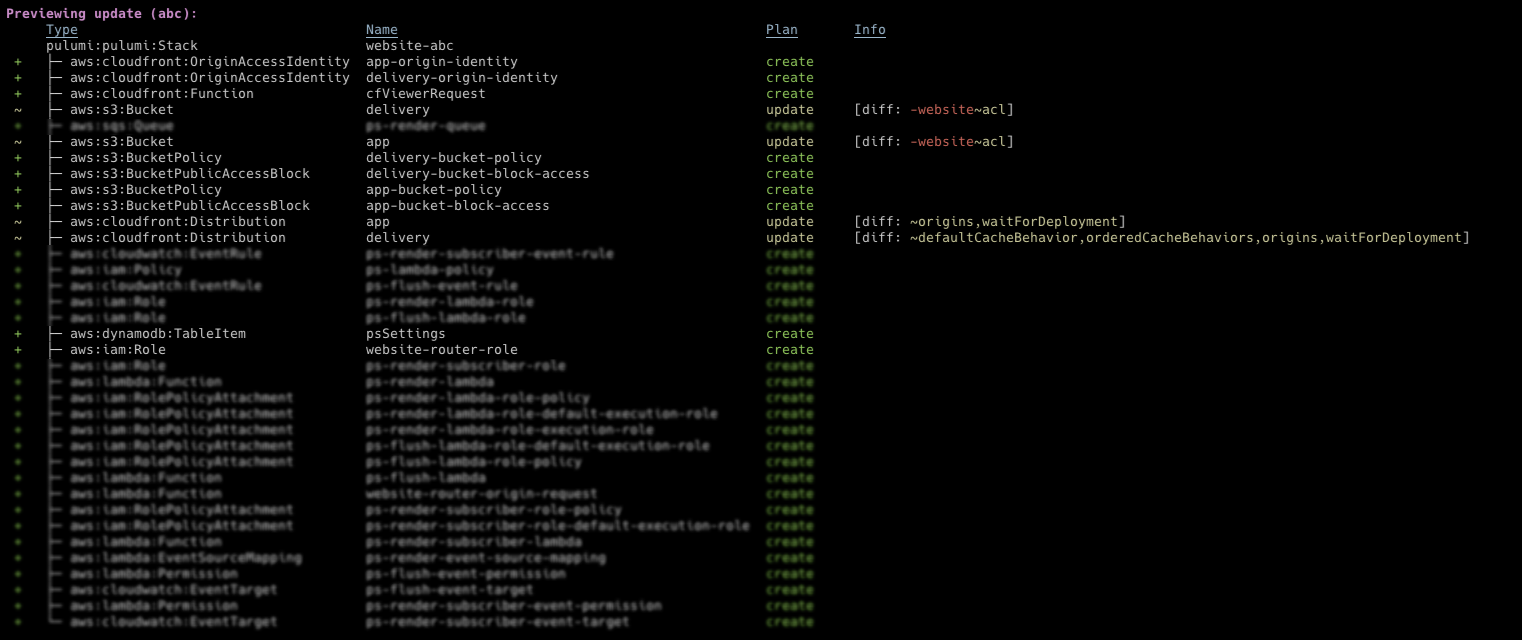
The rest is related to, as with the Admin application, making the Amazon S3 buckets publicly inaccessible.
There’s also the Amazon Cloudfront function / Amazon Lambda@Edge function, that are here for multi-tenancy routing purposes (if enabled).
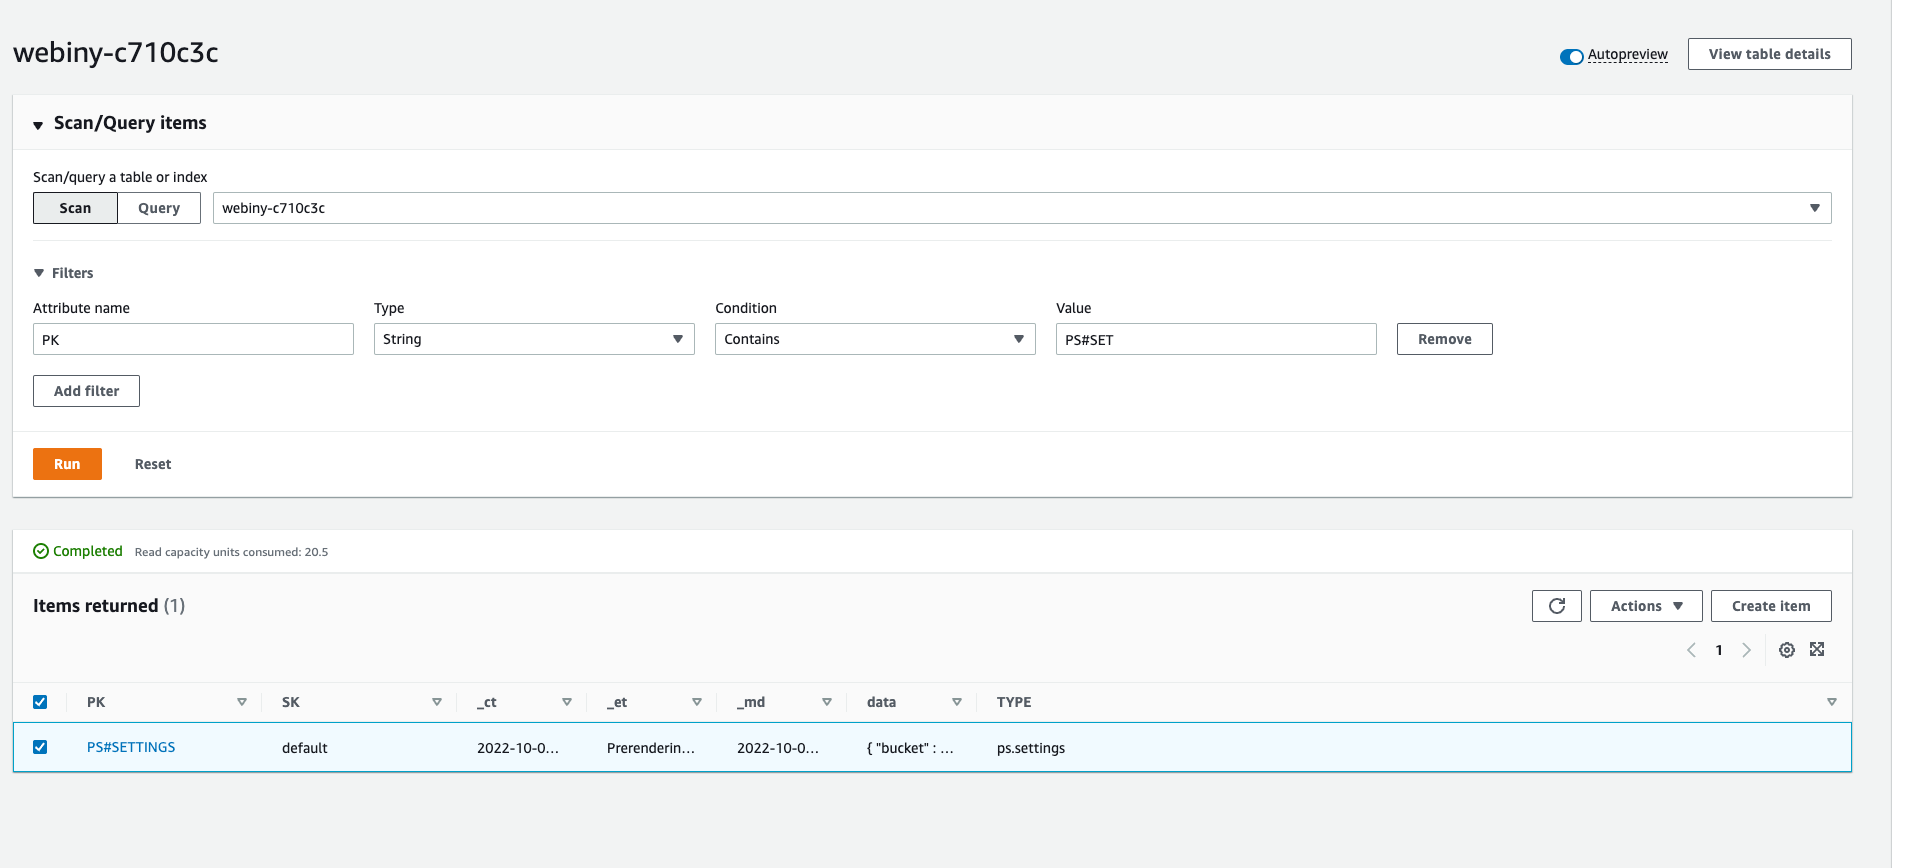
Finally, similarly to what we had in the API application section, a PS#SETTINGS Amazon DynamoDB entry will be created in the process. Meaning, in order to avoid the error we explained above, we’ll need to find the record via the DynamoDB console, and delete it:
Once the record has been deleted, we can start with the deployment.
So, to deploy the changes, for starters, as with the Admin application, we recommend a refresh is performed with the following command:
Once completed, the deployment can be performed via the following command:
The following is a result we should receive:
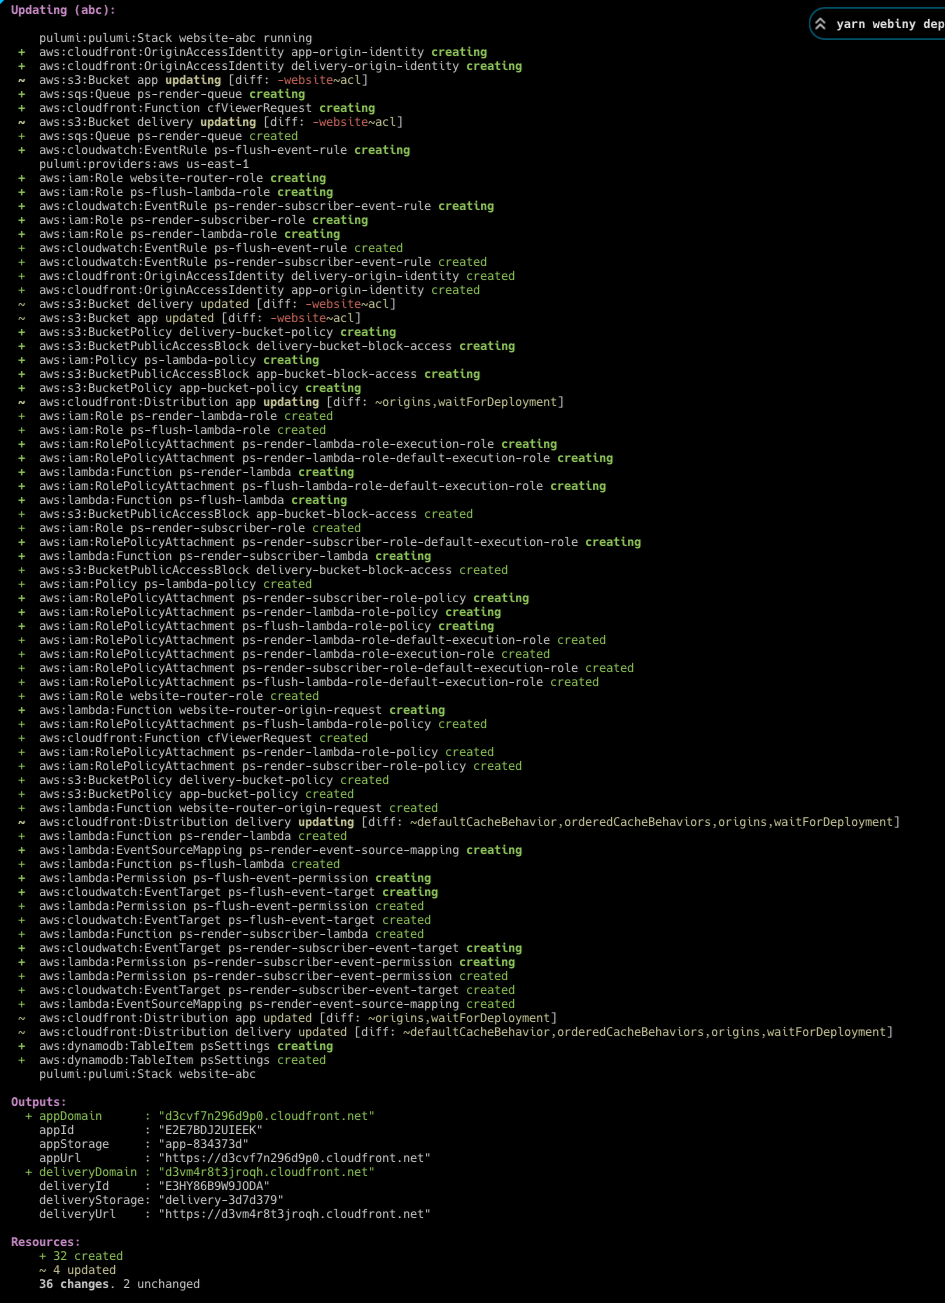
As we can see, 32 create and four update operations have been performed.
With the Website application, we’ve completed the Pulumi state files migration. The only thing left to do is manually test the re-deployed system and ensure everything is working as expected. To get started, we suggest running the yarn webiny info --env xyz command, and opening the Admin application in your browser:
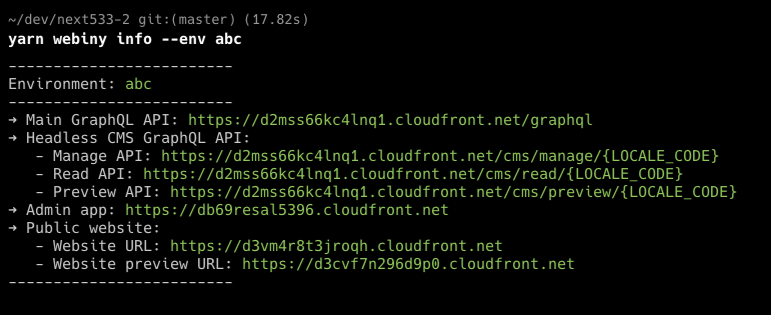
If everything works as expected, we can finalize the migration by copying the migrated Pulumi state files in our state files storage.
More on this in the next section.
5. Store Migrate Pulumi State Files
Once we’ve determined everything is in order, the final step would be to copy the migrated Pulumi files back into its original storage.
If you’re migrating a local / dev-purposed project, then there are no extra steps because you already have everything up-to-date in your local .pulumi folder. On the other hand, if you’re migrating a long-lived environment, migrated Pulumi state files should be copied back into the storage you’re using, for example an existing Amazon S3 bucket.
Once done, we suggest a deployment preview is run against every application. If the state files were copied back correctly, then the preview should report no changes / nothing to deploy.
Finally, it might not also be a bad idea to additionally try to make a small change in the cloud infrastructure (Pulumi) code, and try to preview/deploy it. Adding an extra resource tag might be a simple yet good-enough change to test.
Conclusion
By successfully completing the above steps, you should have your existing Webiny project migrated to the new project structure, and be able to enjoy all of the benefits that it brings.
We are aware that the migration process is a lengthy and a non-trivial one. So, if additional questions arise or you need additional help, feel free to ping us via our community Slack. We’d be glad to assist!