Heads up! This article was written before Webiny 6.0 was released and may contain outdated information.

Joseph Chege
Heads up! This article was written before Webiny 6.0 was released and may contain outdated information.
Webiny is the AI-programmable CMS that gives enterprises full control. Build, extend and automate your content operations with a platform designed to be shaped by both developers and AI agents.

import OnPagePromo from "../components/ui/on-page-promo/on-page-promo"
Building a notes app with Webiny Headless CMS and Next.js gives you the flexibility to decouple your backend from the frontend. This way, you get the best of both worlds. A highly scalable and secure backend content management application, and at the same time the advantage of choosing the best frontend platform to channel your application to your users.
Webiny is an open-source, developer-friendly serverless CMS powered by modern tools and technologies such as Node.js, React and a GraphQL API. It also gives you the flexibility to integrate with other tools like Gatsby, Next.js and Astro. Webiny helps you engineer, build and deploy applications on top of the serverless infrastructure. Check this guide to understand its unique features.
Next.js is a React-based frontend web framework. It allows you to perform server-side rendering (SSR) operations which keep API keys safe from prying eyes. It can also generate pages when the site is built using static rendering.
In this guide, we will build a Webiny content model for a notes app. We will then consume this content using the Next.js framework. So let’s dive in!
To follow along with this tutorial, ensure you have the following requirements ready:
A model defines the structure of the data that your application will consume. Each application has a different content model. Here, we need to set up the primary inputs that a Note app should have.
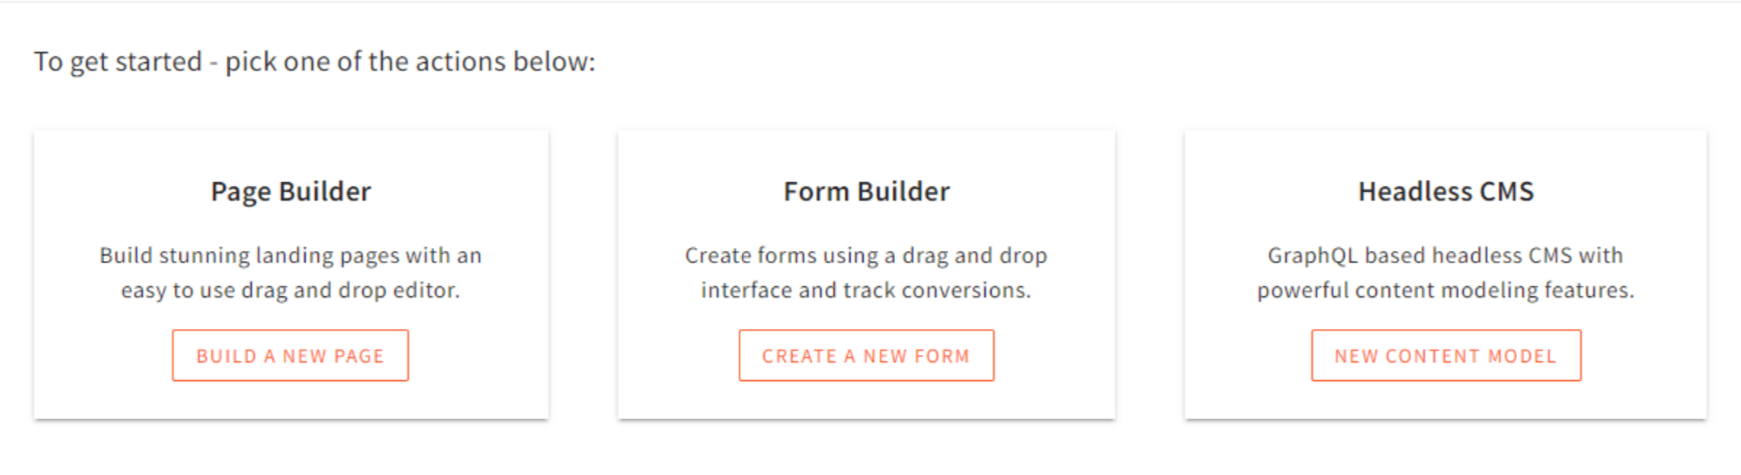
From your AWS deployed Webiny project, head over to the Webiny Admin dashboard page. Click the Headless CMS card, and set up a new New Content Model.
On the resulting page, click on New Model to create the Notes model:

Type in the model name ("Notes") and the description on the resulting pop-up and create the model:

Once you have created the Notes model, you will be directed to a fields page to insert the relevant fields/content:
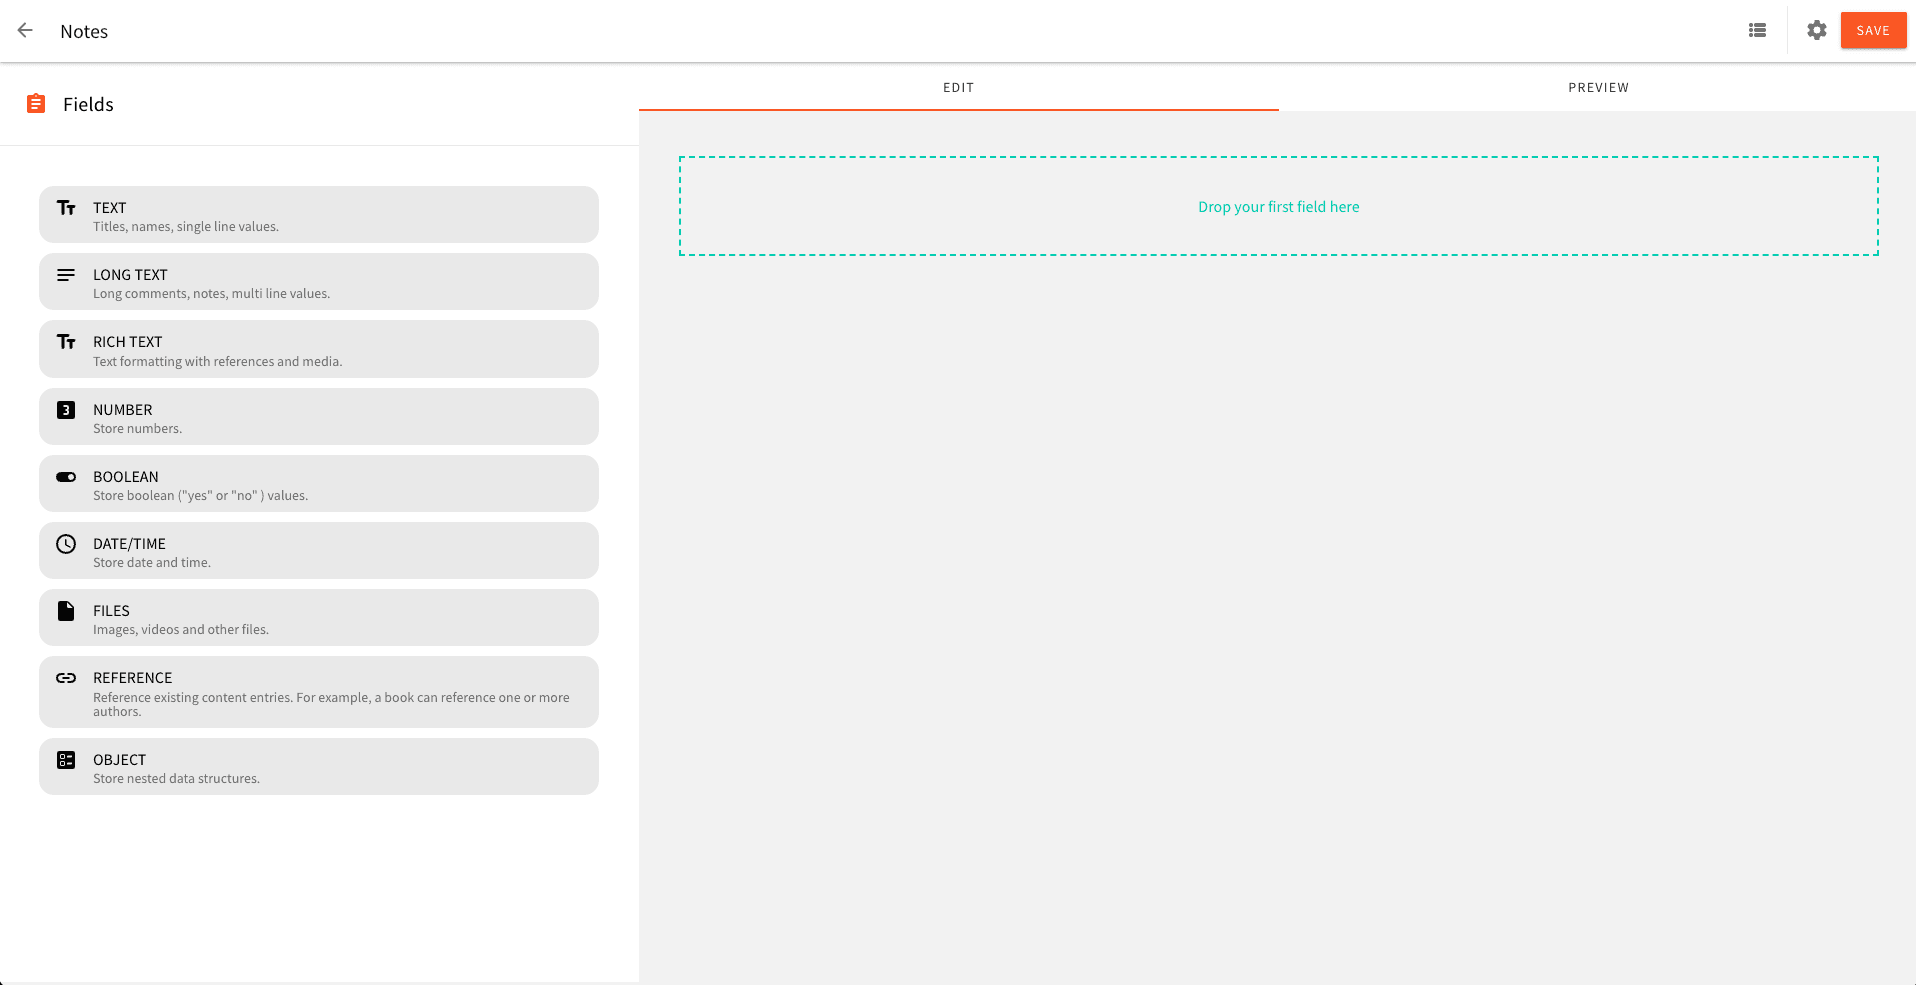
In this case, we will use two fields to create a Note: title and description. Therefore, drag the text field from the left to the right to create the title page. Do the same for the description field.

You can sort the fields by simply dragging them appropriately:

Once you have added the relevant fields, click the Save button on the top right. The resulting page will have your recently created model listed:

Let’s test if this model works as expected by feeding in a note record to the Model.
To insert data in the recently created model, we will do it from the Webiny API GraphQL Playground. Go ahead and launch the API Playground:
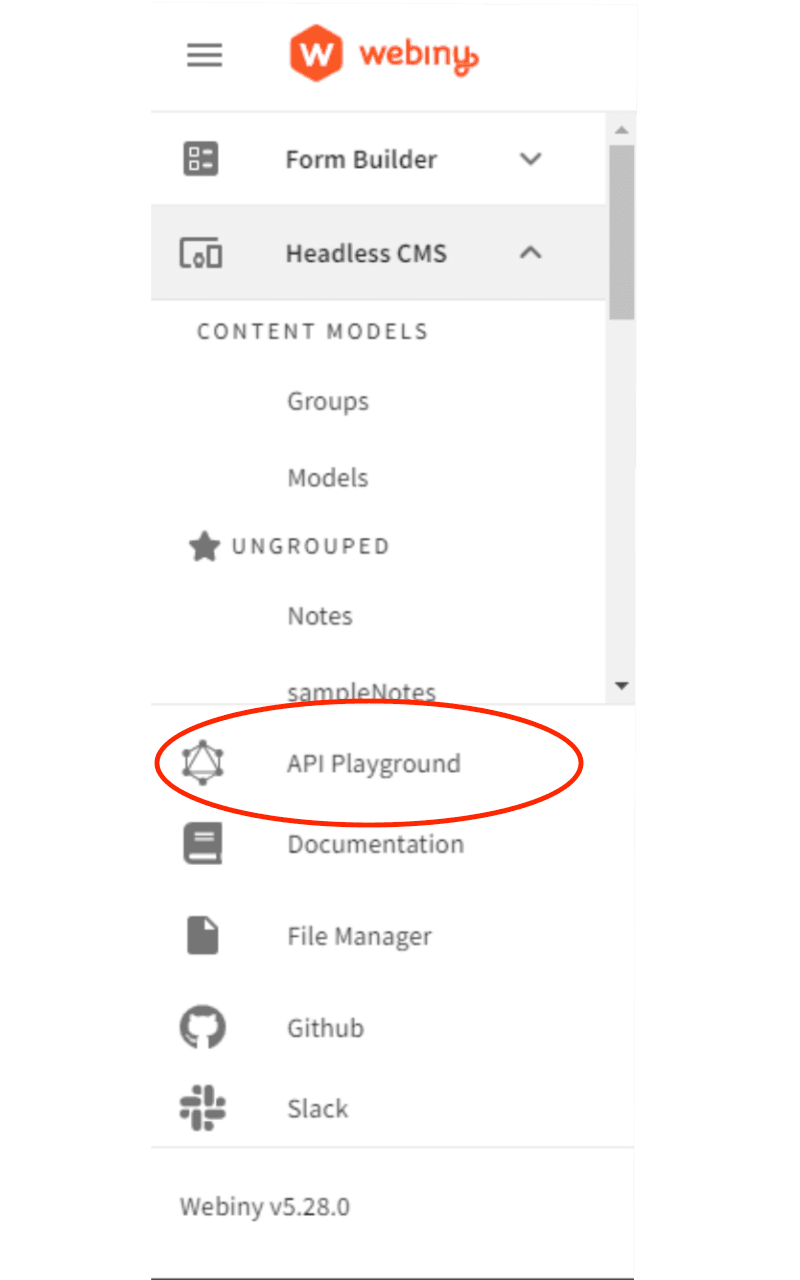
Then click on API Playground. You will be presented with a GraphQL API Playground as such:

We will run the first query in this playground to check and test the model. Click on the Read API tab. On the left pane, write the following GraphQL query:
query listNotes {
  listNotes {
   data {
    id
    title
    description
   }
  }
}
Ensure that you comment out any other pre-existing query and then hit the play button. The results on the right pane should be similar to:
{
  "data": {
   "listNotes": {
    "data": []
   }
  },
  "extensions": {
   "console": []
  }
}
The data array is empty because we have not added any sample notes yet.
To create a sample note, click on the Manage API tab and add the following GraphQL mutation:
mutation createNote($title:String!,$description:String!){
  createNotes(data:{title:$title,description:$description}){
   data {
    id
    title
    description
    createdOn
   }
  }
}
From above, the title and the description are variables that will be supplied from the query variables section. Click on the query variables section and add the data:
{
  "title":"My first Note",
  "description": "My first note is awesome."
}
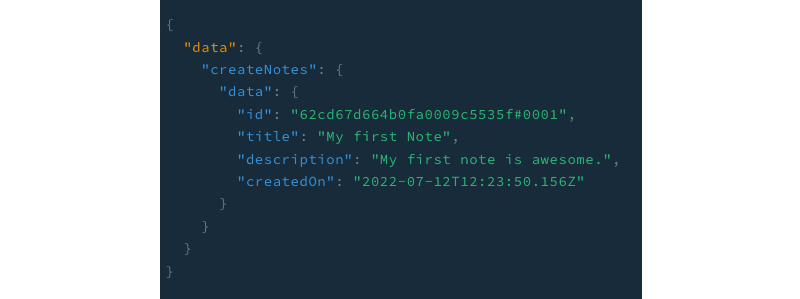
Ensure you have commented out any other mutation on the pane, and then hit the play button. On the right pane, you will get a similar result as such:
At this stage, the note created is on the preview. It won't be accessed until it is published. To check it out, click on the Preview API tab and add the below query on the left pane:
query getNotes {
  listNotes {
   data{
    id
    title
    description
   }
  }
}
Ensure that any other query on the pane is commented out, and then hit the play button. On the right pane, you should get the recently created note as below:

The next step is to publish it. Switch to the Manage API tab. On the left pane, add the following mutation:
mutation publishNote($id:ID!){
  publishNotes(revision:$id){
   data {
    id
    title
    description
   }
  }
}
From the above mutation, we will be passing the ID variable from the query variables section. Therefore, change the data in the query variables section to:
{
  "id": "id_of_the_note"
}
Replace the value of the id with the id of the recently created note. Ensure that any other mutation is commented out. Then click on the play button.
On the right pane, you should get a response as below to suggest that the note has been successfully published:
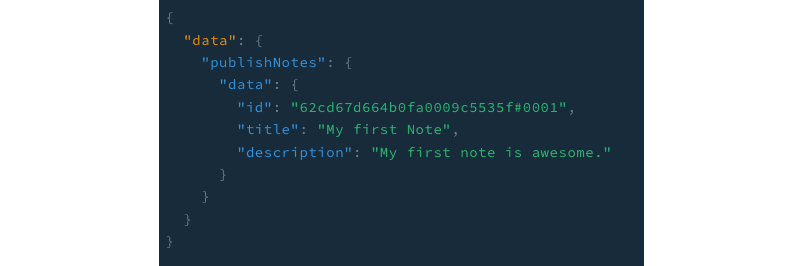
Now switch to the Read API tab, and hit the play button. You should have the note included in the right pane output.

To delete a note, switch back to the Manage API tab. On the left pane, add the following mutation:
mutation deleteNote($id:ID!){
  deleteNotes(revision:$id){
   data
  }
}
From the above mutation, we are passing the ID variable from the query variables section as follows:
{
  "id": "62b8a4e71931c2000a118a18#0001"
}
Ensure that you have commented out any other mutation on the left pane, and then click on the play button at the center. On the right pane, you should get a similar response as below to signify that the note has been deleted:

To connect our Next.js Application with the CMS, we need to create a Webiny API ACCESS KEY. Click on the top hamburger icon to access Settings and select the API Keys under Access Management. Then create a New API Key.


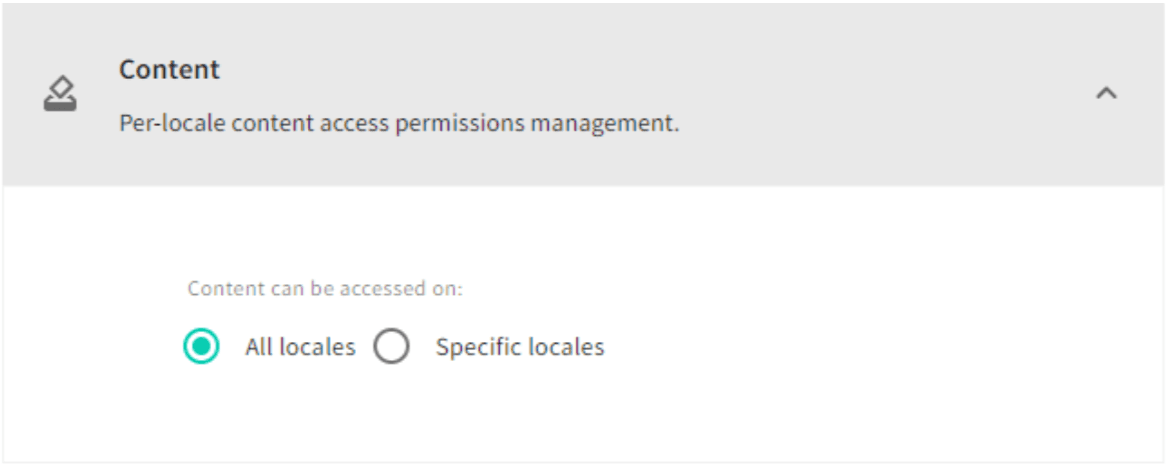
In the resulting form, add the key name and description. In the Permissions section, under Content, select All Locales that the API can be accessed on.
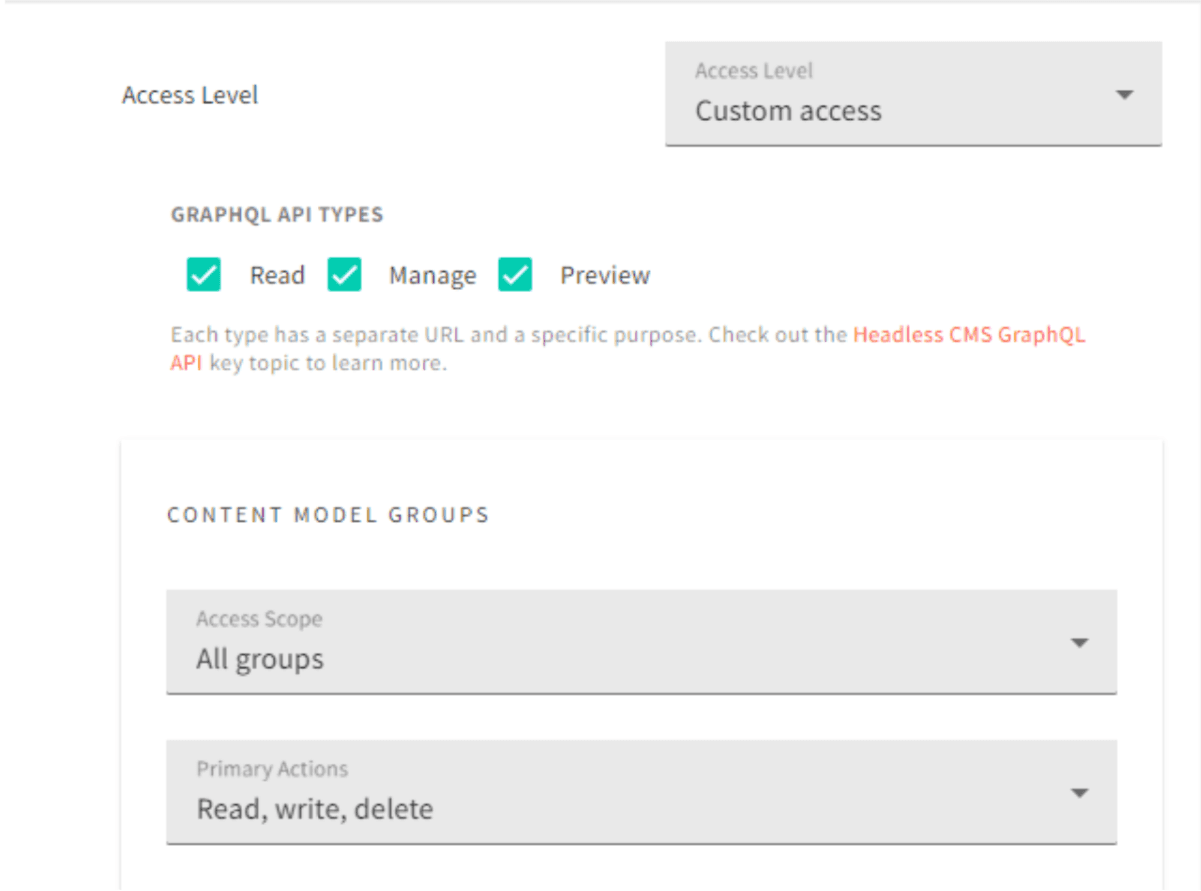
Webiny allows you to set Full access as well as Custom Access options for your API.
To create a Custom Access:
The created content model can have different operations such as Read, Write, and Delete. To allow Next.js to perform such actions, head over to Content model Groups and select All groups. Then choose Read, Write and Delete Primary actions.
Caution! This will allow anyone who has your API key and API URL to modify the data in your Webiny instance. If you are using Webiny for anything other than this content model, we recommend you assign the Notes content model to a group, and restrict API access to that model and content only.
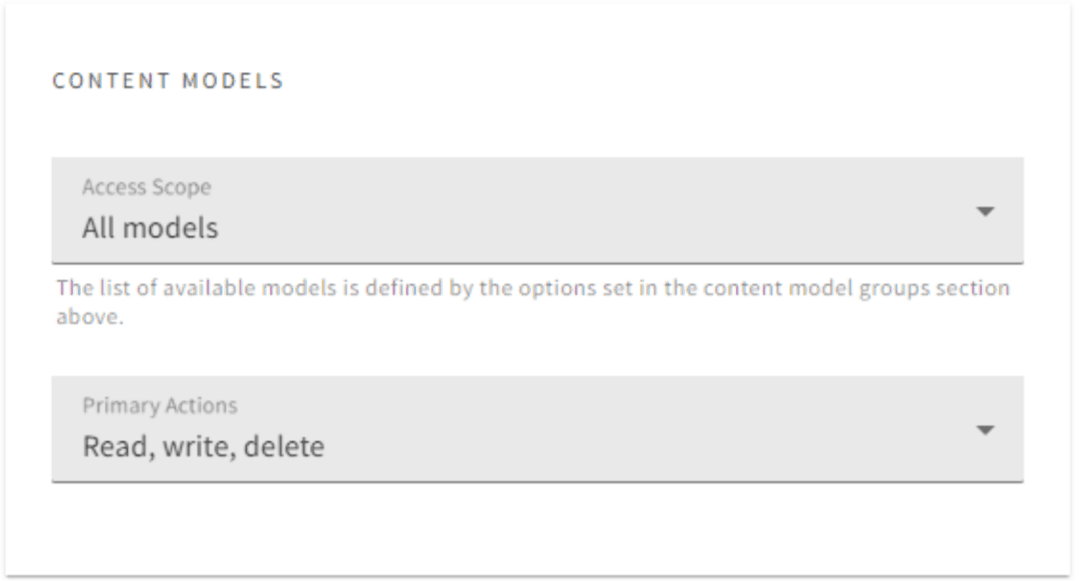
For Content models access, select All models, and Read, Write and Delete Primary actions.
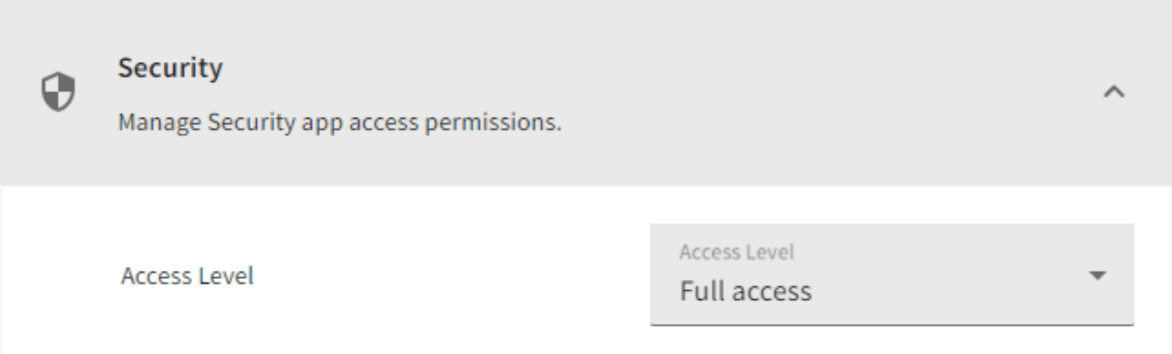
To grant the API Full access, click on the Security tab, and give Full access to all access levels.
To manage the I18N access permissions, head over to the I18N section and grant Full access.

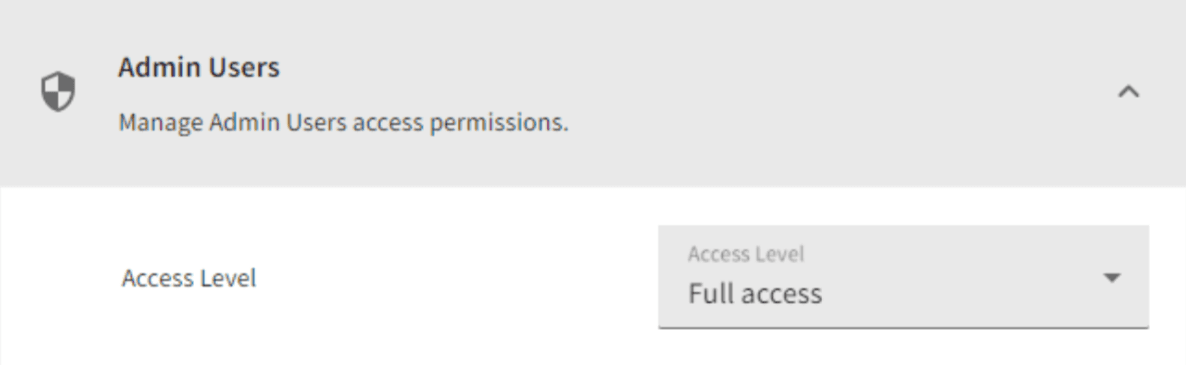
If you have different Admin users, Webiny allows you to manage the user access permissions. To do this, go to the Admin users, and grant Full access to your Admin users.
Once you have configured the correct API access management, click the Save API Key button. The created API Key should now be listed on the left side. Head over to this newly created API key and copy the token generated. We will use this token key to perform different permission to the API using Next.js.
To set up the Next.js application, we will use the create next app tool to bootstrap a basic Next.js application.
First, create a new folder where you want the Next.js app to live. Then run the following command from your text editor terminal or open a terminal that points to the newly created directory:
npx create-next-app notes-app-webiny
This will create a local Next.js app. Once the setup is done, proceed to the newly created Next.js project directory:
cd notes-app-webiny
To test this out, run the command npm run dev. Then open http://localhost:3000 on the browser. You will be served with the Hello world version of Next.js.
Now, dive in and consume the Webiny API using this Next.js project. Create a .env.local file at the root directory of your project to host the Webiny API configuration as follows:
WEBINY_API_SECRET=your_access_token
NEXT_PUBLIC_WEBINY_API_READ_URL=your_read_url
NEXT_PUBLIC_WEBINY_API_MANAGE_URL=your_manage_url
From above:
NEXT_PUBLIC_WEBINY_API_READ_URL env variable.NEXT_PUBLIC_WEBINY_API_MANAGE_URL env variable.Next.js needs to communicate with Webiny using the API access token we have ready as an env variable. Because Next.js uses Server-Side Rendering (SSR), we can interact with an API directly using Next.js on the server and avoid exposing our token to the browser, which would be a security risk.
To establish this server connection, head over to the pages folder and create a lib directory. In the lib directory, create an api.js file. We will define the functionalities of communicating to the Webiny Headless CMS. We will start by defining a function for sending requests to the CMS as follows:
async function fetchAPI(query, { variables } = {},read ) {
   const url = read ? process.env.NEXT_PUBLIC_WEBINY_API_READ_URL : process.env.NEXT_PUBLIC_WEBINY_API_MANAGE_URL;
   const res = await fetch(url, {
    method: 'POST',
    headers: {
     'Content-Type': 'application/json',
     'Authorization': `Bearer ${process.env.WEBINY_API_SECRET}`
    },
    body: JSON.stringify({
     query,
     variables,
    }),
   });
   const json = await res.json()
   if (json.errors) {
    throw new Error('Failed to fetch API')
   }
   return json.data
}
The above function receives three parameters the query or mutation object, variables, and read. The read parameter will define the URL to be used. The variables will be sent for API mutation requests.
In case of any errors, the function will throw an exception; else, it will return the data fetched.
Let's create a basic navigation component. In the project folder, create a components folder. In the components folder, create a Navbar folder and add two files: Navbar.js, and navbar.module.css. In the navbar.module.css file, add the following navbar styles:
.navbar {
   width: 100%;
   display: flex;
   justify-content: left;
   padding: 20px;
   border-bottom: 1px solid #f4f4f4;
   margin-bottom: 20px;
}

.navHeading{
   font-weight: bold;
   text-transform: uppercase;
}
In the Navbar.js file, add the following basic Next.js navigation:
import React from 'react';
import styles from './navbar.module.css';

export default function Navbar() {
  return (
   <nav className={styles.navbar}>
    <h4 className={styles.navHeading}>
     Notes App
    </h4>
   </nav>
  )
}
To display the Notes, we will create a card component that Next.js will use to display and manage the Notes. Create a NoteCard folder inside the components folder. In the NoteCard directory, create two files: Notecard.js, and notecard.module.css. Then create your card as follows:
In the notecard.module.css, add the following card styling:
.card {
   padding:10px;
   border: 1px solid #f4f4f4;
   width: 80%;
   margin:0px auto 20px auto ;
   display: flex;
   justify-content: space-between;
}

.card h4{
   font-weight: bold;
   font-family: 'Segoe UI', Tahoma, Geneva, Verdana, sans-serif;
}

.card p {
   font-size: 14px;
   font-family: 'Segoe UI', Tahoma, Geneva, Verdana, sans-serif;
}
Then create a Note Card inside the Notecard.js file as follows:
import React from 'react';
import styles from './notecard.module.css';

export default function NoteCard({cardData,handleDeleteNote}) {
  return (
   <div className={styles.card}>

    <div className={styles.cardDetails}>
     <h4>{cardData.title}</h4>
     <p>{cardData.description}</p>
    </div>

   </div>
  )
}
The card is ready to receive some data and display Notes. Let’s go ahead and get this data from Webiny and show it to a Next.js page.
In the lib/api.js file, add a function to fetch all notes as follows:
export async function getAllNotesForHome() {
   const data = await fetchAPI(
     `query Notes {
      listNotes {
       data {
        id
        title
        description
       }
      }
     }
    `,
    {},
    true
   );
   return data.listNotes.data
}
To display the Notes, head over to the pages/index.js file and do the following:
import {useState} from 'react';
import {getAllNotesForHome} from './lib/api';
import Navbar from '../components/Navbar/Navbar';
import NoteCard from '../components/NoteCard/NoteCard';
getServerSideProps().getServerSideProps() allow your page to fetch external data at page build time. This way, you can export a props function that fetches and returns the data, which will then be passed as props to the NoteCard component as follows:
export async function getServerSideProps() {
   const allNotes = await getAllNotesForHome();
   return {
     props: { allNotes },
   }
}
Home FunctionWe will also add a notes state for allNotes. Then render the NoteCard component with the data that maps to the allNotes props.
export default function Home({allNotes}) {
   const [notes,setNotes] = useState(allNotes);
   return (
     <>
     <Head>
     <title>Notes App</title>
     <meta name="description" content="Notes App" />
     <link rel="icon" href="/favicon.ico" />
     </Head>
     <Navbar />
     <div className={styles.main}>
     {

       notes.length > 0 ? (
         notes.map((note,index) => (
           <div key={index}>
           <NoteCard cardData={note}/>
           </div>
         ))
         ) : (
         <p>You do not have any notes saved...</p>
       )
     }
     </div>
     </>
   )
}
To format the page, go ahead and update the style for the main class in the styles/Home.module.css file as such:
.main {
  width: 50%;
  margin: 0px auto;
}
To test everything is working, start your development server (if the Next.js app is not already up and running) and run the following command from a terminal that points to the Next.js app directory:
npm run dev
Open http://localhost:3000 from your browser. Your UI should resemble the following:

This displays the Note record we added earlier when interacting with the Webiny Note model.
Likewise, Next.js should be able to add new note records to your API. Head over to the /lib/api.js file, and create a function for adding notes as such:
export async function addNote(data){
  const response = await fetchAPI(`
   mutation createNote($title:String!,$description:String!){
    createNotes(data:{title:$title,description:$description}){
     data {
      id
      title
      description
      createdOn
     }
    }
   }
  `,{
   variables:{
    'title':data.title,
    'description':data.description
   }
  },false);
  return response.createNotes.data;
}
Also, we will need a function for publishing these notes to the server:
export async function publishNote(data){
  const response = await fetchAPI(`
   mutation publishNote($id:ID!){
    publishNotes(revision:$id){
     data {
      id
      title
      description
     }
    }
   }
  `,{
   variables:{
    id:data.id
   }
  },false);
  return response.publishNotes.data;
}
Create a component that will render a Next.js UI to add notes. Inside the components folder, create an AddNote folder. Inside the AddNote folder, add two files: AddNote.js, and addnote.module.css, and create the component as follows.
Add some styling to the addnote.module.css:
.container {
   width: 80%;
   margin: 0px auto 10px auto;
}

.form {
   display: block;
   width: 100%;
   padding: 0px;
   margin:0px;
}

.formGroup label {
   font-weight: bold;
}

.formGroup input[type="text"]{
   margin-top: 5px;
   border: 1px solid #f4f4f4;
   padding:10px;
   margin-right: 5px;
   width: 100%;
   margin-bottom: 10px;
}

.formGroup textarea {
   margin-top: 5px;
   border: 1px solid #f4f4f4;
   padding:10px;
   margin-right: 5px;
   width: 100%;
   margin-bottom: 10px;
}

.formGroup button {
   display: inline-block;
   padding: 10px;
   border: 1px solid #f4f4f4;
   width: 100%;
   text-align: center;
}

.error {
   margin:5px 0px 10px 0px;
   border: 1px solid #f4f4f4;
   padding: 10px;
   width: 100%;
   color: red;
   text-align: center;
}

.message {
   margin:5px 0px 10px 0px;
   border: 1px solid #f4f4f4;
   padding: 10px;
   width: 100%;
   color: green;
   text-align: center;
}
Then create the components inside the AddNote.js file by adding the following:
import React,{useState} from 'react'
import styles from './addnote.module.css';
import {addNote,publishNote} from '../../lib/api';

function AddNote(props) {

   const [title,setTitle] = useState('');
   const [description,setDescription] = useState('');
   const [error,setError] = useState('');
   const [message,setMessage] = useState('');

   const onSubmit = async (e) => {
     e.preventDefault();

     // reset error and message.
     setError('');
     setMessage('');

     if(title){
       if(description) {
         let response = await addNote({ // add the note.
           title,
           description
         });

         response = await publishNote({ // publish the note.
           id:response.id
         });

         if(response) {
           // reset the fields
           setTitle('');
           setDescription('');
           setMessage("Note added successfully.");
           // append the note.
           props.addNote(response);
           // reset the show add note.
           props.resetShowAddNote();
         }


       } else {
         setError("Description is required");
       }
     } else {
       setError('Title is required');
     }
   }


   return (
     <div className={styles.container}>
       <form className={styles.form} onSubmit={onSubmit}>
         {
           error ? (
             <div className={styles.error}>
               {error}
             </div>
           ) : null
         }

         {
           message ? (
             <div className={styles.message}>
               {message}
             </div>
           ) : null
         }

         <div className={styles.formGroup}>
           <label htmlFor="title">Title</label>
           <input type="text" value={title} name="title" id="title" placeholder='Title' onChange={ (e) => setTitle(e.target.value) } />
         </div>
         <div className={styles.formGroup}>
           <label htmlFor="description">Description</label>
           <textarea name="description" value={description} rows="4" placeholder='Describe it here...' onChange={ (e) => setDescription(e.target.value)} />
         </div>
         <div className={styles.formGroup}>
           <button type="submit">Submit</button>
         </div>
       </form>
     </div>
   )
}

export default AddNote
To consume this component, head over to the pages/index.js file:
import AddNote from '../components/AddNote/AddNote';
const [showAddNote,toggleShowAddNote] = useState(false);
const addNote = (note) => setNotes([...notes,note]);
const resetShowAddNote = () => toggleShowAddNote(!showAddNote);
<div className={styles.main}>
  <div className={styles.addNote}>
   <button onClick={resetShowAddNote}>
    {
     showAddNote ? "Back to Notes" : "Add a Note"
    }
   </button>
  </div>
  {
   showAddNote ? (
    <AddNote addNote={addNote} resetShowAddNote={resetShowAddNote}/>
   ) : (
    notes.length > 0 ? (
     notes.map((note,index) => (
       <div key={index}>
        <NoteCard cardData={note}/>
       </div>
      ))
     ) : (
      <p>You do not have any notes saved...</p>
     )

   )
  }
</div>
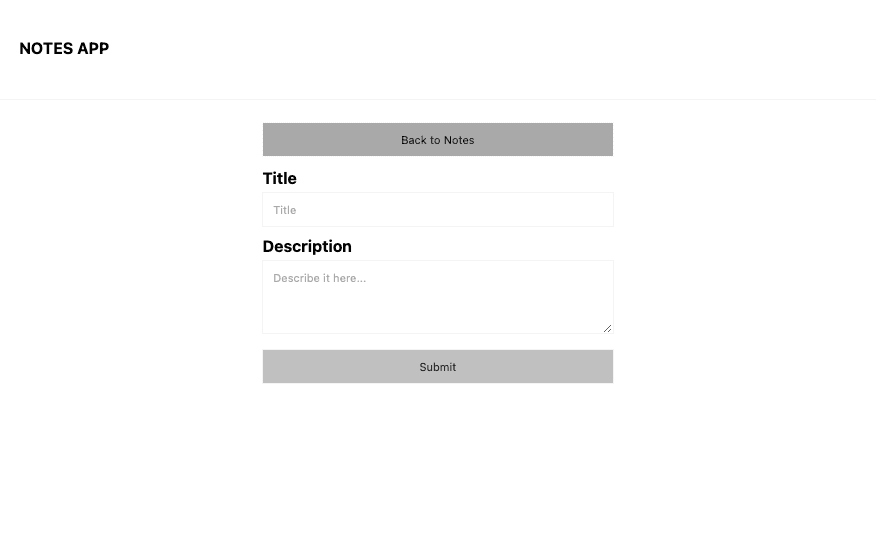
Ensure that your development server is up and running, and then visit the homepage (http://localhost:3000). Click the "Add a Note" button, fill in the resulting form with note details, and then click Submit.
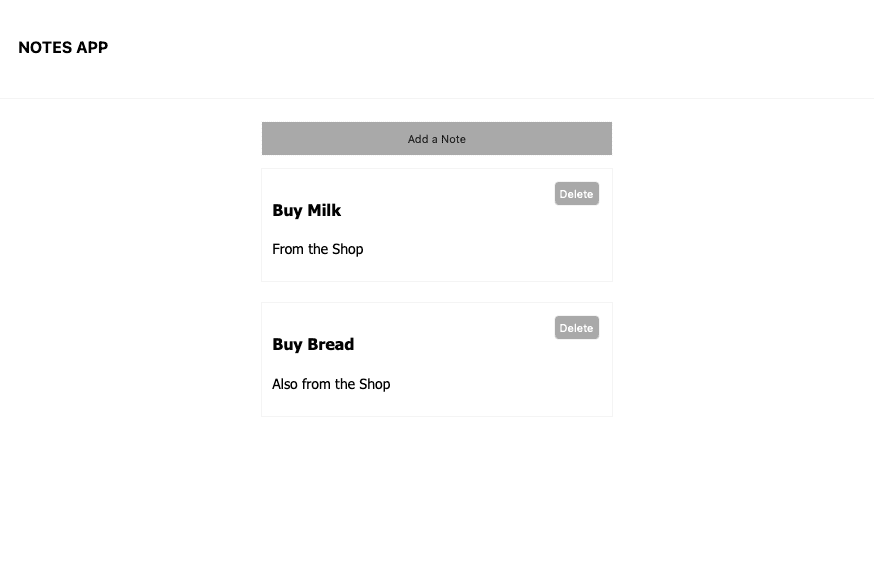
Once you have added a note, you will be redirected back to the notes section with the recently added notes:
To manage the notes, let's create a component that will allow you to delete a note.
First, go to the lib/api.js file, and create a function for deleting a note as follows:
export async function deleteNote(data){
  const response = await fetchAPI(`
   mutation publishNote($id:ID!){
    deleteNotes(revision:$id){
     data
    }
   }
  `,{
   variables:{
    id:data.id
   }
  },false);
  return response.deleteNotes.data;
}
Then in the pages/index.js file:
import {deleteNote} from './lib/api';
deleteNote Handler Function:const handleDeleteNote = (id) => {
let result = deleteNote({id}); // delete the note.
if(result){
setNotes( notes.filter((note) => note.id !== id)); // filter the deleted note
} else {
throw new Error(result.error)
}
}
<NoteCard cardData={note} handleDeleteNote={handleDeleteNote} />
Since the handleDeleteNote is executed inside the NoteCard component, we need to receive this prop. Navigate to the NoteCard component:
function NoteCard({cardData,handleDeleteNote})
<div className={styles.cardActions}>
   <button onClick={ () => handleDeleteNote(cardData.id)}>Delete</button>
</div>
Finally, add the following styles to the notecard.module.css to format the for the delete button:
.cardActions button{
   display: inline-block;
   border: 1px solid #f4f4f4;
   padding: 5px;
   background-color: darkgray;
   border-radius: 5px;
   color: #fff;
}
Ensure that the development server is still running. From the home page, each note will have a delete button. Click on it, and the note will get deleted from your server.
This guide helped you create a notes application using Webiny Headless CMS as your data source. This gives your applications content control, access control, site reliability and decoupled engineering.
Full source code: https://github.com/webiny/write-with-webiny/tree/main/tutorials/notes-app-with-nextjs
This article was written by a contributor to the Write with Webiny program. Would you like to write a technical article like this and get paid to do so? Check out the Write with Webiny GitHub repo.