Learn Webiny Next.js App
In this lesson, you'll build a real Next.js application that fetches and displays products from your Webiny Headless CMS.
In this lesson...
Here are the topics we'll cover
Understand the three Headless CMS GraphQL APIs.
Create and secure API keys.
Initialize the SDK for the next lessons.
What you'll build:
The project scaffold for the Learn Webiny Next.js app: environment setup, an API key, TypeScript types, and an initialized SDK instance ready to use in the following lessons.
Prerequisites:
- Completed Lessons 1-4 (content models and entries)
- At least 2-3 published products in your Webiny CMS
- Node.js 20.9+ and npm/yarn installed
- Basic understanding of React and Next.js
Introduction
So far, you've learned how to create content models and add entries to Webiny. Now it's time to connect an actual application to your CMS.
In this lesson, we'll set up a Next.js project and wire it up to Webiny using the Webiny SDK (@webiny/sdk) — a TypeScript library that gives you a clean, type-safe interface to the Webiny APIs without writing raw GraphQL.
This lesson focuses purely on project setup: cloning the starter, creating an API key, configuring credentials, and initializing the SDK. The next two lessons will put the SDK to work — reading products and writing contact form submissions.
This lesson establishes the foundation for the next lessons where we'll add a contact form, implement lifecycle events, and more!
We'll be building on this same Next.js application throughout the remaining lessons, so each lesson adds new functionality to the same codebase.
Project Setup
First, let's set up the Next.js project.
Step 1: Clone the Starter Repository
For this tutorial, we'll use a basic Next.js starter repository that's been set up with TypeScript and Tailwind CSS:
Clone the repository and install dependencies:
Step 2: Explore the Project Structure
The starter project has a basic Next.js 16 setup with TypeScript and Tailwind CSS:
Step 3: Run the Development Server
Start the dev server to confirm everything works:
Open http://localhost:3000 in your browser. You should see a simple page with "Our Products" heading - that's your starting point!
Keep the dev server running while you work. It will auto-reload when you make changes.
Finding Your API Endpoint
Before we can connect to Webiny, we need to find the API endpoint URL.
Open a terminal in your Webiny project directory (not the Next.js app) and run:
You'll see output similar to this:
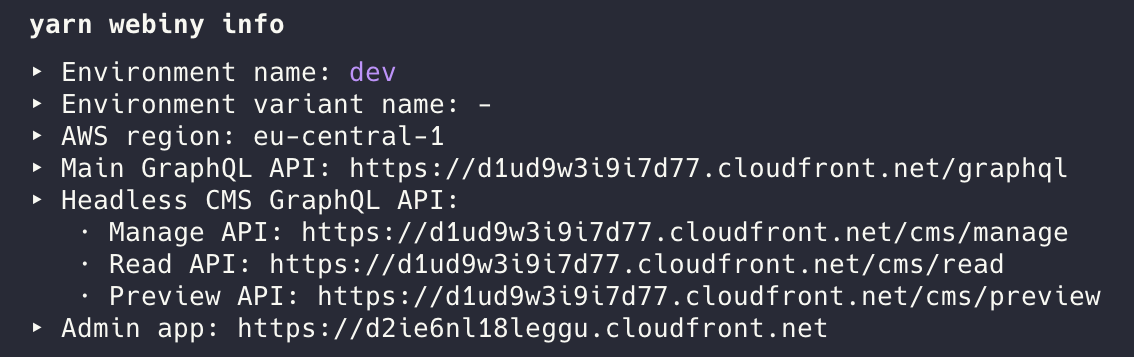
Look for the Headless CMS - Read API URL in the output. It will look something like:
We need the base URL part (the domain). In this example, it would be:
https://d1ud9w3i9i7d77.cloudfront.net
Copy this URL - you'll need it in the next step.
The Read API only returns published content, which is perfect for a public product listing page.
Headless CMS Permissions and GraphQL APIs
Before creating an API key, it's worth understanding what permissions you're actually granting. Webiny's Headless CMS exposes three separate GraphQL APIs, each with a distinct purpose:
| API | Returns | Supports writes? | Typical use case |
|---|---|---|---|
| Read | Published entries only | No | Public websites and apps |
| Preview | Latest revision (draft or published) | No | Preview modes, staging |
| Manage | All entries and all revisions | Yes | Admin UIs, form submissions |
When you create an API key, you select which of these APIs the key can access. The principle of least privilege applies: only grant what you actually need.
- Reading data (e.g. product listings) → enable Read only
- Previewing drafts → enable Read + Preview
- Writing data (e.g. contact form submissions) → enable Manage (Read is still needed for reading)
In this lesson we'll start with Read only, since we're just displaying published products. In the Writing Data lesson we'll expand the key to also include Manage.
Advanced permissions — restricting a key to specific content models or specific operations — require Webiny's Advanced Access Control Layer (AACL), available on Business tier and above. With the open-source version, granting Read or Manage access applies to all content models.
Creating an API Key
Now let's create an API key that allows the Next.js app to access your Webiny CMS.
Step 1: Navigate to API Keys
- Open the Webiny Admin in your browser
- Click Settings in the left sidebar
- Click API Keys
Step 2: Create a New API Key
Click the New API Key button in the top right.
Step 3: Configure the API Key
Fill in the following details:
- Name:
Next.js App - Description:
API access for Next.js application - Permissions: Click on Headless CMS to expand the section
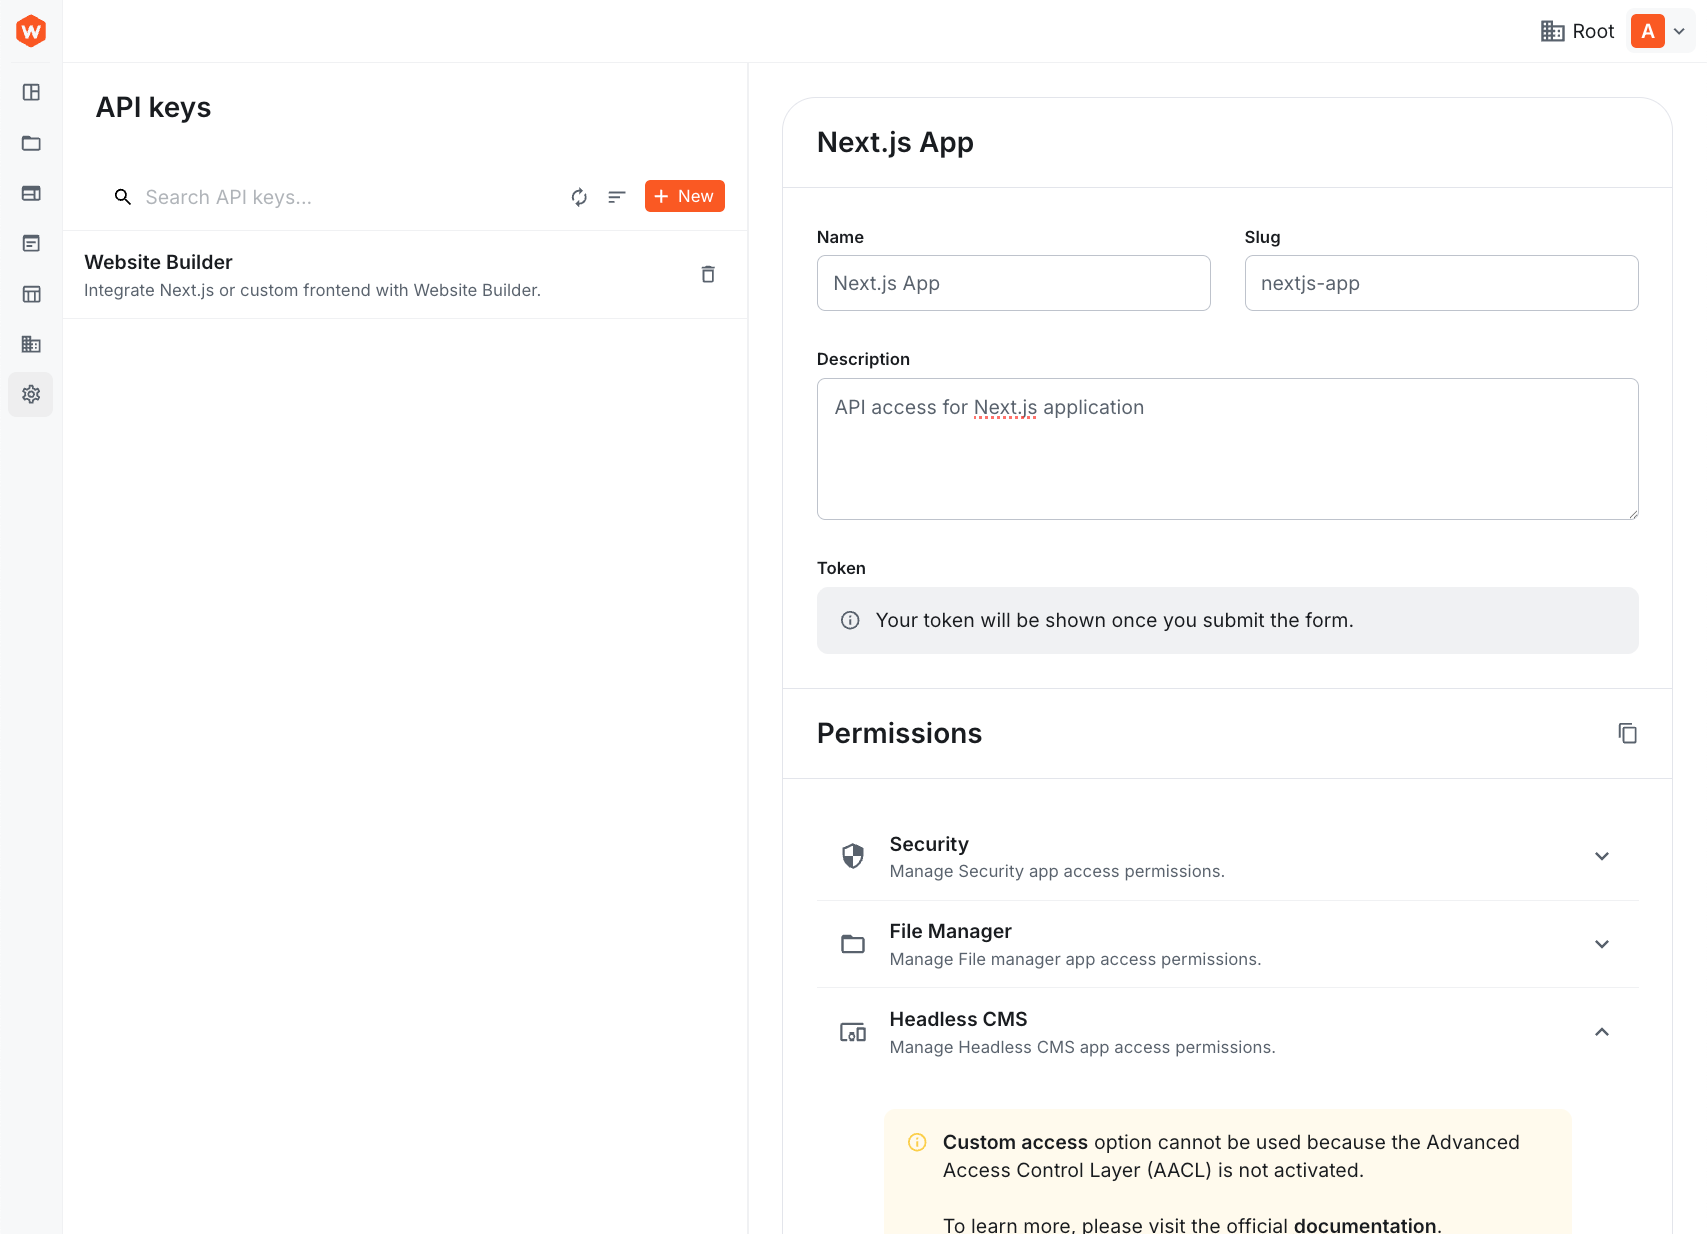
Step 4: Set Permissions
Configure the permissions as follows:
- Access Level: Select Custom access
- GraphQL API Types:
- ✅ Read (checked)
- ❌ Preview (unchecked)
- ❌ Manage (unchecked)
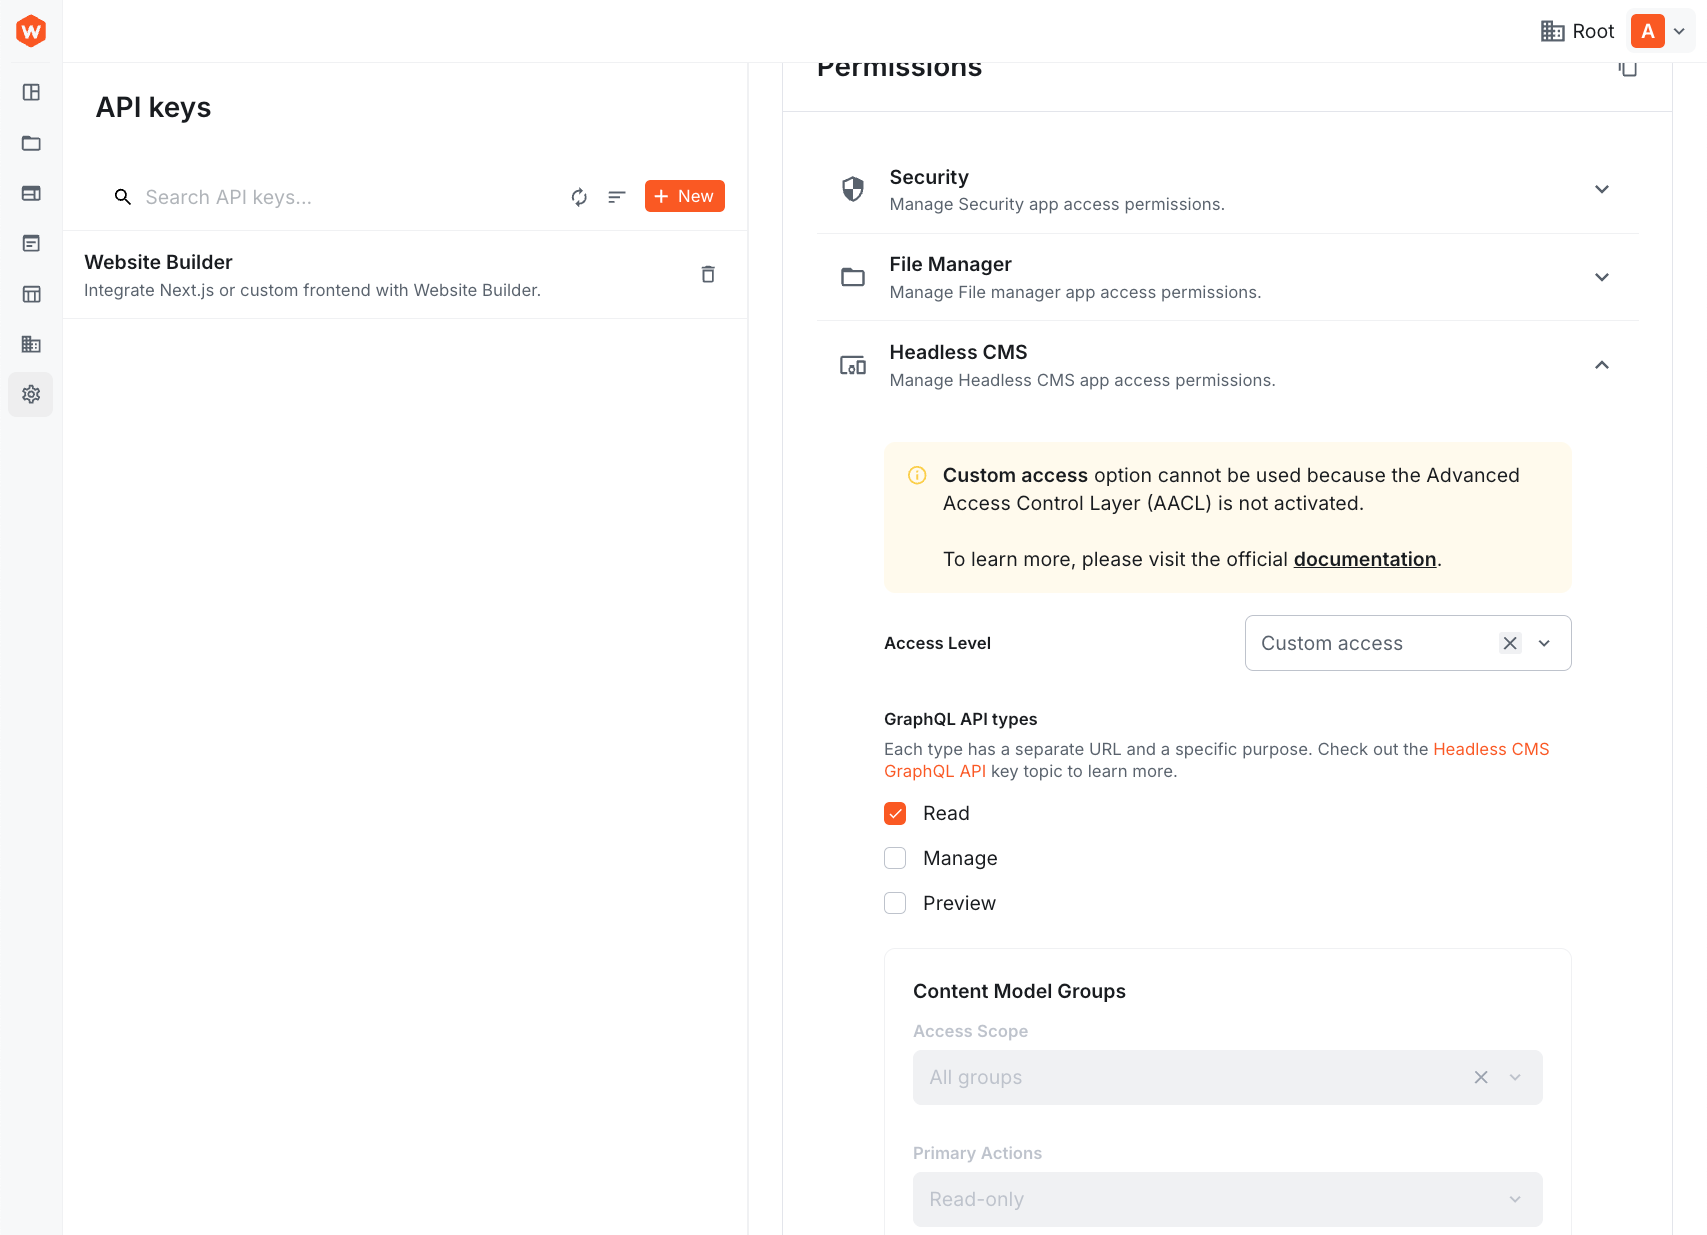
We're giving the API key access to only the Read API because that's all we need for displaying published products. This follows the principle of least privilege - only grant the permissions you actually need. In the next lesson, we'll expand this API key's permissions to include the Manage API for writing data.
Note: Advanced permissions like "Content Model Groups", "Content Models", and "Primary Actions" are only available with the Advanced Access Control Layer (AACL), which requires a Business plan or higher. With the open-source version of Webiny, selecting "Read" API access gives full read access to all content.
Step 5: Save and Copy the Token
- Click Save API Key
- The form will be saved and your API Token will be displayed in the Token field
- Copy the token by clicking the copy icon - you'll need it in the next step!

Keep your API token secure! Anyone with this token can access your Webiny CMS data according to the permissions you've set.
Setting Up Environment Variables
Now let's store the API URL and token securely.
Step 1: Create .env.local
In your Next.js project (not the Webiny project), create a new file called .env.local in the root directory:
Replace:
your-api-token-herewith the token you copied in the previous stephttps://your-url.cloudfront.netwith your actual API endpoint URL
The WEBINY_API_TENANT variable is commented out because we're using the default single-tenant
setup. If you're working with a multi-tenant Webiny instance, uncomment this line and set it to
your tenant ID.
Step 2: Restart the Dev Server
Environment variables are only loaded when the dev server starts, so you need to restart it:
- Stop the dev server (Ctrl+C or Cmd+C)
- Start it again:
npm run dev
Never commit .env.local to version control! It's already included in .gitignore by default,
but always double-check before committing. API tokens should remain secret.
Creating the API Client
Now let's create a reusable API client for communicating with Webiny. We'll use the Webiny SDK which makes interacting with the CMS much simpler than writing raw fetch requests.
Create a new file lib/webiny.ts:
Let's break down what this code does:
- Environment Variables: Loads the API endpoint, token, and tenant.
- SDK Initialization: We initialize
Sdkwith thetoken,endpoint, andtenant. - Exports: We export both the SDK instance and the
CmsEntryDatatype for use throughout the application.
The SDK handles all the complexity of GraphQL queries, authentication headers, and error parsing for you!
Summary
In this lesson, you set up the Next.js project and connected it to Webiny:
- ✅ Cloned the starter repository and installed dependencies including
@webiny/sdk - ✅ Found your Webiny API endpoint using
yarn webiny info - ✅ Created an API key in Webiny Admin with Read permissions
- ✅ Stored credentials securely in
.env.local - ✅ Initialized the Webiny SDK in
lib/webiny.ts
What's Next?
In the next lesson, we'll use the SDK to fetch products from Webiny and display them on the page using Static Site Generation.
Next lesson: Reading Data - Fetch and display products from Webiny using the SDK and SSG.