Page Builder > Essentials
Create Page
Learn how to create a page in Page Builder.
- how to create a page using Page Builder
Webiny’s Page Builder incorporates a drag-and-drop visual editor that allows you to easily create and edit web pages without requiring any coding skills.
In this tutorial, we will learn how to create a page using the Page Builder. As an example, we will create a page with the section shown in the image below:
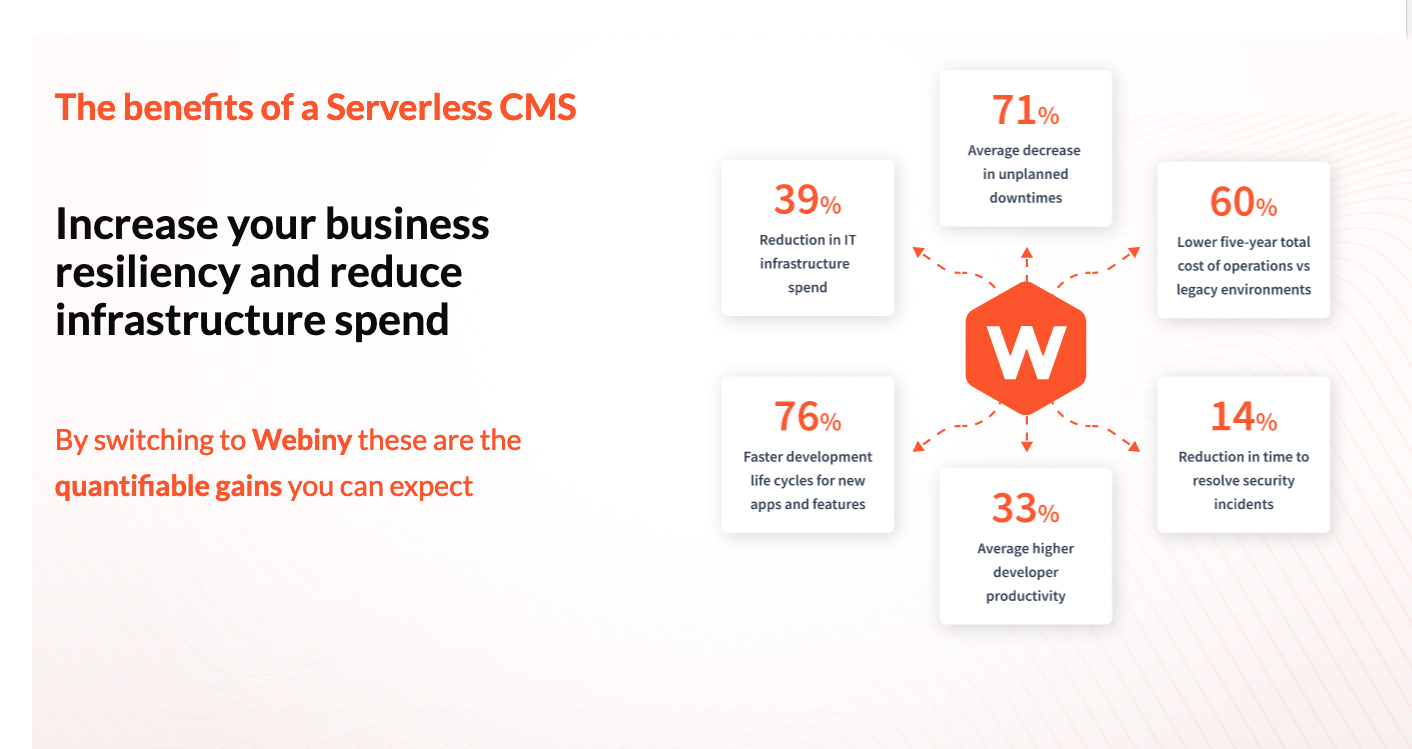 Create Page
We will do this in 6 steps:
- Step 1: Add a new page
- Step 2: Add and edit a new block
- Step 3: Add a heading
- Step 4: Add an image
- Step 5: Review settings
- Step 6: Preview and publish
Step 1: Add a New Page
From the Side Menu, click Page Builder > PAGES > Pages.
✔️ The Pages screen opens.
Click + NEW PAGE.
✔️ The screen to select a template for the page opens.
Click USE A BLANK PAGE TEMPLATE.
✔️ Page editor screen opens.
To rename the page, click the page’s title Untitled.
✔️ A textbox appears.
In the textbox, update the text from Untitled to The benefits of a Serverless CMS.
Click anywhere outside the textbox.
✔️ The message “Page title updated successfully!” displays.
Note: This page title does not need to be same as the title that you want to be listed in search engine rankings. The purpose of this title is for internal content organization.
Step 2: Add and Edit a New Block
Click the ADD BLOCK button ( ➕ ) at the bottom-right corner of the page editor.
✔️ The All blocks screen opens.
Hover on the EMPTY BLOCK.
Click + CLICK TO ADD.
✔️ The page editor screen opens with the newly added block.
Note: Blocks are the building blocks of a page. A page may be built with multiple blocks. A block can contain elements like heading, paragraph, grid, etc. A grid is made of one or more cells. And, the elements like heading and paragraph can also be placed inside cells.
Hover on and click the grid inside the empty block.
✔️ Properties of the grid display in STYLE tab.
In the STYLE tab of the grid element, click Width.
✔️ The Width accordion opens.
a. In the Width value textbox, update the text from 1100 to 100.
b. In the Width unit dropdown, click %.
Note: This will make the grid occupy 100% width of its parent element - the block.
In the STYLE tab of the grid element, click Grid Size.
✔️ The Grid Size accordion opens.
a. In the layout options, click the two-column-layout.
b. Update the value of Cell 1 from 6 to 5.
c. Update the value of Cell 2 from 6 to 7.
Note: The cells are in order from the left to the right i.e. Cell 1, Cell 2, Cell 3, and so on.
Hover on and click the block element.
✔️ Properties of the block display in STYLE tab.
In the STYLE tab of the block element, click Background.
✔️ The Background accordion opens.
a. Click the Image selector.
✔️ The media manager screen opens.
b. Click UPLOAD.
✔️ The file explorer screen opens.
c. From the file explorer, upload the following image:
 Background Image(click to enlarge)
d. Click the uploaded image in the media manager.
✔️ The page editor screen opens with the image added to the page as the block’s background.
e. In the Scaling dropdown, click Cover.
f. In the Position dropdown, click Top.
In the STYLE tab of the block element, click Height.
✔️ The Height accordion opens.
a. In the Height value textbox, update the text to 100.
b. In the Height unit dropdown, click vh.
Step 3: Add a Heading
Click the ADD ELEMENT icon ( ➕ ) at the top-left corner of the page editor.
✔️ The elements menu opens.
Click Basic.
✔️ The Basic elements accordion opens.
Hover on the HEADING element.
Drag and drop the HEADING element inside Cell 1.
Double click the Heading element to edit it.
Update the text from Heading to The benefits of a Serverless CMS.
Select the whole text by pressing Ctrl + A (or with the mouse).
In the text formatting menu that appears above the selected text:
a. Click the Bold icon ( B ).
b. In the Heading Type dropdown, click Heading 1.
c. In the Font Size dropdown, click 30 px.
d. In the Font Color dropdowwn, click the Orange color.
In the STYLE tab of the heading element, click Margin.
✔️ The Margin accordion opens.
a. Click the LINK ALL SIDES icon ( 🔗 ) to make it inactive.
b. Update the margin-bottom value from 0px to 60px.
Now, following the Steps 1 to 9, add the following two texts in order below the The benefits of a Serverless CMS text inside Cell 1 with the mentioned properties:
Text Formatting Color Heading Type Font Size Margin Increase your business
resiliency and reduce
infrastructure spendBold Black Heading 2 36 px Bottom - 40px By switching to Webiny these are the
quantifiable gains you can expect:Normal + Bold (specified) Orange Heading 3 24 px Bottom - 60px
Step 4: Add an Image
From the Basic elements menu, drag and drop the IMAGE element inside Cell 2.
✔️ The media manager screen opens.
Click UPLOAD.
✔️ The file explorer screen opens.
From the file explorer, upload the following image:
 Hero Image(click to enlarge)
Click the uploaded image in the media manager.
✔️ The page editor screen opens with the image added to the page.
In the STYLE tab of the image element, click Image.
✔️ The Image accordion opens.
a. In the Width value textbox, type 80
b. In the Width unit dropdown, click %.
In the STYLE tab of the image element, click Horizontal align.
✔️ The Horizontal align accordion opens.
a. Click the ALIGN RIGHT icon ( Align right icon required ).
Step 5: Review Settings
Click the SETTINGS icon ( ⚙️ ).
✔️ The General settings tab inside the Page Settings screen opens.
In the Path textbox, type /the-benefits-of-a-serverless-cms.
In the Snippet textbox, type Increase your business resiliency and reduce infrastructure spend.
Click SAVE SETTINGS.
✔️ The page editor screen opens with the message “Settings saved!“.
Step 6: Preview and Publish
Click the kebab menu icon ( ⁝ ) on the top right of the page.
✔️ Menu opens with the options Preview and Set as homepage.
Click Preview.
✔️ The page opens in new browser window.
To publish the page, click PUBLISH.
✔️ The Pages screen opens with the message “Your page was published successfully!“.
In the PAGE PREVIEW tab of the The benefits of a Serverless CMS page, click the kebab menu icon ( ⁝ ).
✔️ Menu opens with the options View and Set as homepage.
Click View.
✔️ The The benefits of a Serverless CMS page opens in a new tab.