Core Development Concepts > Extending and Customizing
How to Create a Package in a Webiny Project
Learn how to share code by creating a package in a Webiny project
- how to create a new package in a Webiny project
- how to organize files in a Webiny project
Overview
We often need to share code between multiple packages in our project.
Every Webiny project consists of packages and project applications, you can learn more about them in our key topics section.
Every Webiny project is organized as a monorepo. In this tutorial, you will learn how to organize and share code between multiple packages in a Webiny project. Let’s get started.
What We'll Build
In this tutorial, we’ll be building a package that contains a simple React component and see how we can share it between multiple packages. The same principles apply to Node.js packages you would use in your API.
Here is the file structure of the package we’re about to build:
Prerequisites
A Webiny Project
This tutorial assumes you have already created a new Webiny project to work on. We recommend reading our install Webiny tutorial which shows you how to do it.
Create a Package
In this step, we create a new React package.
The Yarn workspaces aim to make working with monorepos easy.
Learn more about workspaces here.
here.
The Workspaces List
Before we continue, let’s quickly cover the workspaces list, located in the package.json file in the project root.
The content of the package looks as shown below:
As you can see from the example above, you can define exact workspace paths, or provide a wildcard to mark each subfolder as a workspace.
In this tutorial, we use the latter.
Initialize the Package
Enough with the theory, let’s dive in and initialize the package.
First, create a folder called packages inside the root of your project where we add our custom package.
Packages are just regular NPM packages, or in other words, folders with their own package.json
Let’s create a folder called greeting inside packages.
Now that we’ve created our new folder, let’s initialize a new package in it.
For that, we need to create a package.json file inside that folder.
You can add it manually or use the following command inside the newly created folder:
Once we execute the above command, we will be presented with a couple of questions as shown below:
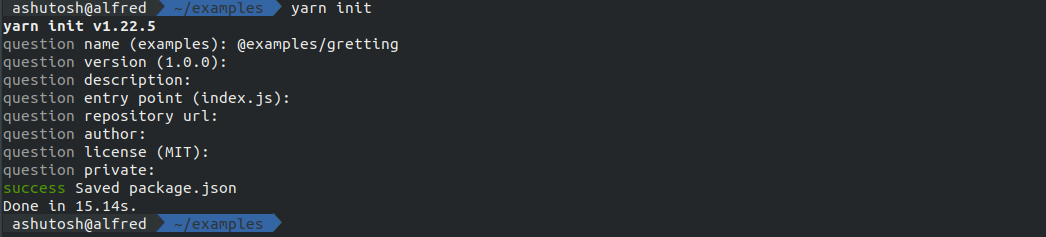 yarn init
You can also run yarn init -y to use sensible defaults.
Depending on your input, the generated package.json file’s content may look similar to the following:
The name property defined in the package’s package.json will be used to later import it.
Create the Package Content
Now that we’ve initialized a new package, let’s start by adding a couple of files.
Source Code
First, we write the source code for our example React component.
For that, create a src folder inside packages/greeting and then add the index.tsx file inside it with the following code:
Here we’re creating a very simple React component. But, you can write whatever logic you need for your project.
Now that we have our desired code in place. We can move to the next step which is adding the required configuration files.
To build our package, we need to add the following configuration files:
Let’s create them one by one.
package.json
Let’s start with the package.json file.
First, we need to add the following devDependencies and dependencies as shown below:
You can find out the full example code used in this tutorial in our repo.
Let’s quickly discuss all of them:
dependencies
This field defines other packages (dependencies) we will use in the code.
In our case we need the following:
react: React is a JavaScript library for creating user interfaces.react-dom: Serves as the entry point to the DOM and server renderers for React.
devDependencies
This value is used to specify the packages that are only needed for local development and testing.
In our case we need the following:
@babel/cli: Babel command line.@babel/core: Babel compiler core.@babel/preset-env: Babel preset for each environment.@babel/preset-react: Babel preset for all React plugins.@babel/preset-typescript: Babel preset for TypeScript.@svgr/webpack: Webpack loader for SVGR.babel-plugin-named-asset-import: Babel plugin for import named exports from non JS/CSS assets.rimraf: A deep deletion module for Node.js (like rm -rf).typescript: TypeScript is a language for application-scale JavaScript.
After that, we add the following scripts inside the package.json file:
scripts
The “scripts” property of your package.json file supports a number of built-in scripts
and their preset life cycle events as well as arbitrary scripts.
In our case we need the following:
build:
it removes the content of the distfolder and compiles the source code viababeland runs thepostbuildcommand.watch:
it runs the babelcompiler inwatchmode, which means the latest changes will compile automatically as source file content changes.postbuild:
as the name suggests, it runs after the completion of the buildcommand. We use it to copy the meta files likepackage.json,README.mdinto thedistfolder and compile typescript code.
After adding script the package.json file look as shown below:
publishConfig
And finally, we add publishConfig which is a set of configuration values, usually used for package publishing purposes.
But, in our case, this is what enables us to import our newly created package from other packages in different project applications.
Webiny uses this to link your package in node_modules with the appropriate target folder, which will be dist once the package is built.
The proper linking of packages is established via the built-in link-workspaces command, defined in your root package.json file.
After adding publishConfig the package.json file look as shown below:
Learn more about publishConfig.
.babelrc.js
Now let’s take a look at the .babelrc.js file which is a configuration file for a tool called babel.
Babel is a JavaScript compiler. We need it because:
- we’re writing the
Reactcode inJSXsyntax which needs to be converted toJS - we’re also using the latest JavaScript features and syntax which are not supported in all browsers, and therefore, need to be converted
In the .babelrc.js we just export the .babel.react configuration file which is defined in the project root.
Every Webiny project comes with a .babel.react.js and .babel.node.js.
You don’t need to know all the configurations.
But, if you’re interested feel free to check the full configuration file.
tsconfig.build.json
Every Webiny project prioritizes TypeScript.
And it needs to be compiled and the tsconfig.build.json file corresponds to the configuration file of the TypeScript compiler (tsc) used when package is being built.
Webiny uses TypeScript (v4). Only in a few cases, like for example configuration files, you will encounter pure JavaScript.
Let’s take a look at the content of this file:
The tsconfig.build.json file specifies the root files and the compiler options required to compile the project.
Please check out the official docs to learn more about it.
tsconfig.json
This is a configuration file for Typescript compiler used by your IDE.
Let’s take a look at the content of this file:
Like the previous file, we’re just using the configuration defined in the
project root here.
README.md(Optional)
A README is a text file that introduces and explains a project. It contains information that is commonly required to understand what the project is about.
Preparing the Package for Usage
Now that we’ve created our package and added the required configuration files, it is time to use it. To do that we need to take the following steps:
installthe packagebuildthe package
Install the Package
Now that we have all the files in place, it is time to install and link the package. Run the following command from the root of your project:
Running this command will do two things:
- install the package dependencies.
- link the package.
The link step is performed by the link-workspaces script
which runs via the postinstall hook.
Build the Package
To use the package we need to build it first.
“And how do we do that?” you may ask, remember we added the build command under the scripts key inside the package.json file of the package.
Now it’s time we use it.
We can simply cd into the package folder which is packages/greeting and run:
And it will work just fine. But, as your project grows and you add more packages, it becomes a chore to run the same command across multiple packages.
Webiny CLI provides the workspaces run (or ws run for short) command that enables you to run a single command across multiple workspaces at once.
The common use case where this might be needed is local development, where you want to watch for code changes on multiple packages, and rebuild them accordingly.
For example, to establish a watch session across multiple packages, located in a specific folder, you can run the following command:
On the other hand, if you wanted to build all of the packages, again, located in a specific folder, you can run:
The ws run command executes the command in question for every workspace present in the folder.
In our case, packages/greeting.
Using the Package in Apps
After completing all these steps you can now simply import and use it as a regular npm package. You can import and use this newly created package in any application or any other package inside the same Webiny project.
Conclusion
Congratulations!
You’ve successfully created a new package in a Webiny project. Monorepo organization makes it possible to structure different logical pieces of your project as multiple packages.
You can also check out a similar code example in our repo.
If you have further questions, feel free to ask for additional help.