Core Development Concepts > CI/CD
Workflows
Get your CI/CD set up in no time with the built-in CI/CD scaffold
- how to set up a CI/CD workflow for your Webiny project
Get your CI/CD set up in no time with the built-in CI/CD scaffold.
Overview
In this guide, we combine all of the concepts we covered in previous Environments, Version Control, Managing Cloud Infrastructure Files, and Testing articles, in order to establish a complete CI/CD workflow. In case you missed those, we encourage you to check them out first.
Before we continue, please note there are no hard-rules when implementing your own CI/CD workflow. Certainly, there are some best practices, but do note that the workflow we’re about to outline here can be modified and adjusted to your needs.
If you’d like to learn more about the CI/CD practice in general and all of the different phases it consists of, check out the CI/CD key topic.
Release Cycles
Usually, teams deliver new features and fixes within release cycles .
.
In other words, in a single release cycle, depending on the priorities and available resources, a number of tasks is assigned to developers, which, ideally, should be completed before the upcoming release. When we say the word release, we’re referring to an event in which we’re rolling out all of the planned fixes and features to actual users.
Some teams have biweekly, some weekly, and some even daily release cycles.
Which schedule you choose again depends on available resources and also on the particular project requirements that are in front of you.
In the rest of this article, we don’t assume any particular release schedule to be followed. But, in case you’re just starting out, we recommend following the weekly release schedule. You can then adjust it along the way, if need be.
Branches and Environments
Long-Lived Branches and Environments
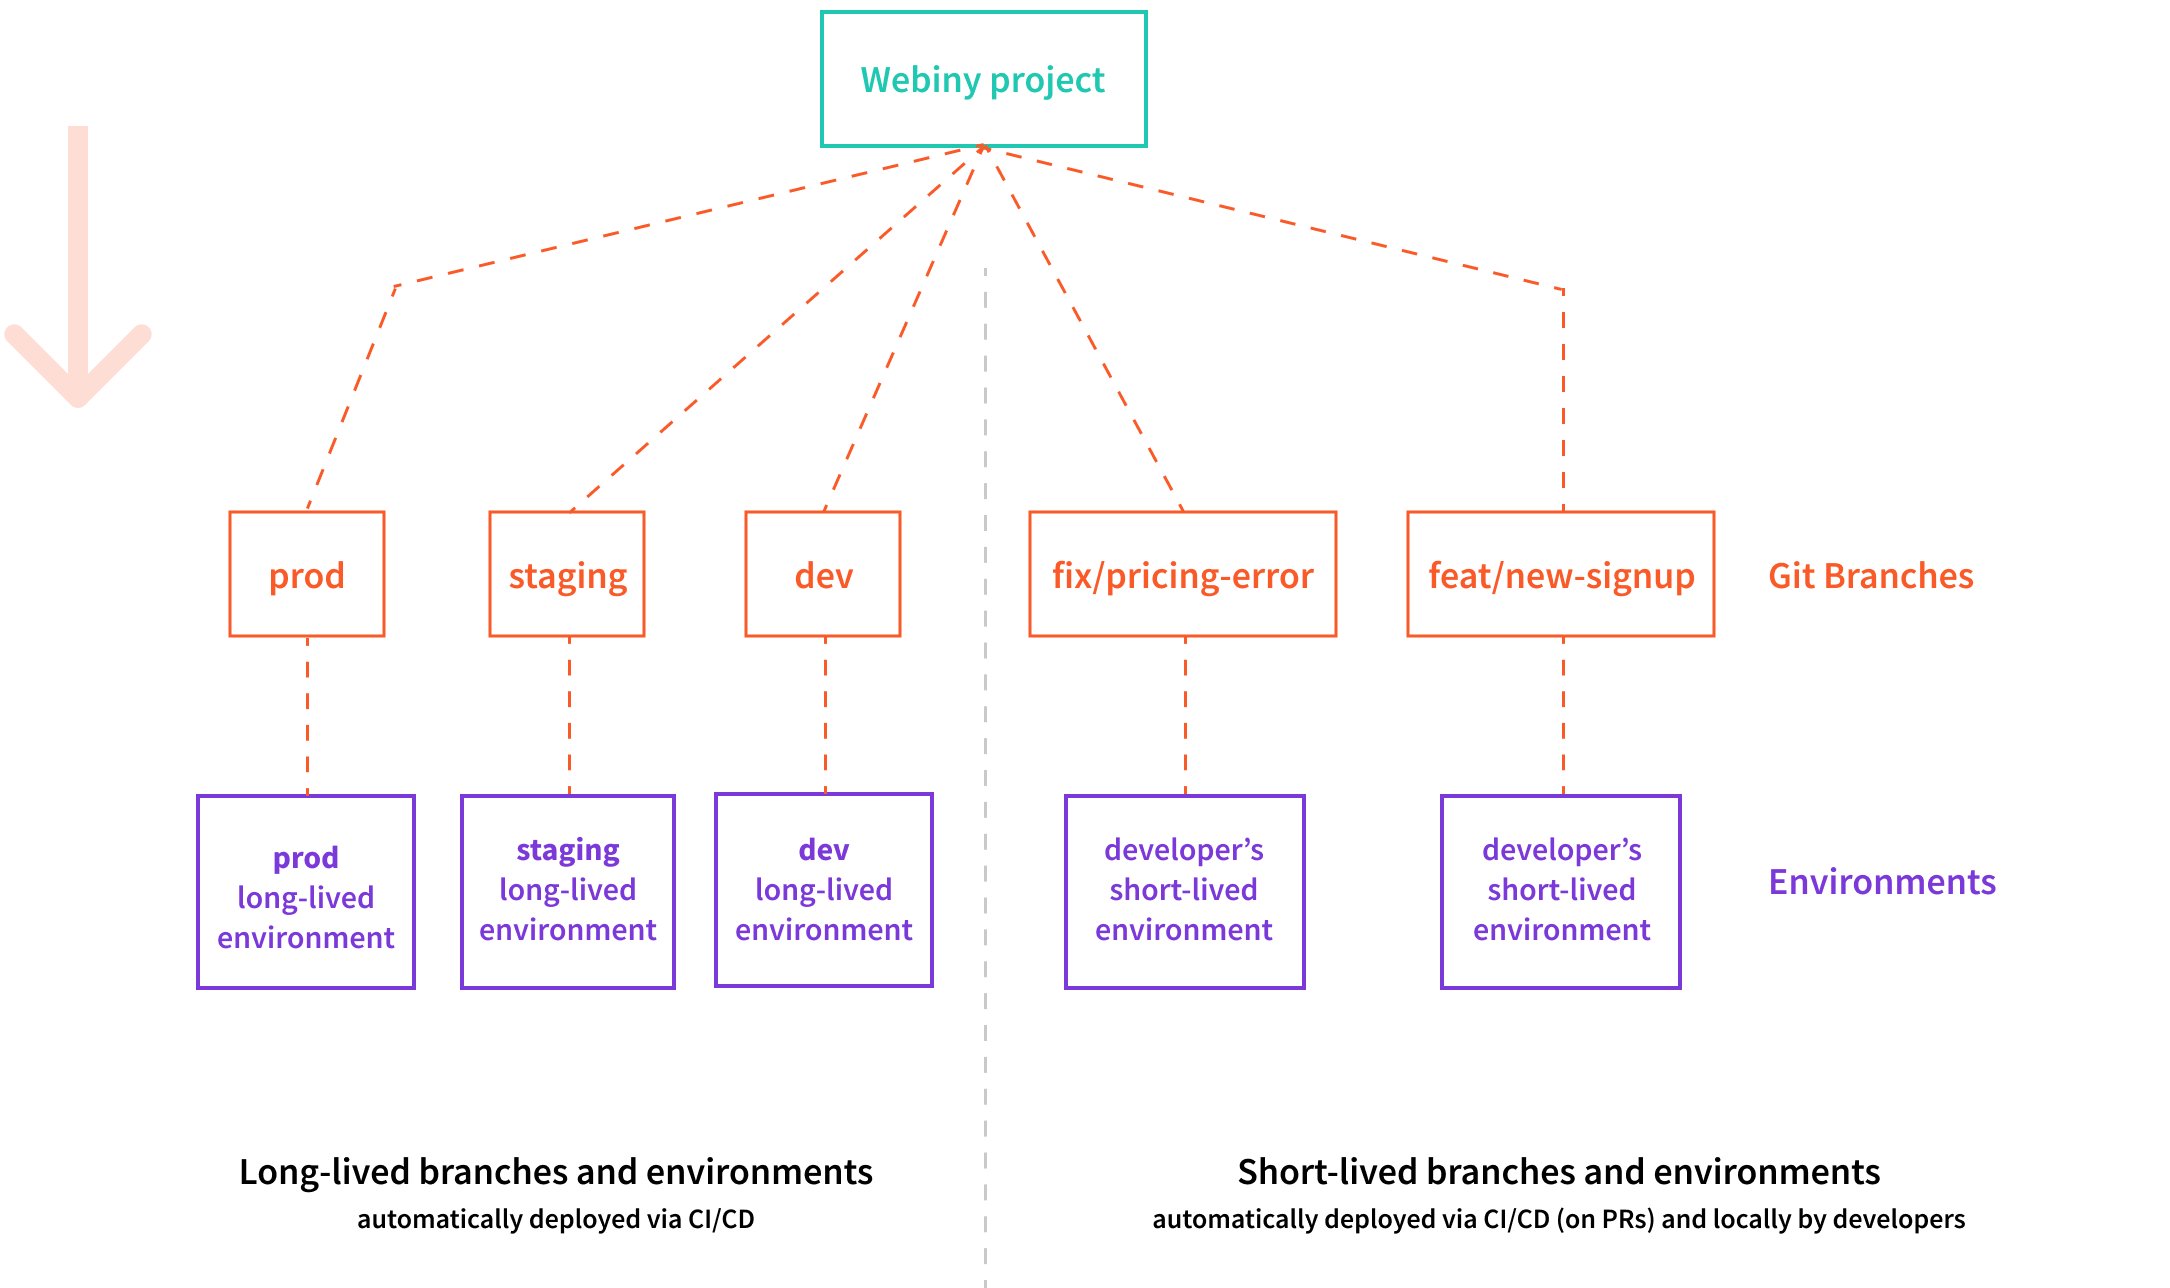
The workflow we’re about to show will consist of three long-lived Git branches and respective environments into which our Webiny project will be deployed: dev, staging, and prod. As mentioned in previous sections, these are used as follows:
dev- new fixes and features are first merged into this branch and deployed into this environmentstaging- for testing new release candidates in a production-like environmentproduction- the system used by real users, must be in a state that is considered stable, as much of the time as possible
Typically, every commit pushed into one of these long-lived branches should trigger automatically re-deployment into its respective long-lived environment.
The dev branch is usually what we select as the default branch of our project’s Git repository.
Short-Lived Branches and Environments
Development
For development and testing purposes, developers are also able to create their own short-lived branches and deploy the project into one or more short-lived and isolated environments. In practice, every new fix or a features starts with these two.
Pull Requests (PRs)
If we wanted to make our CI/CD even more robust, upon submitting pull requests (PRs), we could also dynamically create additional short-lived, or sometimes even called ephemeral, environments. These enable us to perform automated and even manual tests and ensure that no regressions have been introduced by the changes contained in the submitted PR - before merging the code changes into one of the long-lived branches.
Once a PR is closed, these environments are immediately destroyed.
Diagram
The following diagrams gives us an overview of the explained organization of Git branches and environments into which our project is deployed:
 Organization of Git Branches and Environments
With this overview, let’s continue by going step-by-step into how everything works together.
Merging / Deployment Strategies
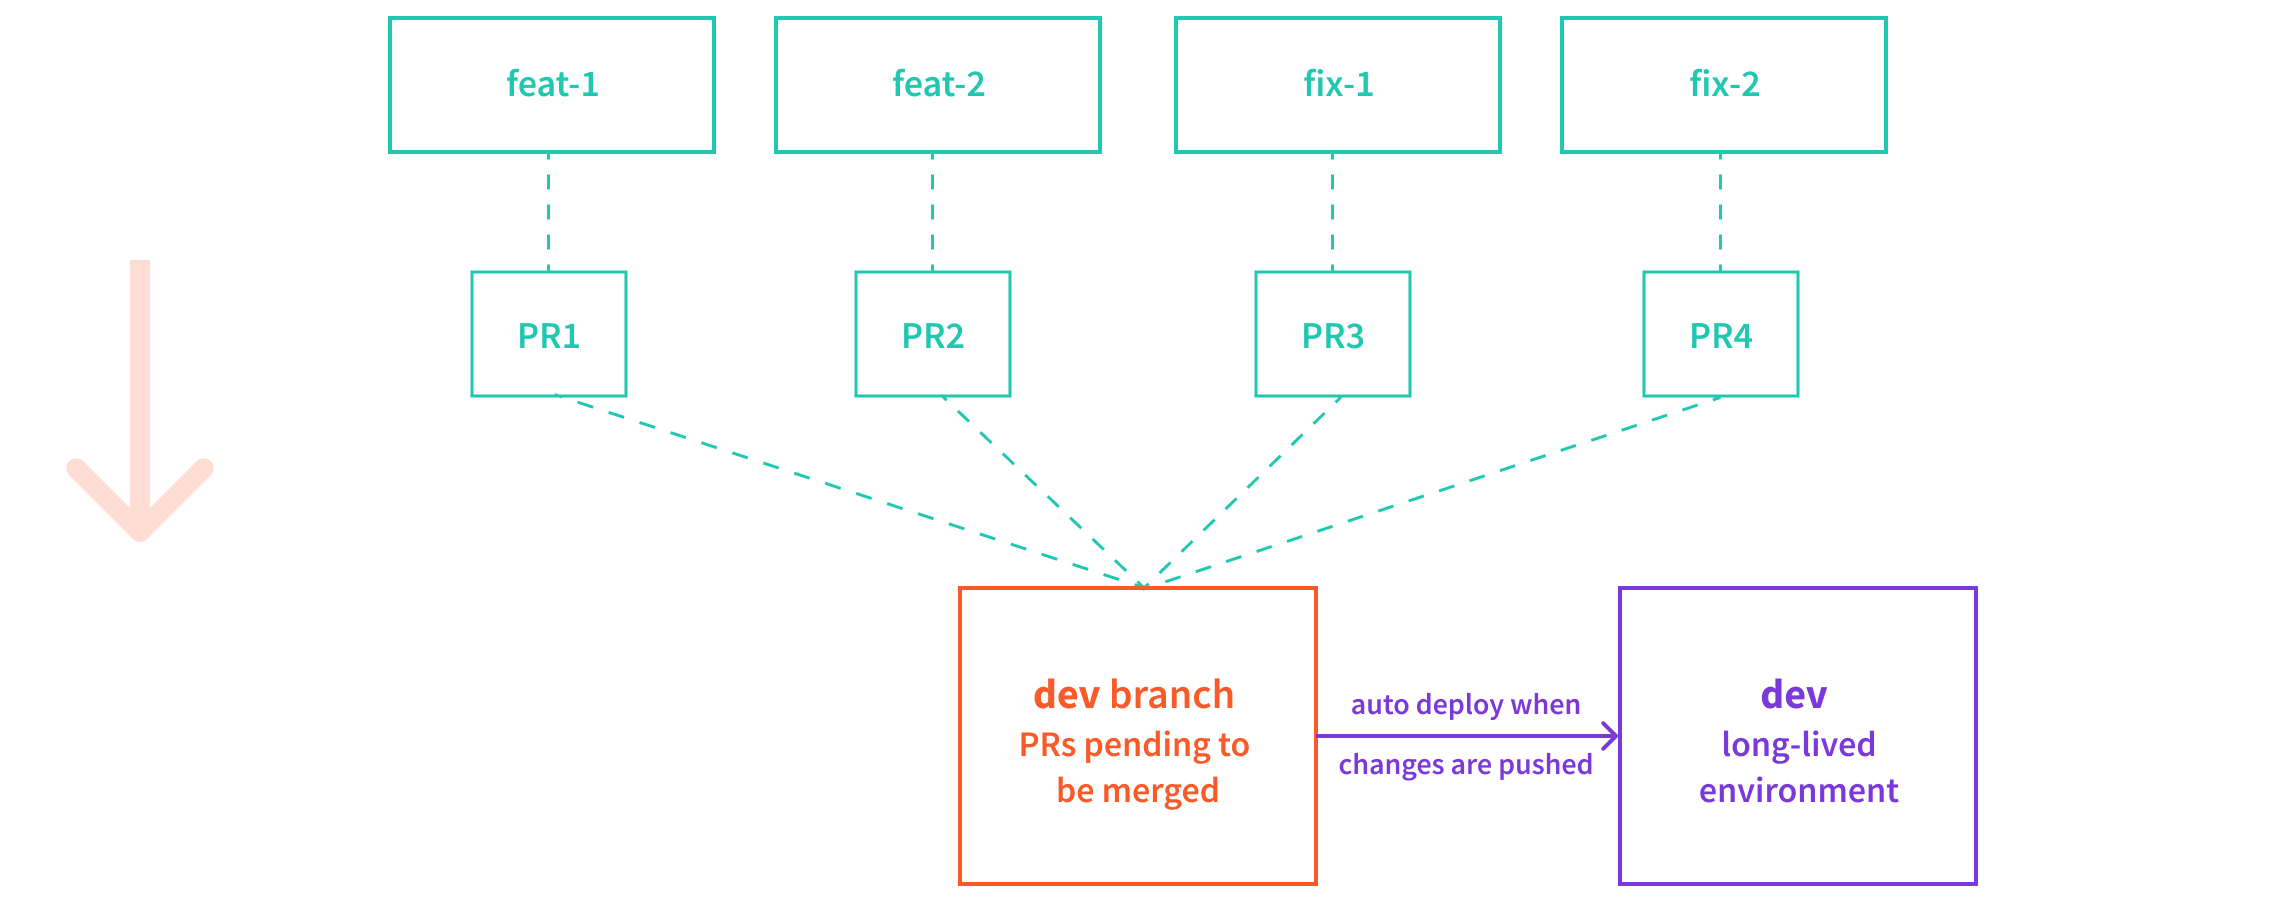
1. Initial Branching and Pull Requests (PRs)
Developers start their development process by creating a new branch from the dev long-lived branch. Once they feel that a particular feature or a fix they’ve been working on is ready, they submit a new pull request (PR), where the target branch is again dev.
As mentioned above, when a PR is submitted, we want to run different types of tests against a project that was dynamically deployed into a short-lived (ephemeral) test environment. Once all tests are passing, we can then approve the PR and merge its code changes into the dev branch.
 Webiny Cloud Infrastructure - Environments
2. Merge Changes tostagingBranch
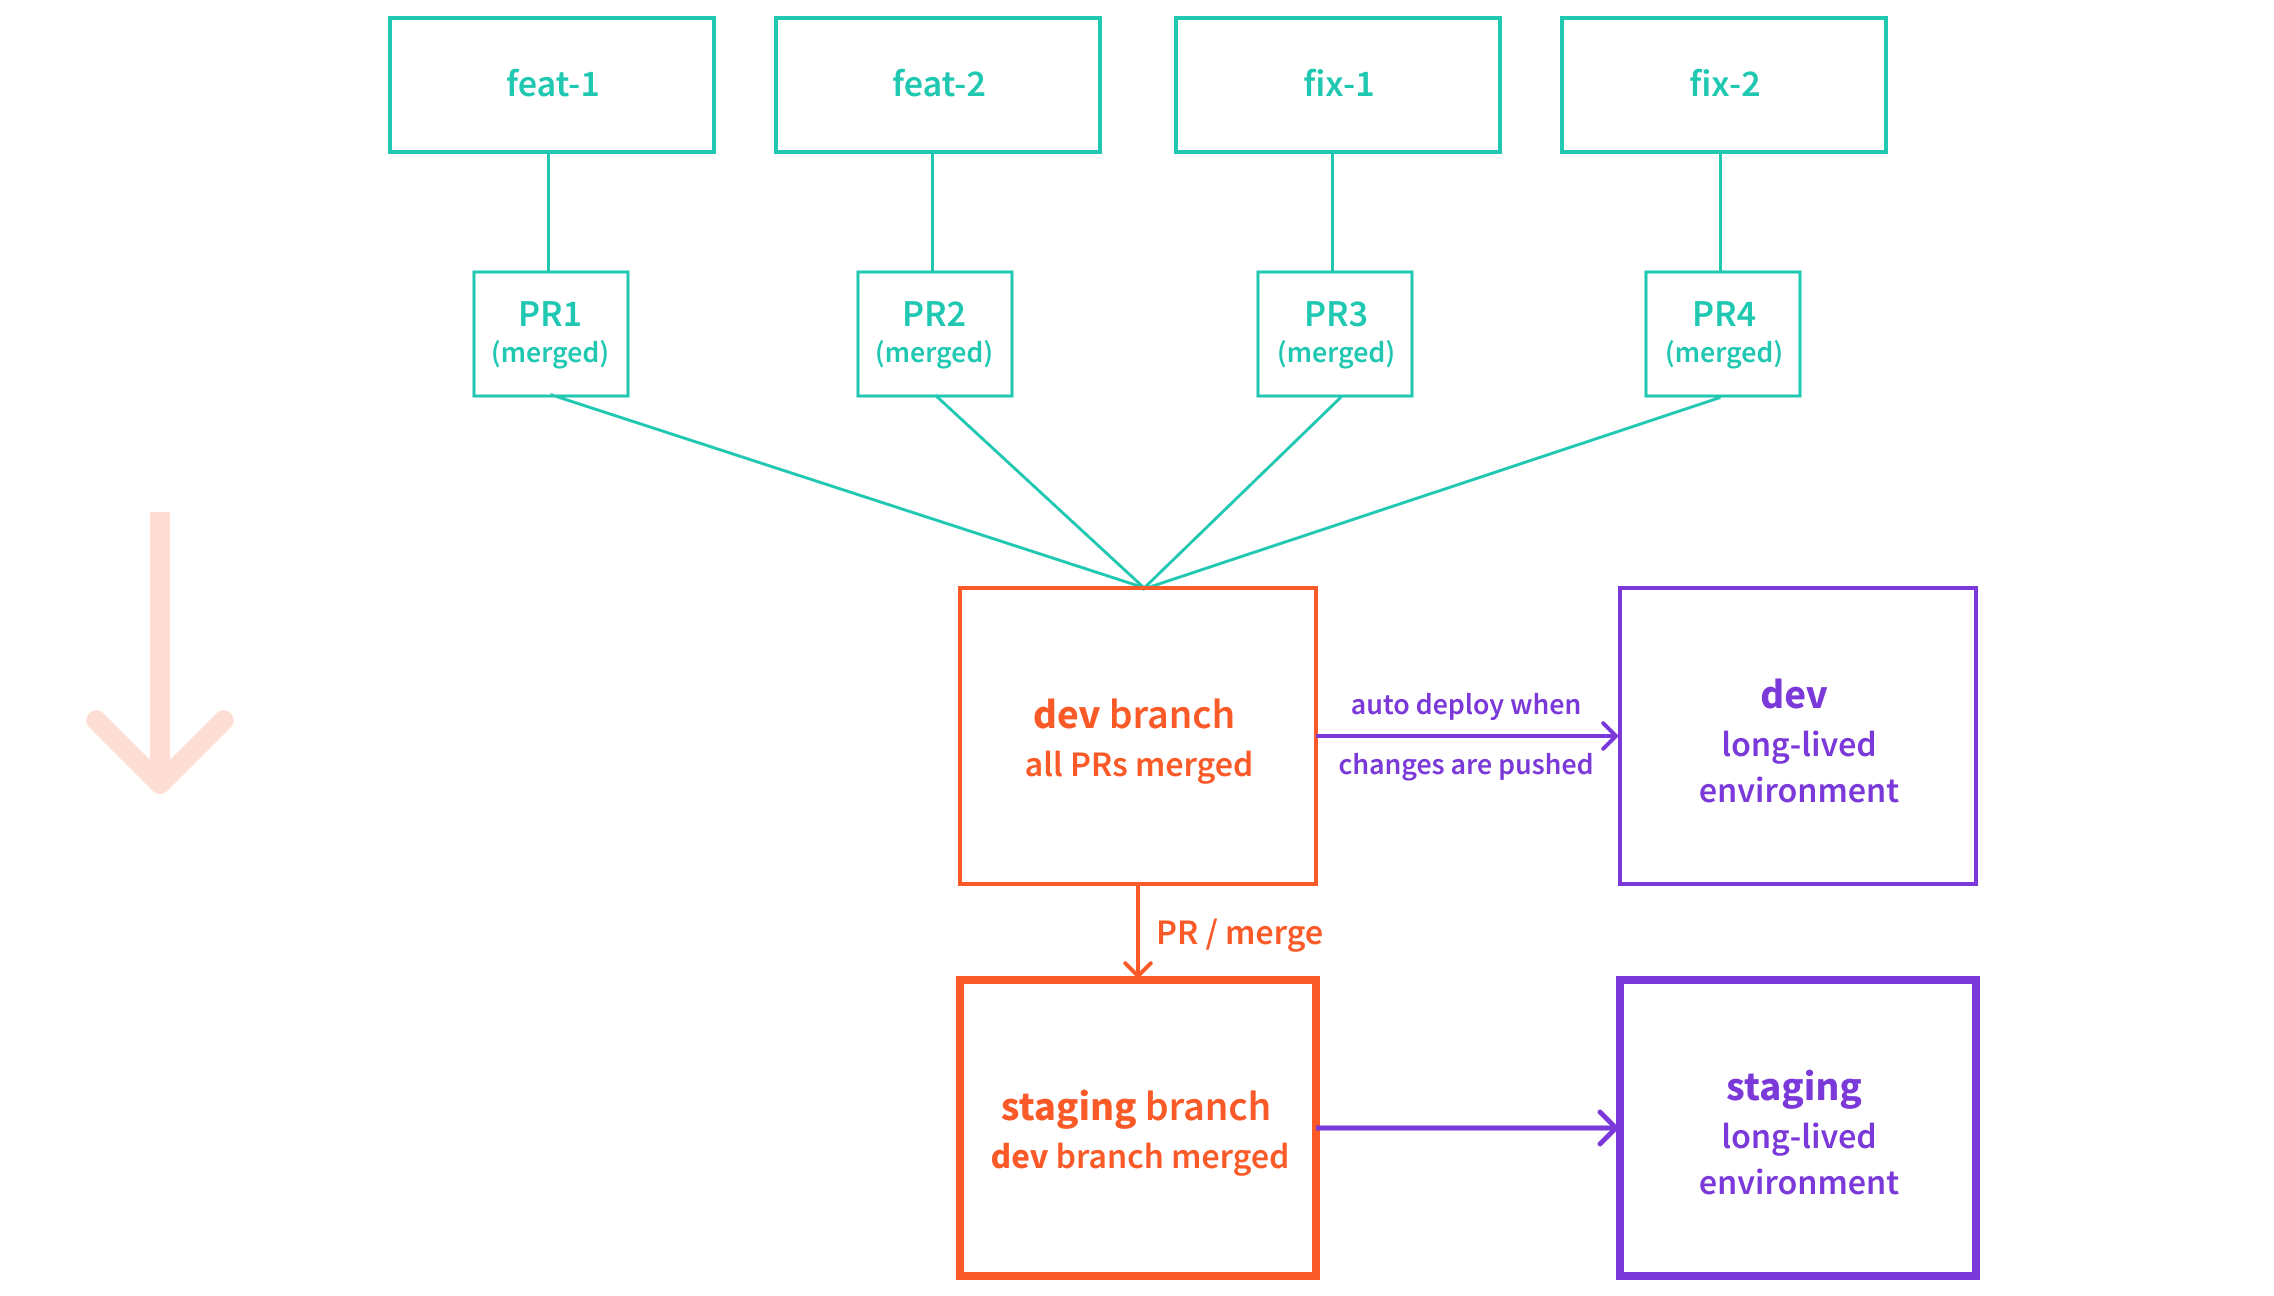
Once all of the pending PRs have been tested successfully and merged into the dev branch, we then continue by merging the dev branch into staging. This can be done either via a new PR or a direct merge, but we recommend the former. This is simply because creating a PR first allows us to maybe preview the deployment that will happen once the code is merged, and maybe perform some other tests.
 Webiny Cloud Infrastructure - Environments
As mentioned, merging code into long-lived branches should trigger automatic deploys into their respective long-lived environments. So, once the deploy into the staging environment has been completed, the rest of the team, for example product owners or QA teams, can start testing the new release candidate.
If issues are discovered while testing, we create new PRs that contain fixes for them, and in terms of their target branch, there are two ways we can go about it.
Merge Strategies
Choosing staging as the Target Branch
With this approach, a PR is created against the staging branch. And, once the tests are passing, we merge the code changes into it.
Note that this means that we now have code changes that exist in staging branch, but not in dev. So, at the end of a release cycle, it’s important that we sync staging and dev branches, by merging all of the additional code changes from staging branch back into the dev.
Choosing dev as the Target Branch
Instead of choosing staging as the target branch of the PR, we can choose dev.
Unlike with the previous approach, here, once the release has been completed, we don’t have to merge all of the changes back into the dev branch. But of course, since the code changes from the PR ware merged into dev, we’ll need to repeat the process of merging the dev branch into staging.
The Recommended Strategy
Because of the following, our recommendation is to use the first Choosing “staging” As The Target Branch strategy:
- new fixes and features are frequently merged into the
devbranch, which can make it unstable - at any point in time, we should be able to merge new features, fixes, and even experiments into the
devbranch - merging new code changes into the
devbranch must not be blocked by any pending release processes - with the second approach, there’s a risk of having unplanned code changes get merged into the
stagingbranch
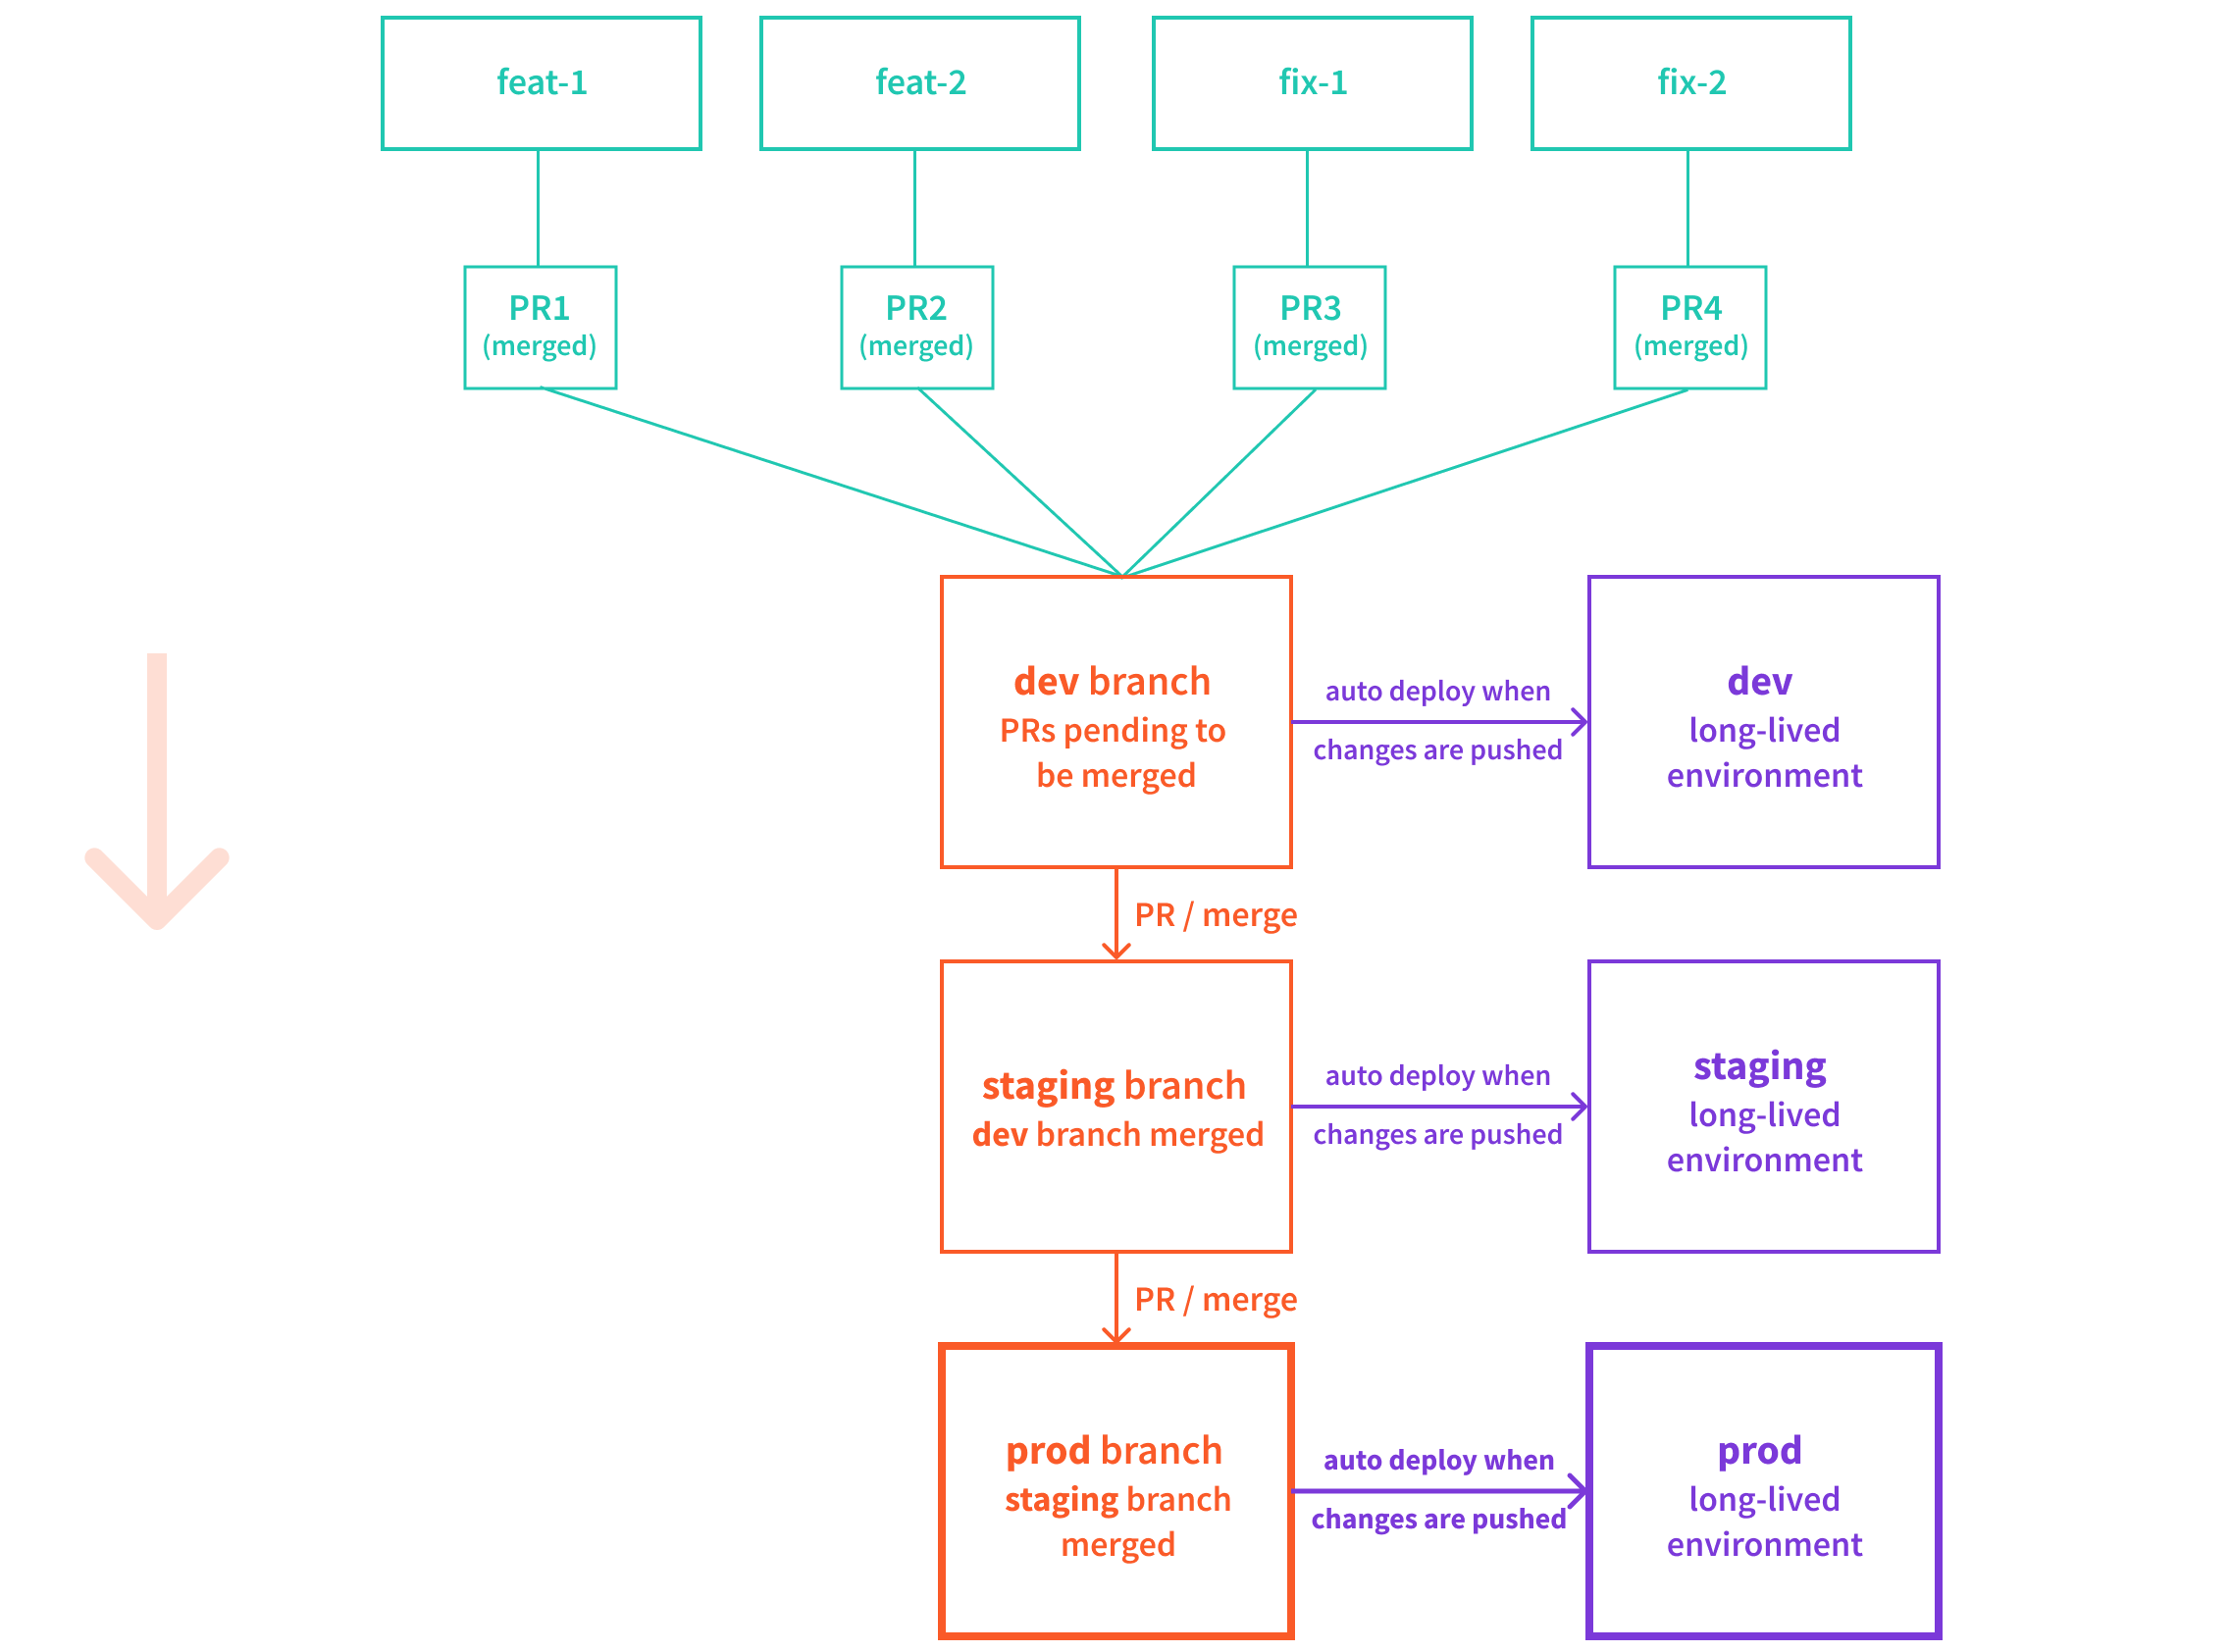
3. Merge Changes toprodBranch
Once the changes deployed into the staging branch have been reviewed and accepted, we then proceed by merging it into the prod branch.
As always, this will trigger automatic deployment of your project, and ultimately, make the new changes available for real users.
 Webiny Cloud Infrastructure - Environments
4. Hot Fixes
Even with all of the steps and measures described in the steps above, unfortunately, it’s still possible for undetected bugs to slip into the production environment.
Some of these may be minor and may not require immediate attention (these can be resolved as part of the next release cycle). But on the other hand, if a bug presents a serious problem and requires immediate attention, then most probably we won’t have any other choice but to apply a hot-fix, directly on the prod branch.
In other words, in cases like these, it’s allowed to break the rules, and either create a PR directly against the prod branch, or even directly push into it. Note that, as the long-lived branches are usually marked as protected, only users with admin privileges will be able to do that.
In case you end up doing this, remember that all of the changes you merge into the prod branch, should also be merged into the dev and staging branches. You can do that by simply merging the prod branch into staging, then merging the staging branch back to dev.
FAQ
Except thedev,staging, andprod, Can We Have Additional Long-Lived Branches and Environments as Part of Our CI/CD Workflow?
You certainly can. Just create the needed long-lived branch, and ensure each push to it automatically deploys your project into the respective environment. You will also want to protect it against direct and unauthorized pushes and accidental deletions.
As an example, we’ve seen users adding an additional uat (user acceptance testing) branch and environment, between the staging and prod environments.