Release Notes > Older Releases > 5.5.0
Webiny 5.5.0 Changelog
See what's new in Webiny version 5.5.0.
Changes
This document highlights the most important fixes, improvements, and features, that were introduced in Webiny 5.5.0.
Please check the Webiny 5.5.0 migration guide for the upgrade steps.
Webiny CLI
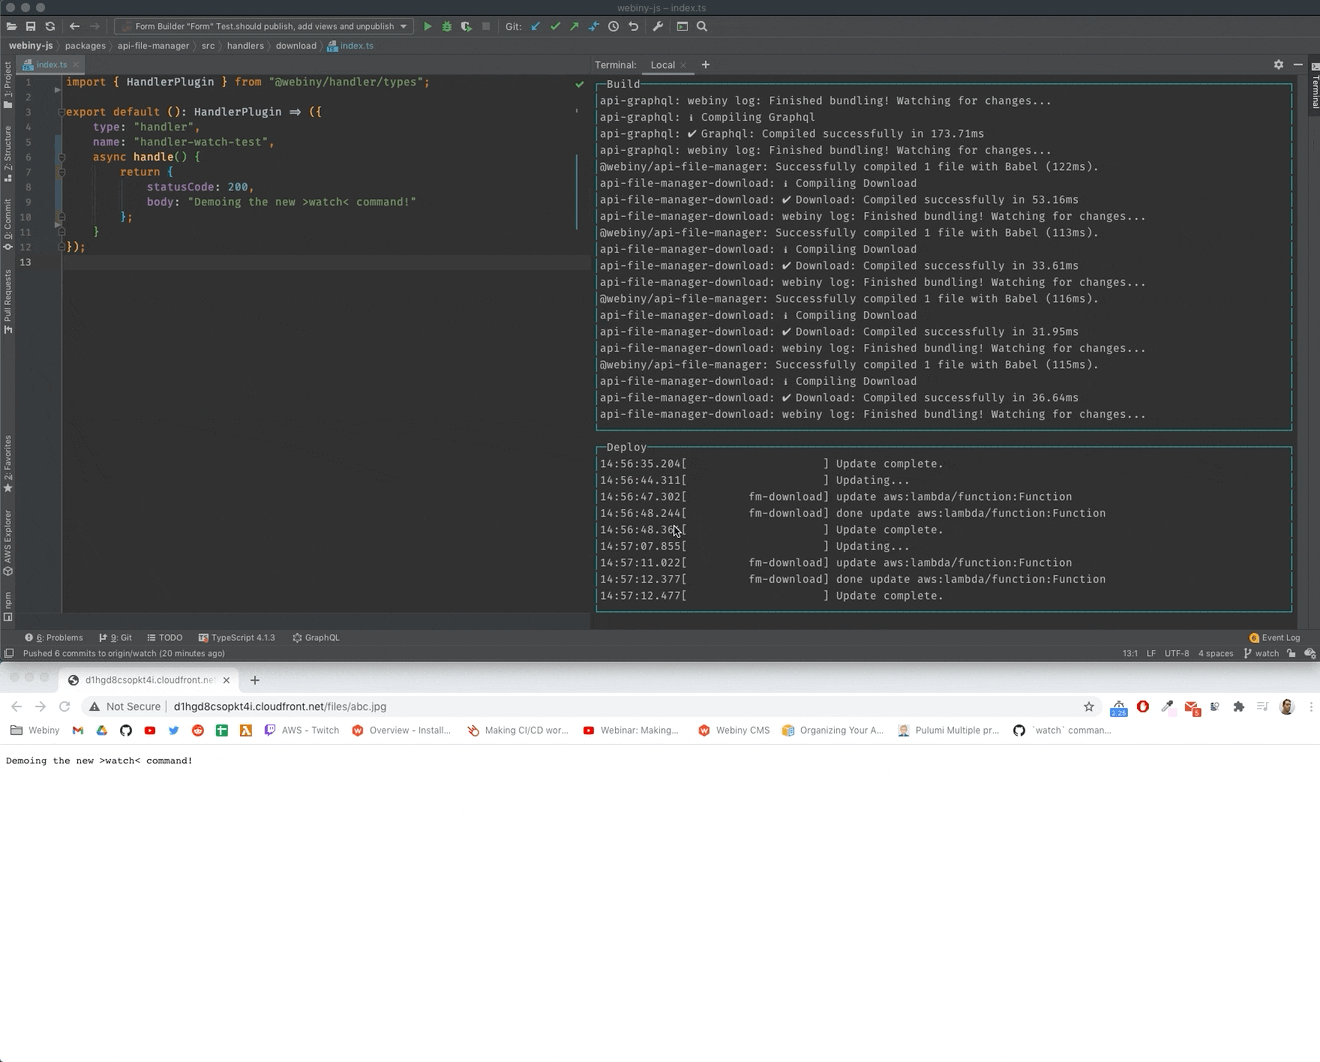
Brand Newwebiny watchCommand (#1540 )
)
We also wrote about the new webiny watch command on our blog! It also contains a live demo, so we encourage you to check it out.
The brand new webiny watch command brings local development experience to a whole new level!
How We Currently Do It
Let’s say you wanted to expand the default GraphQL API, that’s deployed as part of the API project application. At the moment, in order to do that, you’d have to do the following:
- start a watch session on relevant packages using the
webiny workspaces runcommand - make your code changes
- deploy them using the
yarn webiny deploy api --env {your-environment}command - repeat
This is not ideal for a couple of reasons:
- you’re required to manually execute the
webiny deploycommand all the time - the
webiny deploycommand always builds all of the project application’s packages, which can be really slow - apart from running the
webiny deploy, you also need to separately run thewebiny workspaces runcommand we mentioned before, in order to establish watch session on packages you’re working on
The New Way
From now on, you’ll be able to just run the yarn webiny watch api --env {your-environment} command and start coding! The command will automatically start watching all of the relevant packages (no matter where they’re located in your Webiny project) and also re-deploy only relevant cloud infrastructure resources (e.g. a single Lambda function), as needed.
 Webiny CLI - The New watch Command
Logs
And there’s more! By simply appending the --logs argument to the webiny watch command, you also gain the ability to stream all logs from your application code (Lambda functions), directly to your terminal:
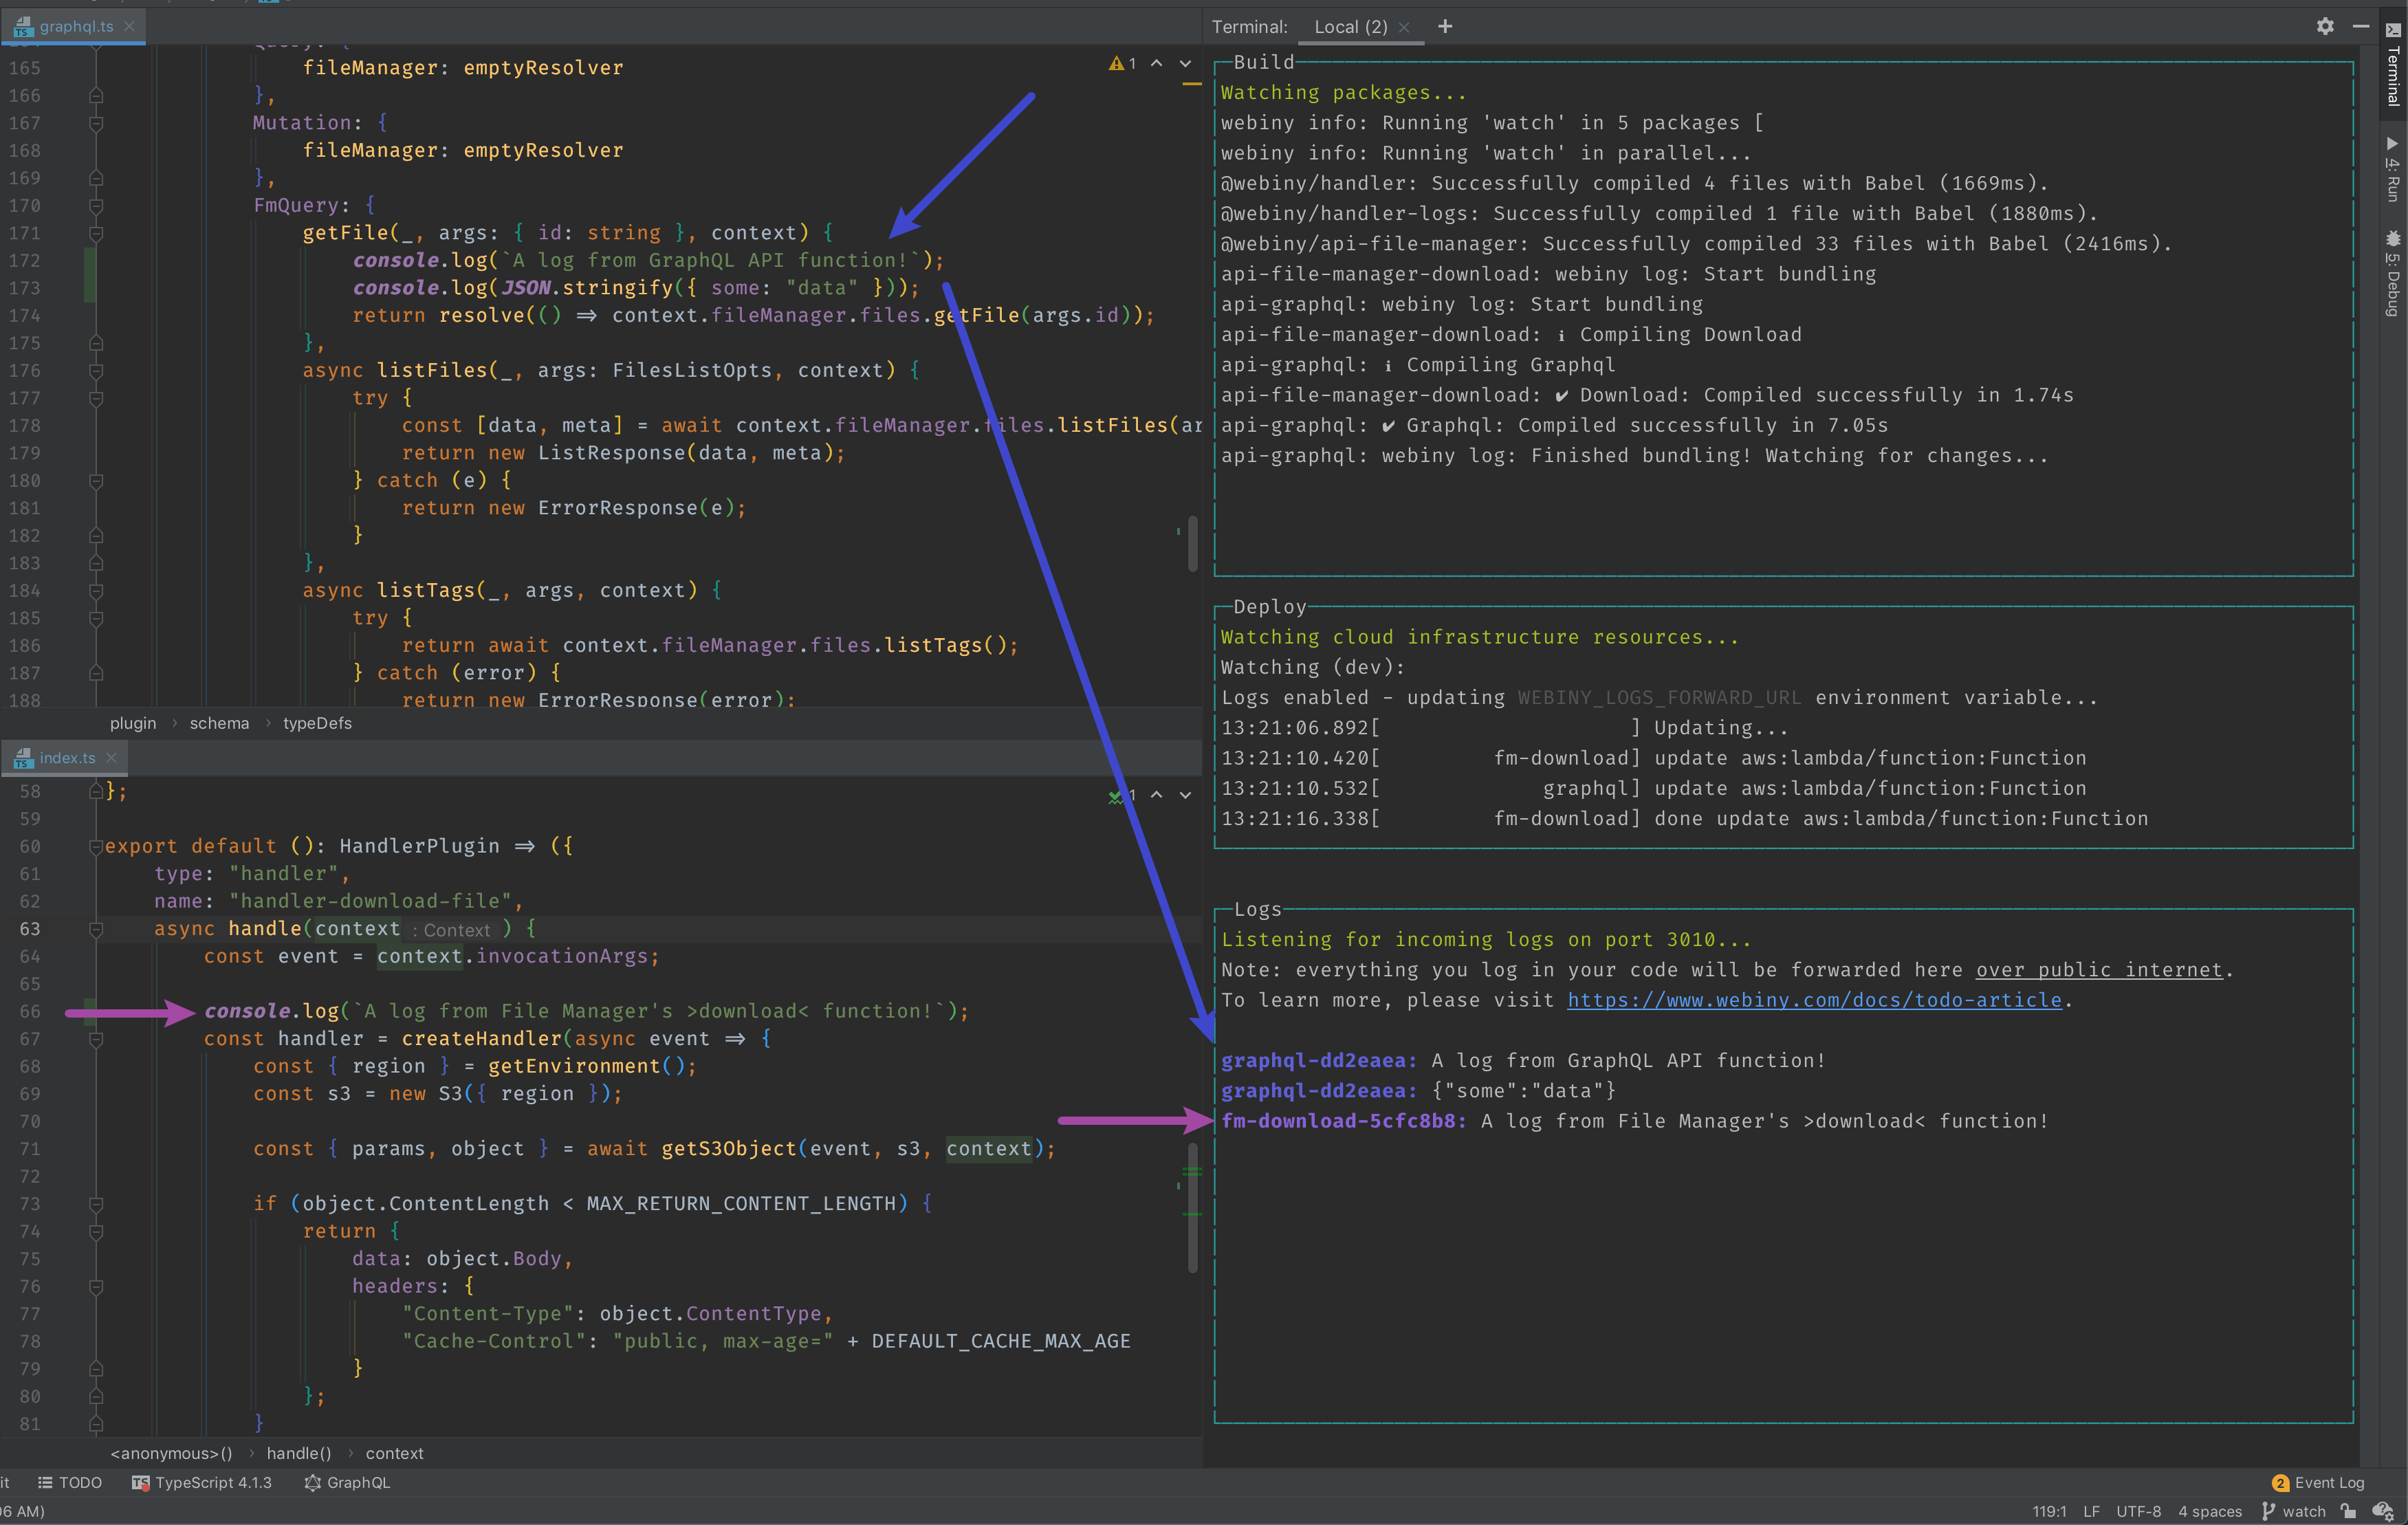 Webiny CLI - Streaming Logs To Your Terminal
This basically means no more digging through Amazon CloudWatch logs while developing or debugging your backend application code.
To learn more about the new webiny watch command, check out the newly added Use the Watch Command guide.
, please note that you’ll have to update it to at least to version 2.27.0, as this version introduces the support for pseudo consoles (you will be asked whether you want this enabled in the installation process). Otherwise, upon starting the webiny watch command, you might be receiving broken output in your terminal.Introduced Newwebiny workspaces treeCommand (#1540)
The new webiny workspaces tree command gives you an overview of all packages that exist within your Webiny project and how they depend on each other.
 Webiny CLI - The New webiny workspaces tree Command
For additional information and usage examples, simply type the following command in your terminal of choice:
Headless CMS
CMS Permissions (#1562)
This release introduces an upgrade to CMS permissions. It includes changes in permission editor UI and permission data structure. The goal is to improve the process of defining fine-grained permissions and make them easier to grasp.
Now you have to define access to specific content model groups first, and based on that, the list of available content models gets updated. The navigation in the Admin Area is also improved by introducing this configuration flow.
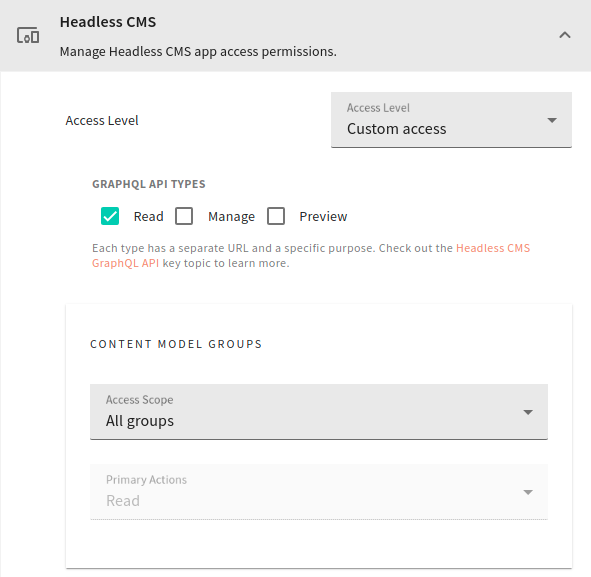 Headless CMS - permission selector UI
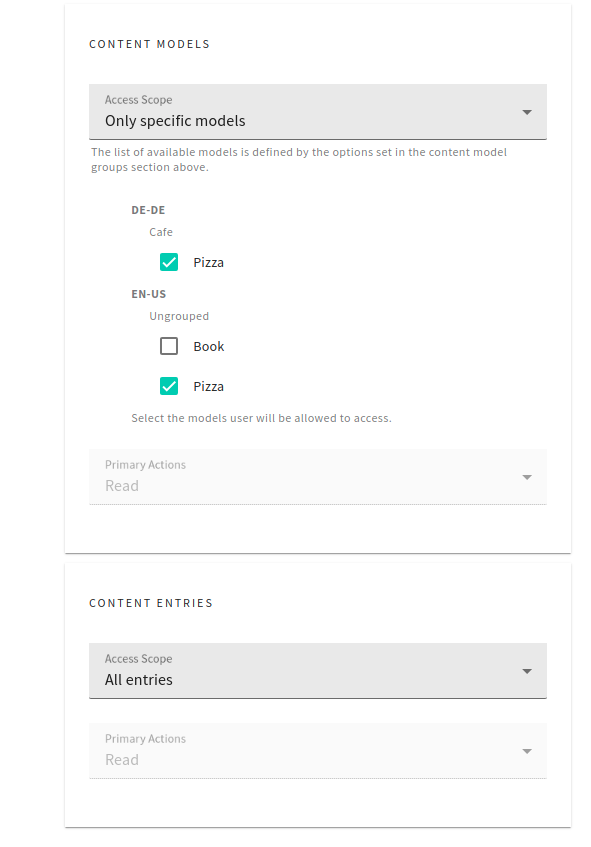 Headless CMS - permission selector UI
Rich Text Content Renderer (#1566)
Up until now, you had to manually render rich text content that comes from the Headless CMS. To make it a lot easier for you, we’ve finally introduced a dedicated component to do the heavy lifting. For details, see the how-to guide on rendering the rich text content.
Filtering by Reference Field Id (#1567)
We added a filtering option, into our generated GraphQL Schema, to filter CMS entries by a reference field id.
For example, you can find all the articles that are connected to an author, or a list of authors:
You can also filter out all the articles that contain an author, or a list of authors:
Page Builder
New Pre-Rendering Related Fixes (#1569)
Two pre-rendering related issues were fixed in this release:
- previewing and pre-rendering pages on non-default locales and tenants now works as expected
- rendering not-found page also now works as expected
Note that, if upgrading to version 5.5.0, there are a couple of manual steps that need to be done in order for these fixes to be fully applied.
Other
Project Organization Changes (#1540)
This release introduces a couple of changes on a project level. Most of these are required by the newly introduced watch command.
All the changes can be automatically applied in your existing Webiny project via the new webiny upgrade command. Please take a look at the upgrade guide for more information.
1..pulumiFolders Moved to Project Root
By default, the Pulumi cloud infrastructure state files are stored locally - in .pulumi folders located in your project applications folders:
Because these files change on every deploy, and that interferes with the new webiny watch command, we’ve been forced to move these folders outside of project application folders. So, all of your locally stored cloud infrastructure state files are now located in your project root, inside the new .pulumi folder:
We’ve seen some users storing the .pulumi folders in an internal Amazon S3 bucket in their CI/CD workflows. So, if you’re using this approach, make sure to take the new location of the .pulumi folders into consideration and adjust your CI/CD logic accordingly.
As noted in the Overview section, please test your changes in pre-production environments first.
If you need additional help or information about this, feel free to contact us over Slack.
2.webiny.root.jsRenamed towebiny.project.js
The webiny.root.js file, located in your project root, has been renamed to webiny.project.js.
3.webiny.application.jsFiles
Every project application now has its own webiny.application.js file. Think of it as a simple manifest file, which contains project application’s ID, name, and description. Optionally, it can also include additional arbitrary properties, if need be.
Learn more about project applications in the Project Applications guide.
4. API Packages - AddedwatchScripts and Commands
Every package located within the api project application folder received a watch script in its package.json file and a watch command in its webiny.config.ts file.
5. Admin Area / Website - AddedwatchScripts
The Admin Area and Website React applications also received a watch script in their respective package.json files. It is a copy of the existing start script.
6. Custom Packages - NewbuildandwatchScripts
Every custom package in your project now uses the new build and watch scripts, located in its package.json file.
Custom packages are, for example, packages created with the webiny scaffold command.
The new scripts section should look like the following:
In order for these to work, the @webiny/cli and @webiny/project-utils were added as development dependencies within the devDependencies property. Finally, the webiny.config.ts file was created, which defines the actual build and watch commands.
Check this example package to see updated package.json and webiny.config.ts files.