With the recent Webiny 5.9.0 release, we've introduced a number of new fixes and improvements, one of which are the improvements made to the existing scaffolding utilities and development workflows. Revisiting these was something we had on our wishlist for quite some time now, and, with this release, we were finally able to do it.
In this blog post, I wanted to go through some of the more important changes that were introduced. For starters, we're going to take a look at some of the existing issues our users were struggling with and how we've managed to resolve them. Then, in the second part of this blog post, in a short demo, we're also going to see the improved scaffolding utilities and development workflows in action.
So, without further ado, let's dive in!
Existing Issues
The following issues are listed in no particular order.
1. Complex ElasticSearch Setup
Prior to Webiny 5.9.0, the GraphQL API Package scaffold (now Extend GraphQL API) relied on both Amazon DynamoDB and Amazon Elasticsearch Service for storing and querying data. And although having Elasticsearch in the mix does provide advanced searching capabilities, in most cases, users actually didn't have a real need for it.
So, we decided to simplify things, by simply removing Elasticsearch, and have the new Extend GraphQL API generate application code that relies exclusively on Amazon DynamoDB, while maintaining the same feature set.
Sure, there are certainly times when you have to be a little bit creative when it comes to DynamoDB (NoSQL) data modeling. But, for developers that at least have some experience and maybe already have a couple of tricks up their sleeves, we believe that this setup will be enough for a good number of use cases.
Note that developers are still able to utilize Elasticsearch or any other database they might need along the way. This is something we plan to cover with one or more tutorials in the near future.
2. Manual Steps
One of the complexities that the existing GraphQL API Package scaffold brought with its dual databases setup was the additional manual step that needed to be taken. After the scaffolding process has been completed and the new application code has been deployed into the cloud, users were still required to manually execute a special GraphQL install mutation. Without completing this step, basically, none of the new GraphQL operations would work.
Furthermore, the application code, or more specifically, the plugins that were generated during both GraphQL API Package and Admin Area Package scaffolding processes, needed to be manually imported and registered by users, in their existing application code. And even though for many this step wasn't such a big hurdle, we still wanted to see if this is something we could eliminate from the whole process.
All in all, because of the fact that manual steps like these introduce an unnecessary friction in the overall user experience, we decided to try and make the whole process completely automatic. And I'm happy to say that we've managed to accomplish that, for both GraphQL API Package and Admin Area Package scaffolds!
Once the scaffolding has been completed, all that's left to do is start a new watch session via the webiny watch command and that's it! You can immediately start building on top of the generated application code.
We'll see how all of this works in the demo soon, in the second part of this blog post.
3. Monorepo Hurdles
Every Webiny project is organized as a monorepo:
Every Webiny project is organized as a monorepo. This essentially means your project is organized as a collection of multiple NPM packages, or, in the context of monorepos, multiple workspaces.
And although this organization does provide a couple of useful capabilities, like creating packages that can be shared across multiple packages or even project applications within a Webiny project, it does bring a noticeable amount of complexity.
Specifically, prior to Webiny 5.9.0, existing GraphQL API Package and Admin Area Package scaffolds would generate new application code as separate packages, by default in the packages folder, located in your project root. And while technically this works, in many ways, this approach turned out to be a very cumbersome one.
The first problem with it was that it makes your application code dislocated. In other words, your GraphQL API application code, located in api/code/graphql folder, would end up importing packages from the outside packages folder. For some users, we've seen this can be illogical and sometimes even hard to grasp. The question that was frequently asked was: "Why not have all of the code simply in one place?".
More importantly, this separate packages approach also introduced really unnecessary development-related complexity. Numerous times we've seen users scratching their heads and asking themselves "I've made a code change, but it's not reflected in my application, what's happening?". In most cases, this simply happened because of the fact that upon initializing the webiny workspaces run watch command, users didn't add their newly generated package to the list of packages that needed to be watched, for example:
yarn webiny workspaces run watch --scope @car-manufacturers/api --scope @car-manufacturers/utils ...
Oh and by the way, on a totally unrelated note, just look at the command itself... that definitely doesn't look very appealing. 😉
On this front, we actually did made some good progress with the webiny watch, introduced with Webiny v5.5.0 release. But, unfortunately, different Module not found: Can't resolve 'custom-plugins' in ... and other monorepo organization-related errors were still giving users headaches.
Based on all of this feedback that we've received from our users, we've come to a conclusion that, where possible, all scaffolds should generate new application code directly within the target project application's package. For example, if we're talking about the Extend GraphQL API scaffold, the application code should generate code within the api/code/graphql folder. On the other hand, when talking about the Extend Admin Area scaffold, the generated Admin Area React application code should be located within the apps/admin/code/ folder.
By doing this, we've removed all of the mentioned hurdles for our users. No more dislocated code, weird monorepo and yarn-related errors, and probably, other annoying issues that maybe we were not even aware of.
4. Two Scaffolds for a Single Task
Previously, because the Admin Area Package scaffold would only generate the Admin Area React application code, in order to get a new fully functioning Admin Area module, users also had to run the GraphQL API Package scaffold, which was responsible for creating the supporting GraphQL API query and mutation operations.
So, if users forgot or simply weren't aware of the fact that both scaffolds needed to be run in order to complete the puzzle, they would end up with an incomplete or sometimes even broken setups. The latter was especially the case if they just ran the first Admin Area Package scaffold.
So, in order to make the whole process more straightforward and improve the overall user experience, we've simply incorporated both pieces into the Extend Admin Area scaffold. Once run, it will generate both the Admin Area React application code, and supporting GraphQL query and mutation operations on our GraphQL API.
Oh and by the way, note that if we just wanted to expand the existing GraphQL API, without creating a new in the Admin Area React application, we can still just use the Extend GraphQL API scaffold. Fun fact: internally, the Extend Admin Area actually relies on the Extend GraphQL API scaffold to generate the supporting GraphQL query and mutation operation.
5. Complex Testing Workflows
There a couple of different types of tests we can write and perform in order to ensure our application works as expected. And, if we were to single out the three most common ones, we could probably go with unit, integration, and end-to-end tests.
I won't go into the specifics and differences between these in this blog post (we have a brief summary here), but I will mention that performing these tests in the serverless applications world can certainly have its challenges. And this is mostly because, in order to achieve the highest level of confidence that our application works, ideally, we would want to perform our tests against real, previously deployed, cloud infrastructure resources. Not against locally running services, mocks, or any other "emulation" tools we can utilize today.
This is something we recognized needs to get more clear with the new Extend GraphQL API scaffold and while developing serverless applications with Webiny in general. Previously, the tests that the GraphQL API Package generated would be run against locally running DynamoDB and Elasticsearch services. Sure, we can do that, but that will only get us so far. What if we wanted to test async workflows, like for example ensure that once a file has been uploaded to our Amazon S3 bucket, a specific AWS Lambda functions gets triggered? What about the differences in behaviour between these local services and the real ones that are running in our cloud? And what about other important aspects like configurations of different cloud infrastructure resources, IAM roles, and other aspects that we may not be aware of? All of these can play an essential role in our serverless application, so we have to make sure our tests are capturing the full picture, not just part of it.
With the new Extend GraphQL API scaffold, users will receive three new example tests - one unit, one integration, and one end-to-end (E2E), which they can extend or just use as a reference in further development.
Demo
Alright, let's see it in action!
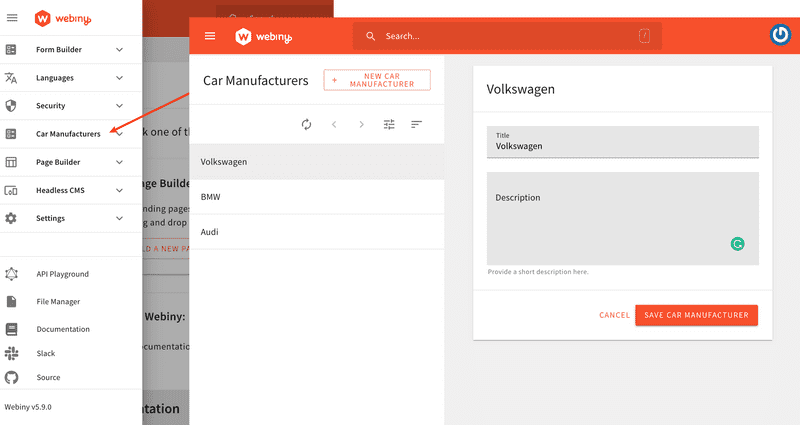
In this short demo, we're going to use the new Extend Admin Area scaffold to create a new Car Manufacturers Admin Area module. Once completed, we should end up with the following:
- a new Car Manufacturers section in our Admin Area React application's main menu
- a new Car Manufacturers CRUD view that lets us perform basic CRUD operations
- the supporting GraphQL query and mutation operations, added to our existing GraphQL API
Before running the Extend Admin Area scaffold, we will first run the following two webiny watch commands:
# Watches for changes in our GraphQL API application code and continuously
# builds and deploys them into the cloud (into a specified environment).
yarn webiny watch api/code/graphql --env dev

# Watches for changes in our Admin Area React application code, and makes
# it possible to immediately see them in our browser.
yarn webiny watch apps/admin --env dev
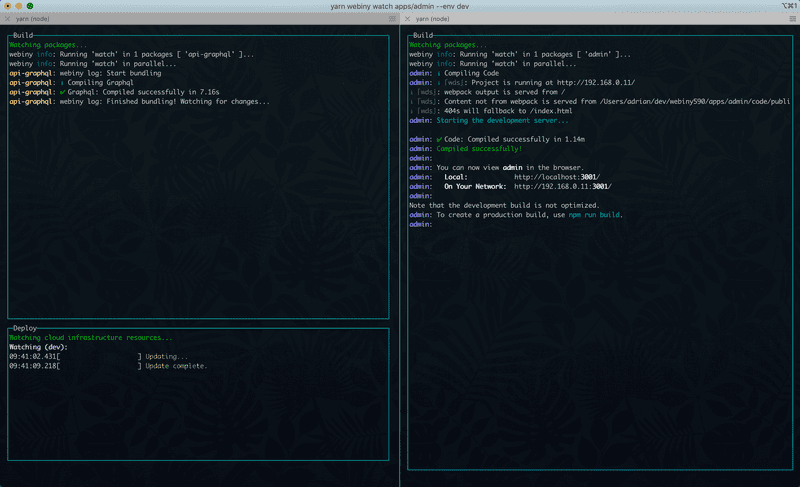
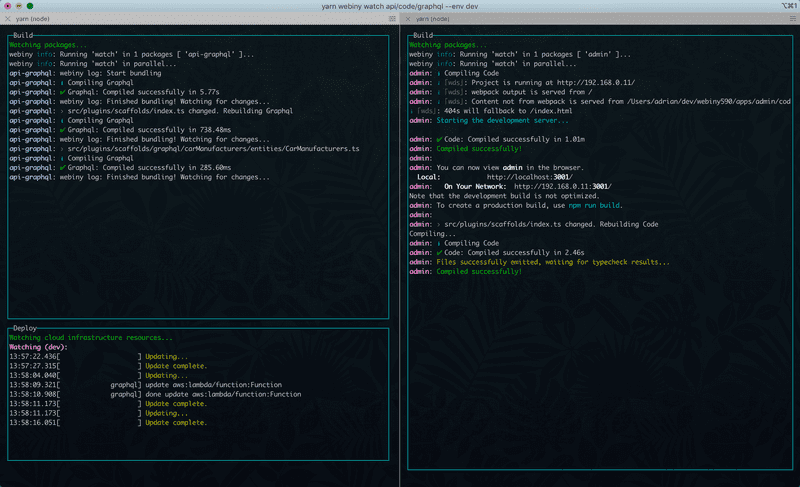
Running these two should give us something like this (I'm using iTerm2 to have two side-by-side terminal sessions):
Before continuing, note that running these two commands is not a requirement. For this demo, I simply decided to do it so we can see how the changes that the Extend Admin Area scaffold performs are immediately built, deployed, and visible in our browser.
Furthermore, note that we've passed api/code/graphql as the first argument to the first webiny watch command. We could've passed just api, but that would initialize a watch session on the whole API project application, which is certainly something that we don't need. We only want to watch the GraphQL API application code that's deployed as part of it, located in the api/code/graphql path.
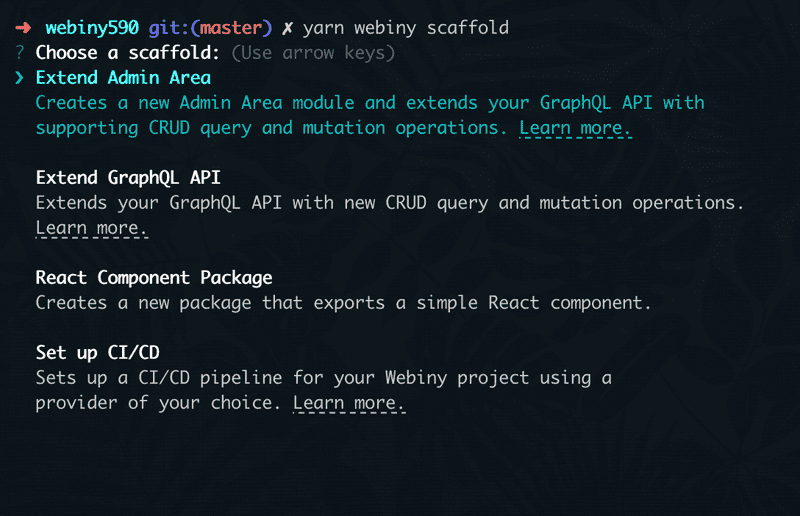
OK, now that we have this in place, let's start one more terminal session, and run the webiny scaffold command from our project root:
yarn webiny scaffold
If you've already used this command before, the first thing you may notice are a couple of visual improvements that we made to the initial list of all available scaffolds:
Each scaffold in the list is now also accompanied by a short description and, where possible, a Learn more link, which takes the user to the relevant documentation article.
So, if we were to select the Extend Admin Area, we'd be asked three questions:
- the path to our GraphQL API's plugins folder (
api/code/graphql/src/pluginsby default) - the path to our Admin Area React application's plugins folder (
apps/admin/code/src/pluginsby default) - the name of the initial data model (entity)
For the first two questions, we can just use the default paths by simply pressing the Enter key. As the answer to the last question, we'll enter CarManufacturer. This is what actually dictates the labels on menus, buttons, names of the supporting GraphQL query and mutation operation, and so on.
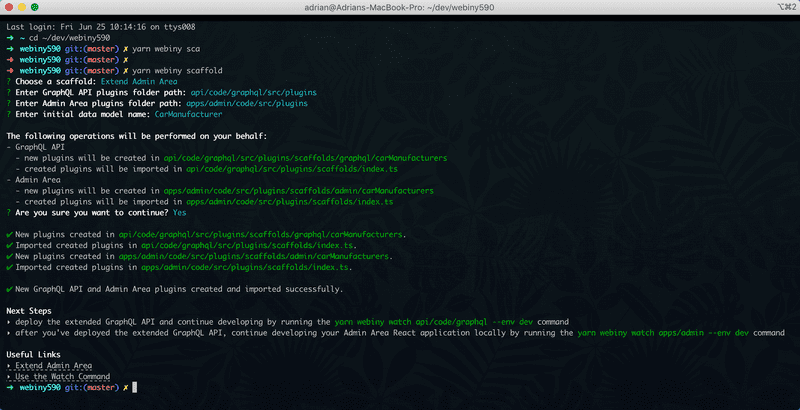
Once we've answered all of the questions, after a quick confirmation step, scaffolding will start and eventually, we should end up with the following output in our terminal:
And, because of the watch sessions we've previously initialized, if we were to return back to our two terminals, we should be able to see additional output, informing us of successful builds in the Build panes, and successful deployment in the Deploy pane.
Which means, the only step that's left to do is to open the Admin Area React application in our browser, and check out the new Car Manufacturers module. No extra steps needed, everything is immediately good to go!
How easy was that? 🚀
Next Steps
Once we got the initial Car Manufacturers Admin Area module working, we can proceed by modifying and extending it to our needs.
On the GraphQL API side, we'd want to start by expanding the CarManufacturer entity and our GraphQL schema with attributes and fields, respectively. Once we're done, we'd then continue by propagating the same changes on the to the Admin Area React application side, by adding new fields to the CarManufacturersForm React component and updating GraphQL queries and mutations we already had in place.
If you want to learn more, we encourage you to check out the Extend Admin Area and Extend GraphQL API docs that we've also published with the Webiny 5.9.0 release. We also have a couple of general development guides that we're currently working on, so stay tuned for those.
Conclusion
With the new and improved scaffolds and development workflows, we really hope we've managed to make serverless application development with Webiny easier and faster than ever.
Now it's your time! Give Webiny 5.9.0 try and let us know how you like it! Any kind of feedback, be it a comment, suggestion, or even a critic, would be greatly appreciated. Your feedback is the only way we can ensure that we're navigating Webiny into the brightest future possible.
Thanks for reading! My name is Adrian and I work as a full stack developer at Webiny. In my spare time, I like to write about my experiences with some of the modern frontend and backend web development tools, hoping it might help other developers. If you have any questions, comments or just wanna say hi, feel free to reach out to me via Twitter.
